

Automatic Car Wash Clearance: What Every Pickup Owner Must Confirm First
Automatic car wash clearance is the space a pickup has to fit inside to pass through a wash bay without touching anything. No single number describes it. The overhead wrap, the dryer bar, the side brushes, the entrance guides and the conveyor rails each impose a limit, and your truck has to clear all of them before the conveyor takes hold.
Five measurements cover the check:
- Height at the tallest fixed point, which is often a rack or an antenna rather than the cab roof, against the overhead wrap, dryer bar and entrance signage.
- Width including mirrors against the side brushes and entry guides, measured with the mirrors in the position the wash requires.
- Track width against the conveyor guide rails and rollers. Tires that sit outside the rail channel can climb it or bind.
- Wheelbase against roller spacing, which matters most on long-bed and crew-cab trucks.
- Ground clearance against undercarriage brushes, running boards, tow hitches, mud flaps and low exhaust or air deflectors.
A truck that fits a manual bay easily can still fail an automatic one. A manual bay only asks that the vehicle stand inside the space. An automatic system adds moving brushes, fixed rail geometry and conveyor timing, and each of those trims the usable envelope. Lift kits, ladder racks, roof tents and aftermarket bumpers take another bite out of what’s left.
So measure. Read the placard at the entrance, check the manufacturer’s figure in the owner’s manual, then run a tape over the truck as it sits today, and again after a lift or a heavy load. If a number lands within a few inches of the limit, ask the attendant before pulling forward. Reputable professional truck wash operations publish their bay limits and keep the equipment aligned to those numbers, which makes that conversation short and factual.
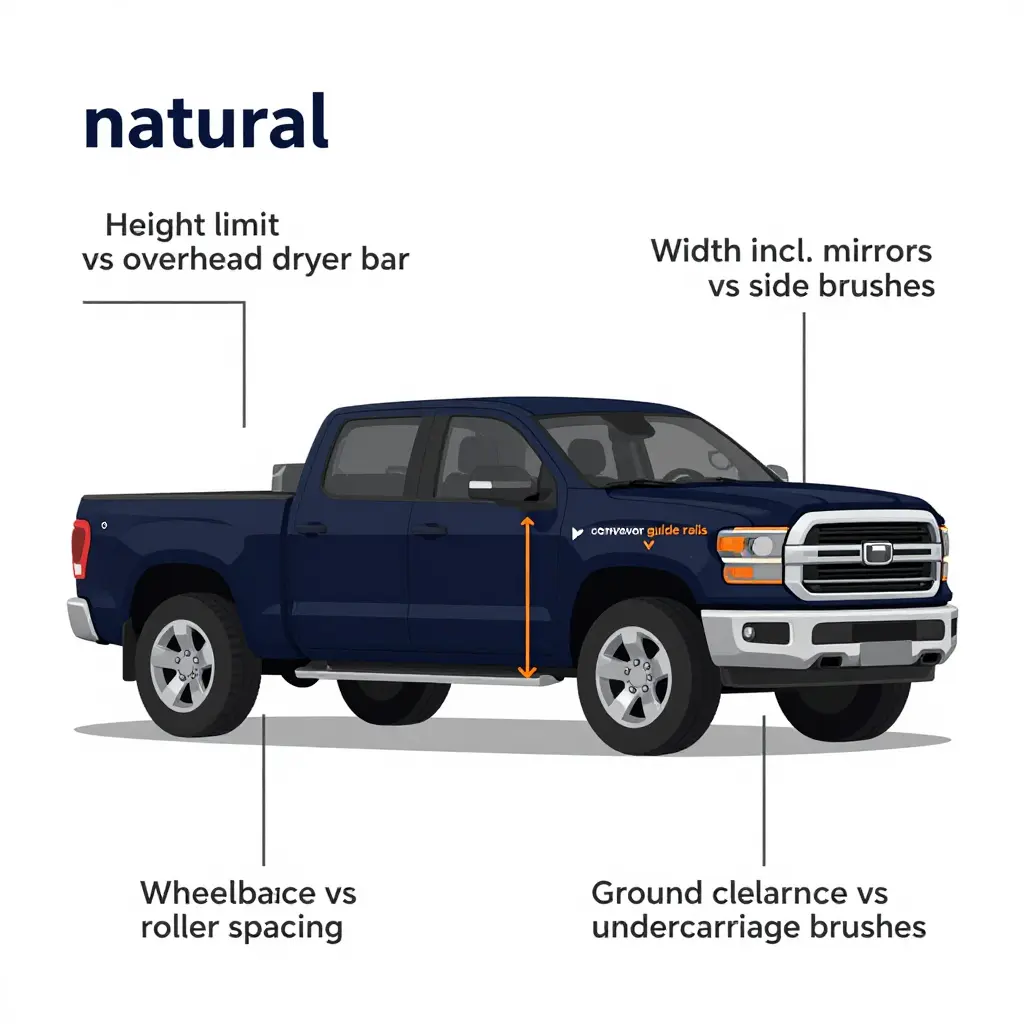
The Five Clearance Measurements That Decide Whether Your Pickup Enters
Posted height and width signs are a starting point, not a guarantee. Measure the truck the way the equipment measures it, in numbers rather than by eye, and set your pickup truck dimensions against the published car wash clearance limits before you queue.
- Height at the tallest fixed point. Ground to roof, antenna tip, light bar and the top of anything on the rack. Entry sensors read the highest physical point on the vehicle, so an antenna or a light bar bracket can stop the line while the cab clears fine.
- Width with the mirrors folded and extended. Write down both figures, and treat the extended one as your real-world number. Folding may recover several inches, but the unfolded body plus mirror housings is what meets the entrance guides and foam curtains.
- Track width against the guide rails. Measure center to center across the front tires and compare it with the rail gap. A stance wider than the guide channel will drag the rail or load the push roller unevenly.
- Wheelbase and tire diameter against roller and brush spacing. A long wheelbase can bridge a roller gap. Oversized tires change how the front wheel engages the push roller and how the side brushes sweep the fenders.
- Ground clearance above spray arms and tire guides. Lowest hard point underneath against the height of the spray arms and tire guides in the tunnel. Running boards, the exhaust, a skid plate and the hitch are the usual candidates.
The tightest figure decides. A wash that clears your roof but not your track width is still a no-go: the equipment doesn’t negotiate, one contact point halts the line, and the damage rarely stops at a single panel.
Fairings, ramps or cargo carried in the bed or mounted on a rack change both the height and width envelope, so re-measure with the load in place every time you haul.
Where Each Clearance Measurement Is Taken
Before you point a lifted pickup at an automatic bay, it helps to know what the machine measures against. The two-view sketch below shows the four numbers that matter on a stock or lightly modified truck: overall height, width across the mirrors, ground clearance at the lowest chassis point, and wheelbase from axle center to axle center.
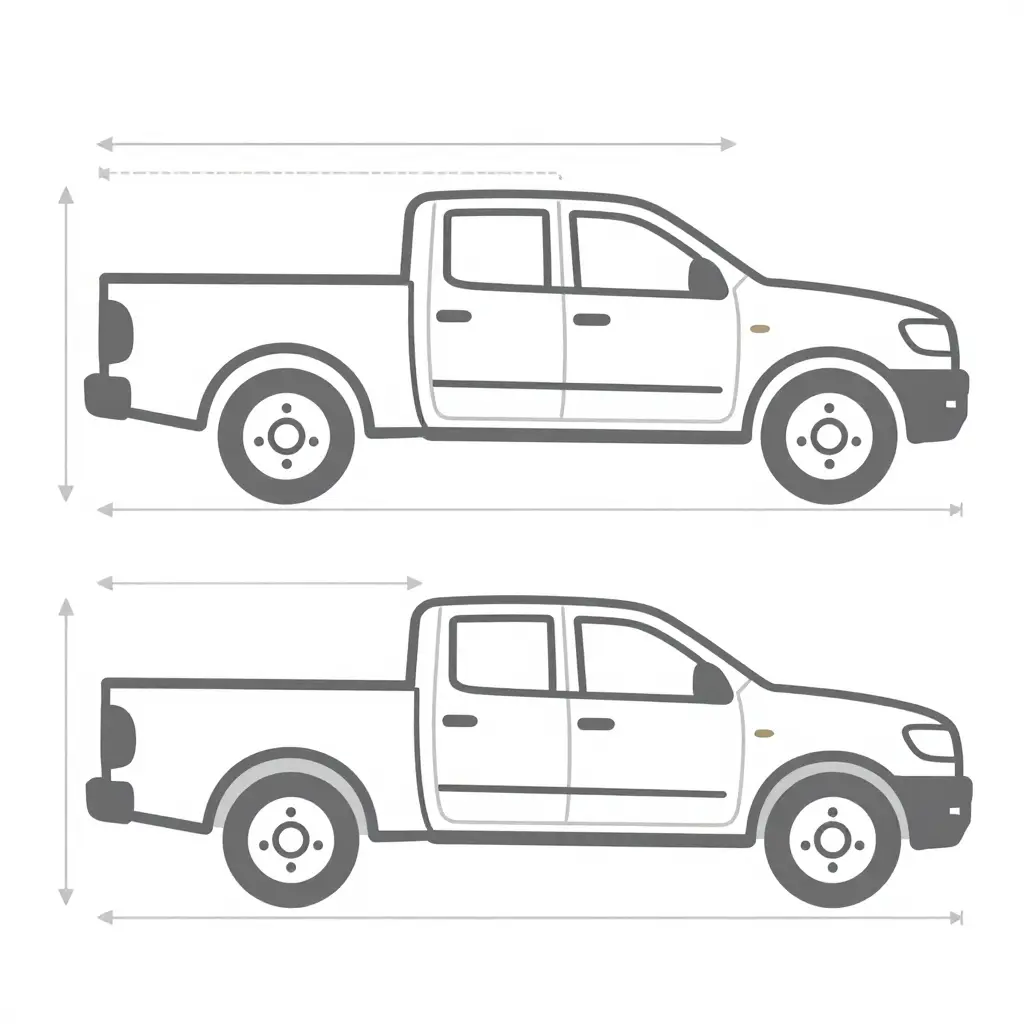
Figure 1: Side and front profile of a pickup, with dimension lines marking overall height, width including mirrors, ground clearance and wheelbase.
Use it as a mental checklist. Height decides whether you clear the wrap-around brushes and the dryer hood, and width across the mirrors decides whether you fit between the guide rails without clipping a housing. Ground clearance governs what the undercarriage jets and the conveyor track meet on the way beneath you. Wheelbase sets how the truck tracks through the tunnel, and a long one wants a gentle entry angle and steady, no-brake progress once you are lined up.
Measure with the truck loaded the way you actually drive it. A full tank, a bed full of gear or a set of fairings strapped down can move a number by an inch or two. If your truck sits close to a bay’s published limits, ask staff to confirm before you commit. If you are chasing stubborn road film underneath, these tips on cleaning grease and tar off your trucks fast are worth a read while you are at it.
The sketch carries no numbers or labels, only the measuring points and the envelope around the body, so you can print it, write your own figures in the margins and keep it in the glovebox.
How to Verify Car Wash Clearance Before You Pay
Before the gate arm lifts and your card gets charged, a five-minute walk-around costs less than a cracked mirror and an insurance claim. Brushes pass within inches of sheet metal and the rails grip your tires with very little tolerance. Treat the posted numbers as limits, not suggestions.
- Read the posted bay limits, including any restriction on roof racks or bed cargo.
- Measure the truck loaded, with fairings, ramps or cargo already strapped down, and measure at the highest and widest points: cab roof or light bar, antenna, and the widest fender or tow mirror rather than the door handles.
- Fold or remove protruding accessories such as mirrors, antennas, bed extenders and hitch racks, then measure the final footprint.
- Compare your figures against the site’s stated maximums and keep several inches on every dimension instead of matching the limit exactly.
- Confirm the numbers with staff whenever the signage is faded, ambiguous, or seems to describe a different bay from the one you have been assigned.
If you run the rig through commercial equipment regularly, find out how a dedicated truck wash center sets up its lanes and what it expects from drivers before your next visit.
Why a Few Inches of Margin Actually Matters
Two to four inches of working margin is not overcautious. It absorbs what changes between the tape measure and the tunnel. Brushes deflect as they spin, and on a tall, flat-sided pickup the cloth can whip outward and slap a light bar or roof rack that measured exactly at the maximum. Mirrors suffer most, because they sit on the widest point of the vehicle and rotate freely: one extended arm catching a side brush can fold it back into the glass or snap the housing.
The conveyor is only as reliable as the tires riding it. A truck sitting slightly off-center because of wide fenders or oversized rubber can drift, misalign the rollers and stall the line. A pickup height figure taken loaded, at the true high and wide points, leaves room for brush deflection, mirror swing and an imperfect entry. Leave the margin and you drive out with a clean truck and nothing else.
Pickups rarely fail on roof height alone. Mirrors, load height and a rear overhang hanging past the exit sensor account for more of it. Take your own measurements where the operator checks, then compare them against the posted limits before a wheel touches the conveyor.
Pickup Measurement vs. Typical Automatic Car Wash Limit
| Measurement | Where It Is Taken | Typical Pickup Range | Typical Automatic Bay Limit | Margin to Confirm |
|---|---|---|---|---|
| Overall height | Ground to highest fixed point of the cab roof | 73 to 82 in (1,855 to 2,083 mm) | 84 in (7 ft) common, 96 in at high-bay sites | Keep 2 to 6 in under the height bar |
| Height with rack or load | Ground to top of roof rack, light bar, antenna, or cargo | 78 to 100 in | 84 to 96 in | Confirm 6 to 12 in; remove removable racks first |
| Width with mirrors extended | Outer edge of left mirror to outer edge of right mirror | 96 to 105 in | 90 to 102 in at the bay opening | Mirrors usually must fold; measure folded width instead |
| Width with mirrors folded | Body panel to body panel with mirrors folded in | 79 to 86 in | 90 to 102 in | Keep 4 to 8 in of clearance per side |
| Track width | Center of left tire tread to center of right tire tread | 67 to 69 in | Guide rails or conveyor track about 72 to 78 in | Keep 3 to 5 in; wide-body trucks run tighter |
| Wheelbase | Front axle center to rear axle center | 122 to 176 in, short regular cabs to long-bed crew cabs | Set by roller spacing rather than by a single posted number | Confirm the bay handles your wheelbase, in both directions |
| Tire section width | Sidewall to sidewall at the widest point | 10.5 to 13.5 in (265 to 345 mm) | 12 to 14 in rail opening on most bays | Under 1 in with LT-metric tires; confirm rail gauge |
| Ground clearance | Lowest point of chassis, differential, or step to ground | 8 to 10 in | 4 to 6 in minimum to clear rails and brushes | Keep 2 to 4 in; check running boards and mud flaps |
| Front overhang and approach angle | Front bumper leading edge to front axle center, plus bumper approach angle | 35 to 45 in overhang, 18 to 28 degrees | 48 in overhang and roughly 10 to 15 degrees at entry ramp | Confirm ramp angle; low air dams and tow hooks are the risk points |
| Rear overhang with loaded bed | Rear axle center to rearmost point of load, tailgate, or hitch | 45 to 60 in | 48 to 60 in before the exit sensor or blower frame | Keep 0 to 6 in; strap or remove anything past the tailgate |
Caption: Figures vary by site, equipment brand, and bay configuration and must be confirmed against the posted signage at the wash entrance before entry.
What Posted Bay Limits Actually Tell You
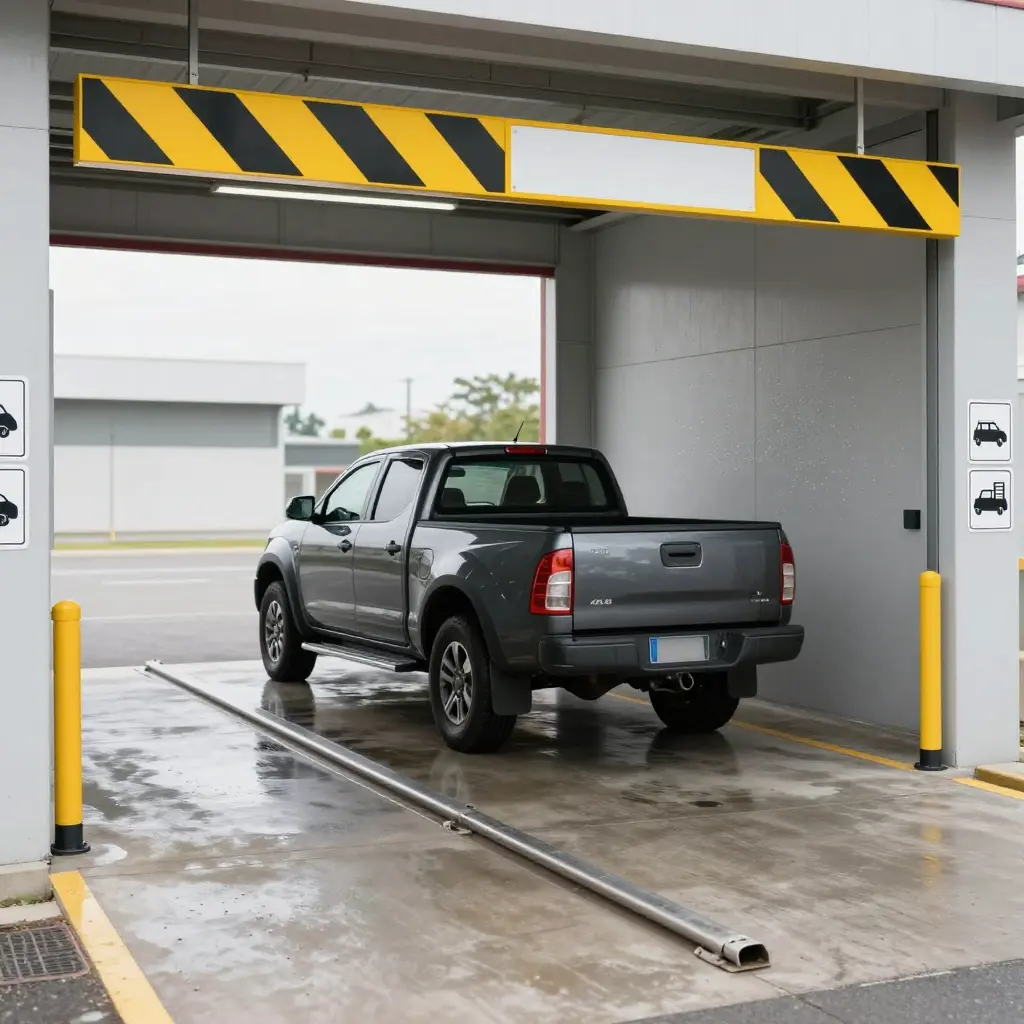
Walk up to most automatic bays and you will see one or two numbers on a plate by the entrance. That plate is not a vehicle spec sheet. It is the shortest summary an operator can legally and practically post, and reading it correctly means knowing which figures come from signage guidance, which from equipment documentation, and which from compliance paperwork.
The categories operators usually publish
- Maximum vehicle height. The most consistently posted figure, usually attached to a physical clearance bar or arch. It reflects the lowest obstruction in the bay, not the tallest vehicle the site has ever handled.
- Maximum vehicle width. Published as a lane or track width, because guide rails, brushes and blower arms occupy fixed space. Signage guidance usually ties it to rail spacing rather than to body width alone.
- Maximum tire width. Set by equipment manufacturer documentation, which defines the tire envelope a conveyor or rail system can accept. Operators tend to copy that figure straight onto the sign, because a tire outside the rail cannot be pulled through safely.
- Rack, ladder carrier and roof cargo restrictions. Posted as icons or short warnings, driven mostly by brush contact risk and operator policy rather than by an engineering limit.
What frequently gets left off
| Category | Usually on signage? | Where it is actually documented |
|---|---|---|
| Maximum height | Yes | Operator signage and clearance bar |
| Maximum width | Yes | Operator signage, rail spacing |
| Tire width | Sometimes | Equipment manufacturer manuals |
| Minimum ground clearance | Rarely | Manufacturer manuals, operator policy |
| Wheelbase compatibility | Rarely | Equipment documentation, site assessment |
| Racks and ladder carriers | Occasionally | Operator warnings, insurance guidance |
Minimum ground clearance and wheelbase compatibility are the two silent gaps. Low-hanging exhaust or fairing components can foul a conveyor, and a very short or very long wheelbase can sit awkwardly against the guide rollers, yet neither figure is commonly printed. Where operators do address them it is usually in staff instructions or in the compliance paperwork behind the site license, which is one reason truck wash industry compliance and emissions regulations is worth understanding before you assume a bay was cleared for your vehicle.
Treat unlisted limits as unknown, not permissive
An absent figure means nobody has told you the answer. It does not mean the bay can take it. Ask an attendant, measure the tallest and widest points yourself, and strip racks, ladder carriers or fairings before you queue. Two minutes at the entrance is cheaper than a bent roof, a damaged brush unit and an argument about who pays.
Pickup Height Profiles Against a Representative Automatic Bay Limit
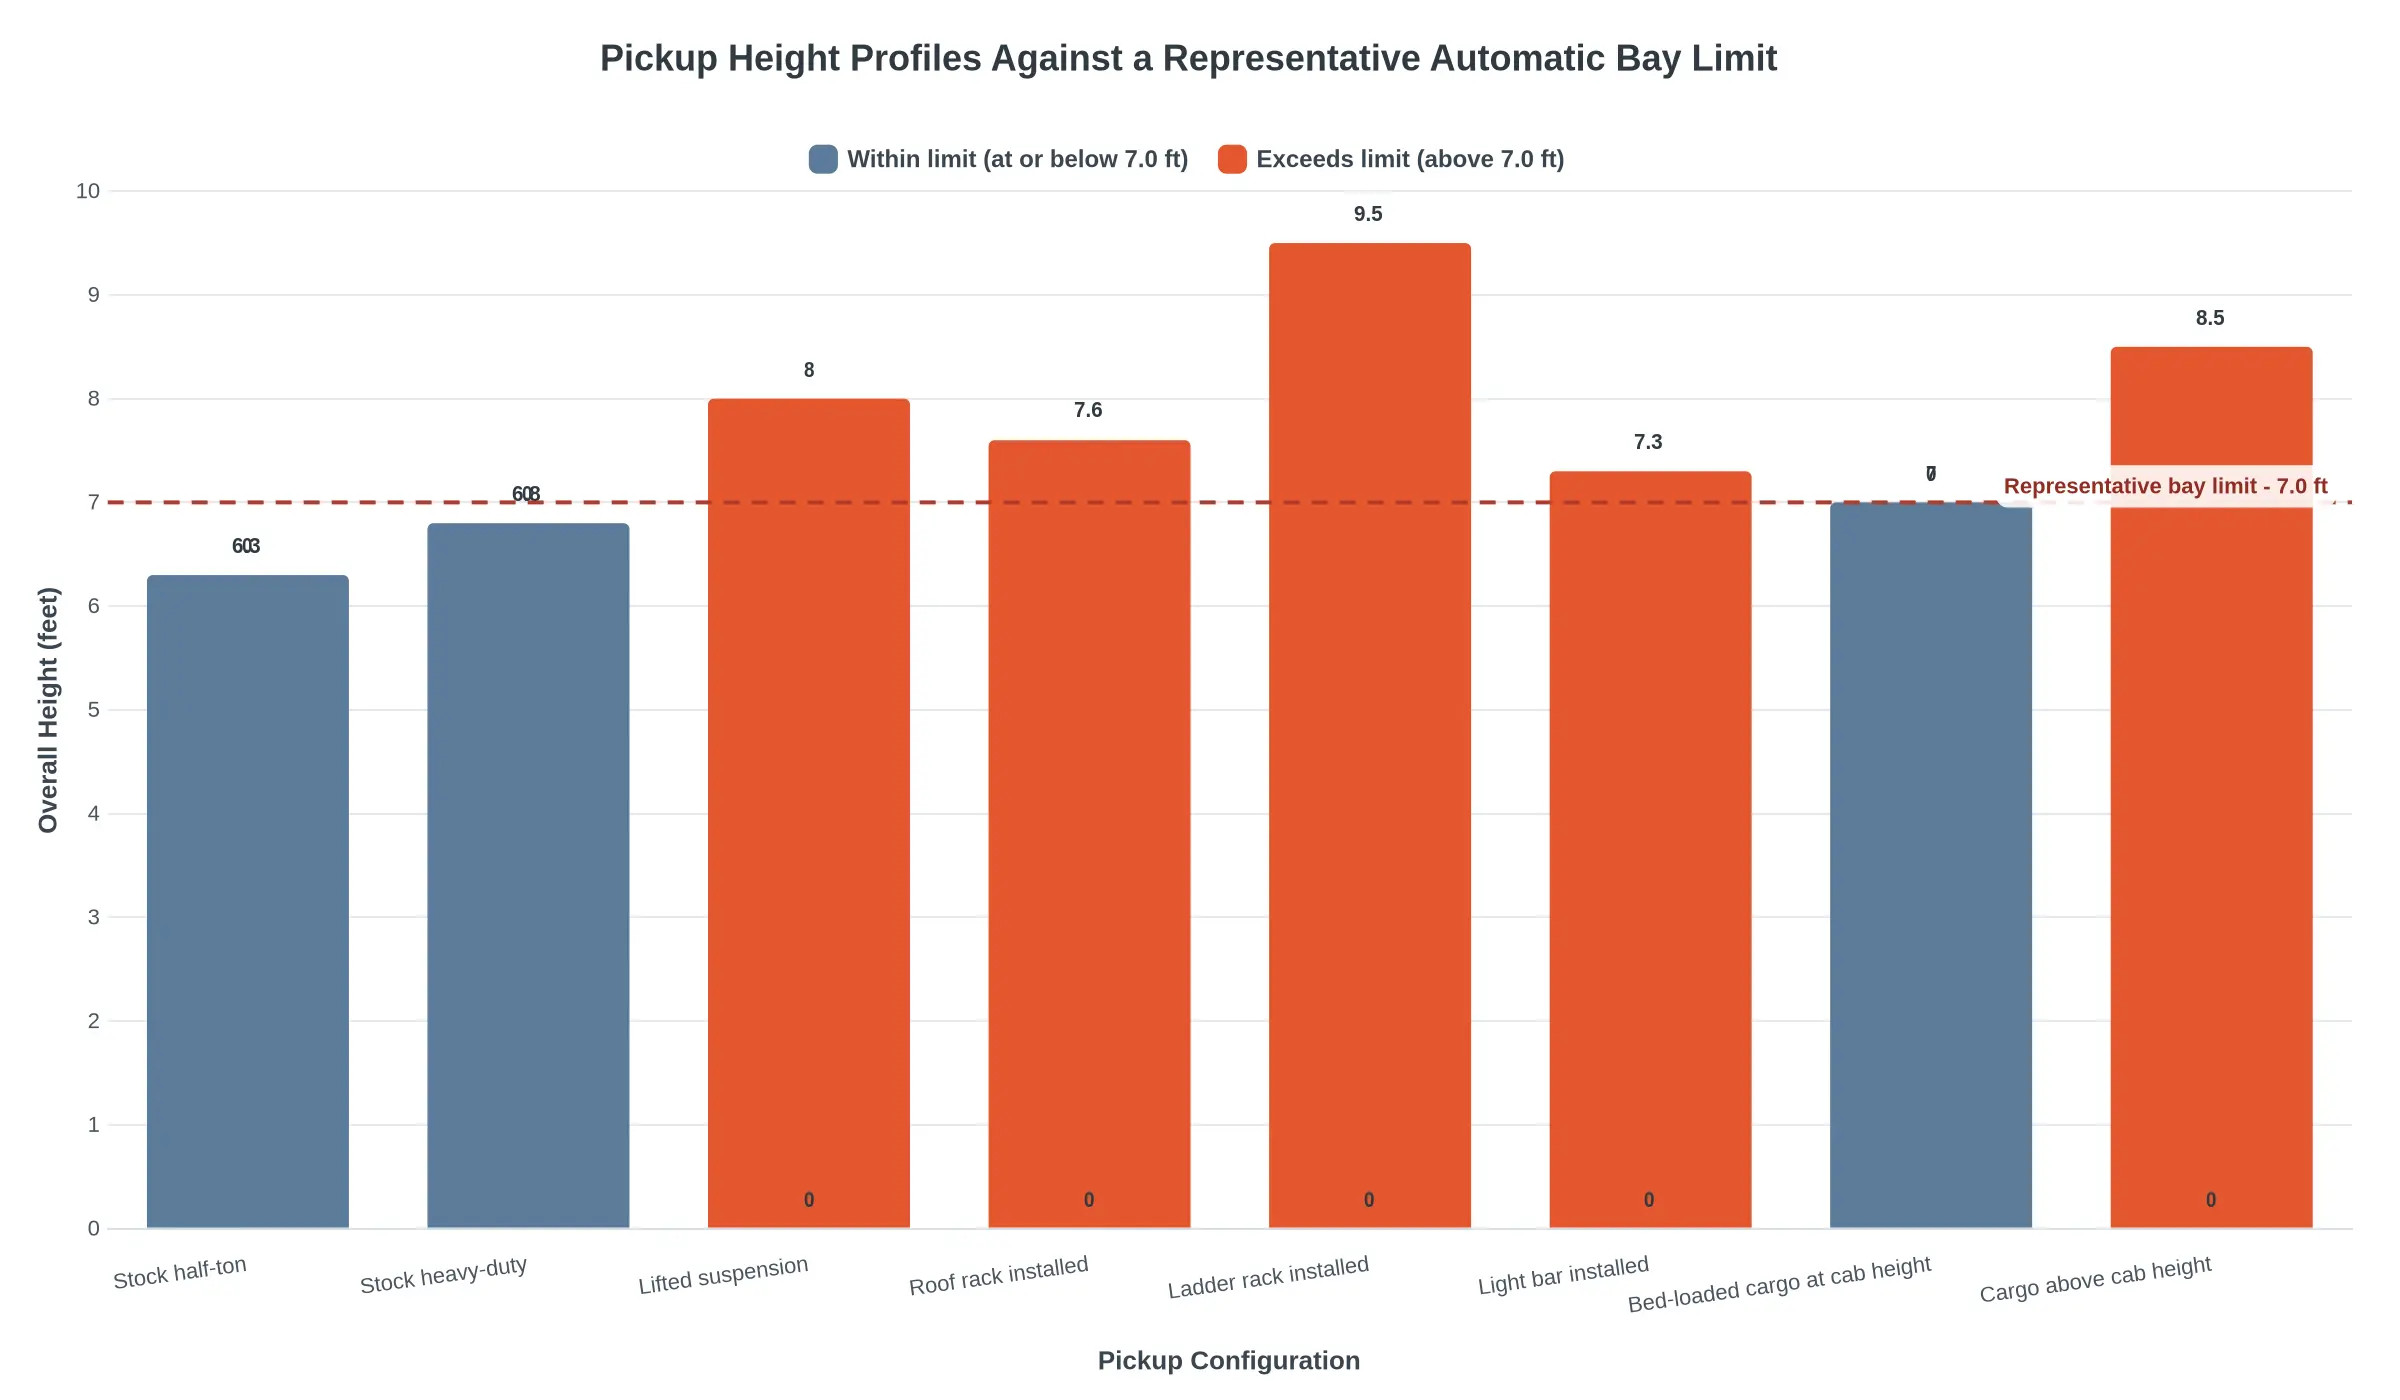
Figure 2. Overall height of eight common pickup configurations against a 7.0 ft representative bay limit. Bars in orange-red exceed the line. The reference line is one representative limit used for illustration, not a universal standard: real clearances vary by site, equipment model and local code, so verify the posted figure at the wash you plan to use.
A stock half-ton and a stock heavy-duty pickup both sit under the line in this example, the heavy-duty by an inch or three rather than by much, and that is where drivers get lulled. Add a ladder rack to the same truck and total height climbs toward nine feet, enough to catch a rotating brush arm, a dryer hood or a guide rail you never see from the driver’s seat.
The pattern is the point: every bar over the line got there because of something bolted on or loaded up, not because of the factory build. Accessories are the variable. A roof rack, a light bar, cargo stacked to cab height or fairings strapped above the roofline can each turn a wash-safe truck into a no-go in a matter of minutes.
How to use this comparison
- Measure the highest fixed point with accessories installed and cargo loaded, not the empty, stock-height figure from the brochure.
- Add a buffer instead of running right at the posted number. Suspension sag and tire pressure move the math more than most owners expect.
- Re-measure after every modification, and before any trip carrying something tall.
- Height is one dimension. Width, bumper guards and antenna clearance count too, and facilities that stay on top of truck wash industry compliance standards tend to post clearer, more reliable signage for all of them.
If your configuration lands above the line, skip the automatic tunnel. A self-serve bay or a hand wash protects the rack hardware and the equipment, and nobody wants to explain a torn brush assembly to the site manager.
Hauling Motorcycle Fairings: How Cargo Rewrites Your Clearance Numbers
Fairings are the most awkward cargo a motorcycle produces: wide, light, and prone to cracking long before they bend. So they almost never ride flat or loose. Most riders stand them upright in the bed or bolt them to a padded rack, which is the safest way to move them and the quickest way to change your clearance numbers.
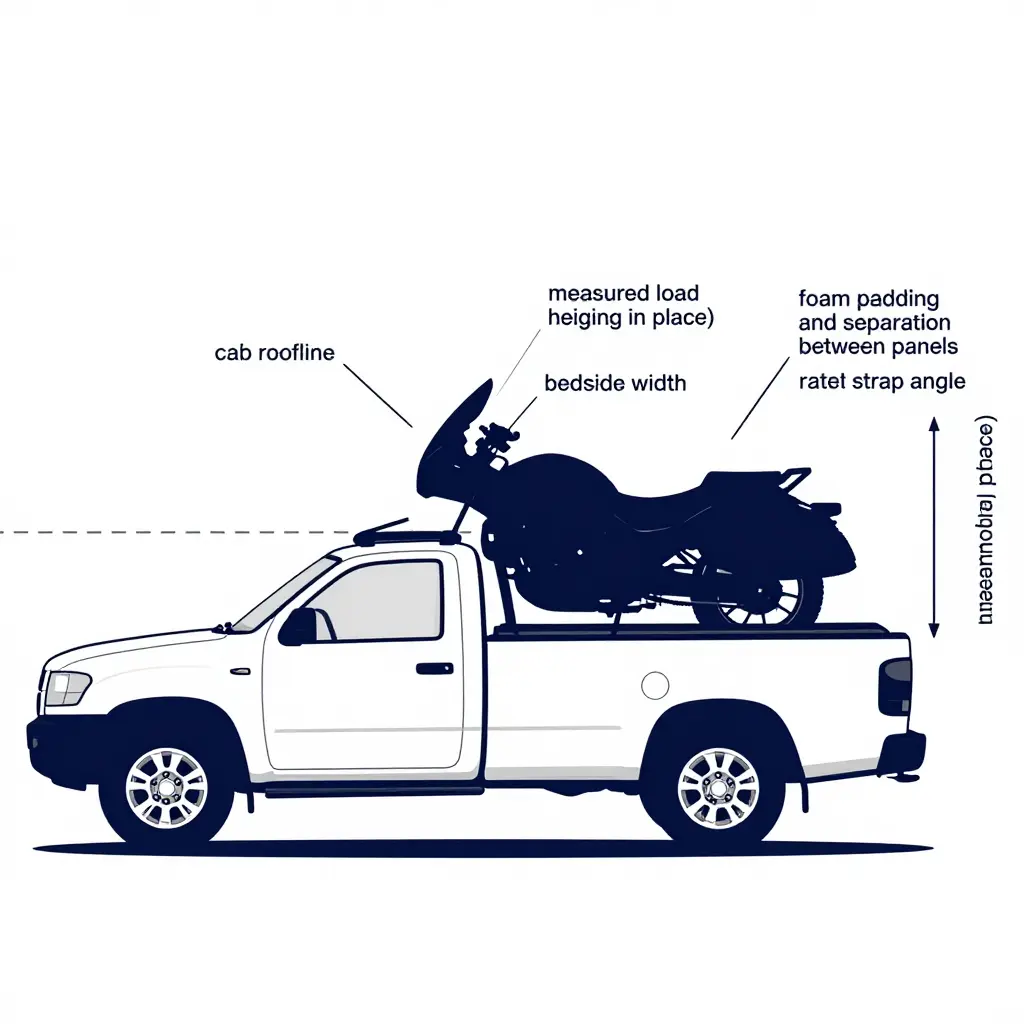
Upright placement changes two dimensions at once
A fairing standing on its base usually rises above the cab roofline, and its widest point often sits past the bedside, especially on a short bed. Both matter before you approach an automated bay. Your cargo clearance is no longer the truck’s factory figures; it is the tallest and widest point of the loaded vehicle.
Measure with the cargo in place
Do not measure the truck empty and assume the load adds a few inches. Park on level ground, load the fairings exactly as you plan to travel, then:
- Measure from the ground to the highest point of the fairing, not the top of the bed rail.
- Check the width at the widest fairing edge, including any padding and strap hardware.
- Compare those figures with the bay’s posted height and width limits, and leave a margin for suspension squat and for brushes that hang into the opening.
Strapping, padding, and separation
Ratchet straps should pull the load down and forward so the top edge stays below the cab line wherever the mounting allows. Never let a strap compress a painted panel: run it around a frame or through a mounting hole. Separate panels with foam, moving blankets or cardboard so they cannot rub, and pad every contact point between fairing and bed rail. A strap hooked over a fairing edge leaves a stress mark even when it survives the trip.
Why brush contact is a double risk
A spinning brush catching a fairing edge causes trouble in both directions. A protruding panel can snag wrap material, drag the brush carriage or trigger an emergency stop. On your side, brush filaments carry grit that scuffs clear coat, and the flex they put on thin ABS can crack mounting tabs already under load. Keeping the load under the cab line protects the wash and the plastic.
Buying replacements or spares
If a fairing does crack, summitfairings.com is a reasonable place to start. The company advertises more than 3,000 styles covering almost all motorcycle models, prices 10 to 40 percent below other sites, and answers to questions within six hours, which matters when you are matching color and model year before a ride.
Before you leave the driveway, get the heavy road grime off the lower body with these fast grease and tar removal strategies, then confirm your loaded height one more time.
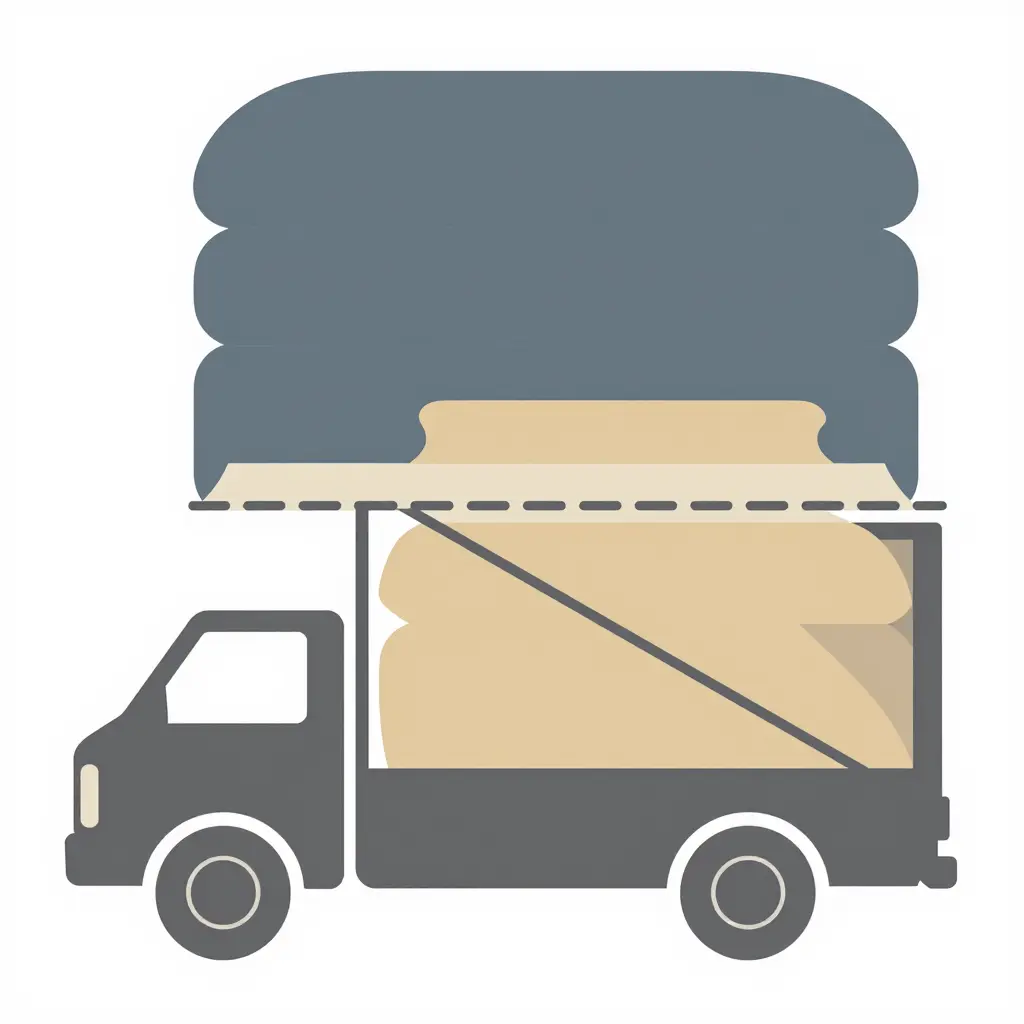
Figure 3. Side-view schematic of the load envelope principle. The dashed horizontal line marks the cab roofline. It is a reference point rather than a bay limit: what matters is the height left between the top of the strapped fairings and the posted limit. The shaded band shows that remaining margin. If the fairings creep into the band, or cross the dashed line, measure again against the bay’s own figures before you enter the tunnel.
Accessories to Remove, Fold or Secure Before the Wash
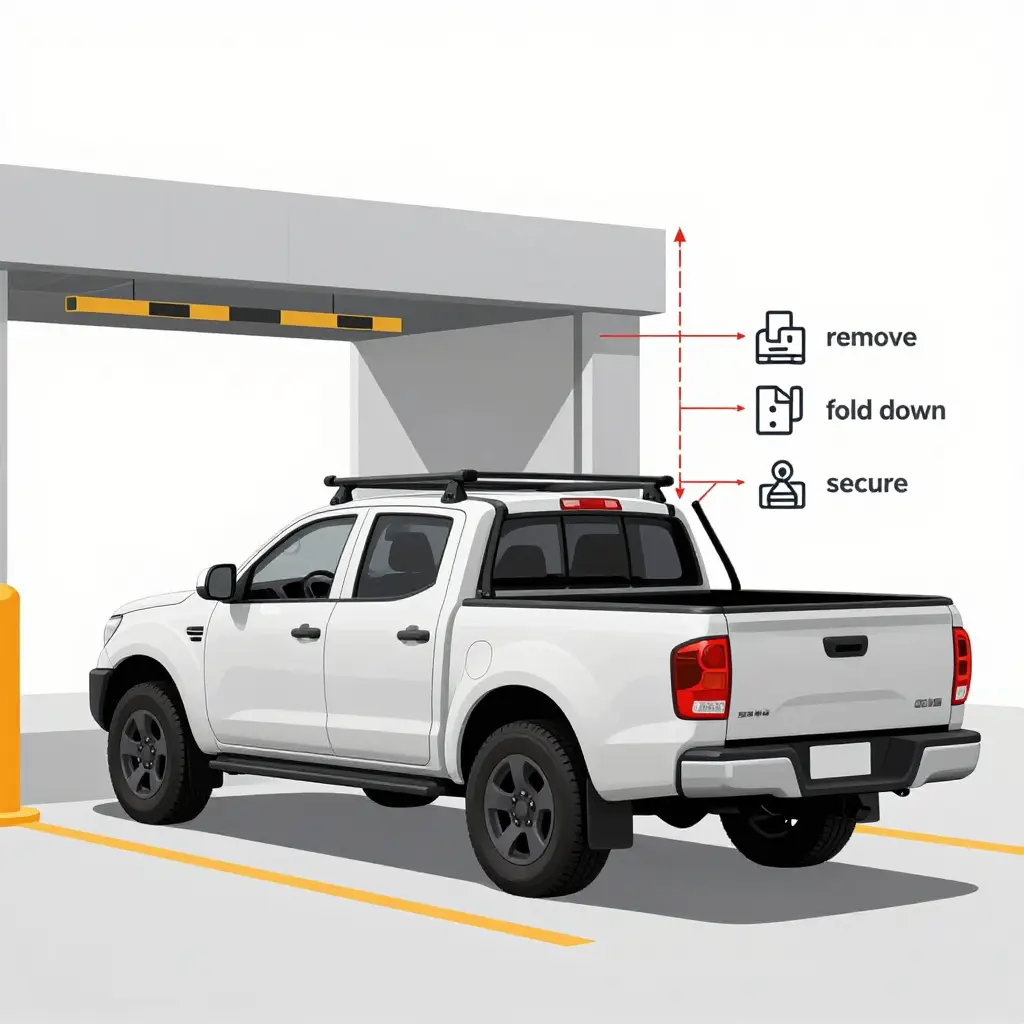
Factory height and width figures describe the truck that left the plant, not the one you drive in. Every rack, bar and mast you bolt on redraws the clearance envelope, and spinning brushes and blower arches do not negotiate. They push, lift, flex and occasionally rip. A two-minute walk-around before you queue prevents almost all of it, and most of the items below are fine to keep once they are stripped down or locked off.
The quick pre-wash checklist
- Roof racks and crossbars – measure to the top of the highest bar, not the roof. Clamp-on crossbars are the usual culprit; pull them off or lower the rack to its shortest setting.
- Ladder racks – a full-height contractor rack can add 18 to 24 inches and turn a half-ton into a commercial-height vehicle. Remove the uprights, or choose a self-serve bay instead.
- Antenna masts – whip antennas flex, snap back and gouge paint or wrap around brush bristles. Unscrew them and store them in the cab.
- Light bars – roof and hood-mounted bars sit right in the brush path. Remove clamp-style units and tuck the wiring harness so nothing dangles.
- Snorkels – a raised air intake changes the profile at the A-pillar and can trap brush material. Confirm the top of the intake still clears the arch, and check that the fasteners are tight.
- Tonneau covers – latch roll-ups and folding covers fully closed; a loose flap lifts in the blower arch and can peel back. Hard folding panels should sit flat and locked.
- Bed extenders – fold the extender in before you enter. In the out position it projects past the tailgate and widens your rear footprint beyond the guide rails.
- Trailer and bed-mounted equipment – apply the same routine you would for a trailer: check mounting hardware before a wash, looking for loose bolts, cracked brackets and fatigued straps. Our guidance on importance of regular trailer maintenance walks through that inspection step by step.
One more thickness check: fold the mirrors in and confirm the tires sit inside the guide rails. Width catches people as often as height does.
Do the walk-around once or twice and it becomes automatic, and the truck, gear and fairings arrive at the other end the way they went in.
Where Clearance Failures Originate on Pickups
Before you pull a pickup into an automatic wash with motorcycle fairings strapped in the bed, it helps to know which parts of the truck tend to cause trouble. The chart below sorts reported clearance failures into six categories, most to least common.

The shares describe failure patterns reported by drivers and wash-bay staff. They are an orientation aid for prioritizing your own inspection, not the output of a controlled, statistically weighted survey. Use the ranking as a starting order, then verify every measurement on your own truck and load.
What the slices tell you
Height with load (28%) is the biggest single culprit, and it makes sense. A lifted pickup carrying fairings, ramps or a tall load in the bed can push past the overhead mitter curtain or the blower arms long before the driver notices anything wrong. Measure from the ground to the highest point of the loaded truck, not to the roof of the cab.
Width with mirrors (22%) comes second. Extended tow mirrors get forgotten because they sit outside your normal sightline while you line up on the conveyor. Fold them in unless the wash explicitly accommodates them.
Roof-mounted accessories (18%) covers light bars, roof racks, antenna whips and cargo baskets. Anything bolted above the roofline changes both height and profile, and spinning brushes catch brackets that look perfectly secure from the driver’s seat.
Tire and wheel width against guide rails (14%) is easy to overlook because it has nothing to do with the body. Oversized tires or aggressive wheel offsets can ride the guide rail rather than track cleanly beside it, which nudges the whole vehicle offline.
Low-hanging front air dams and splitters (11%) catch on conveyor hardware, entry lips and the leading edge of the tunnel. If your truck has been lowered or fitted with an aftermarket splitter, confirm the approach angle before committing.
Undercarriage contact (7%) is the least reported and not zero. Low exhaust tips, running board brackets and skid plates are the usual suspects.
A quick pre-wash measurement checklist
| Check | What to measure | Typical fix |
|---|---|---|
| Overall height | Ground to highest point of load | Remove or lower tall items; confirm tunnel clearance |
| Overall width | Widest point, mirrors included | Fold mirrors in |
| Roof profile | Any accessory above the roofline | Remove removable racks and light bars |
| Track width | Outside edge of tires vs. guide rail spacing | Ask staff about rail-compatible lanes |
| Front overhang | Lowest point of air dam or splitter | Use a lane with a gentler entry, or wash by hand |
| Undercarriage | Lowest hanging bracket or tip | Visual check on a level surface |
If a measurement is close, it is not close enough. Operators build tolerance into their equipment, but a loaded pickup with fairings in the bed is a different vehicle from the one in the owner’s manual. Five minutes with a tape measure beats a bent splitter or a cracked fairing.
Reading the Signage and Choosing the Right Wash Type
The last few yards before the entrance are where most damage happens: not inside the machine, not on the road, but at the bay mouth, where the posted numbers meet the actual vehicle. Read the sign before you commit the front bumper, then match it honestly to the truck and whatever is strapped behind the cab.
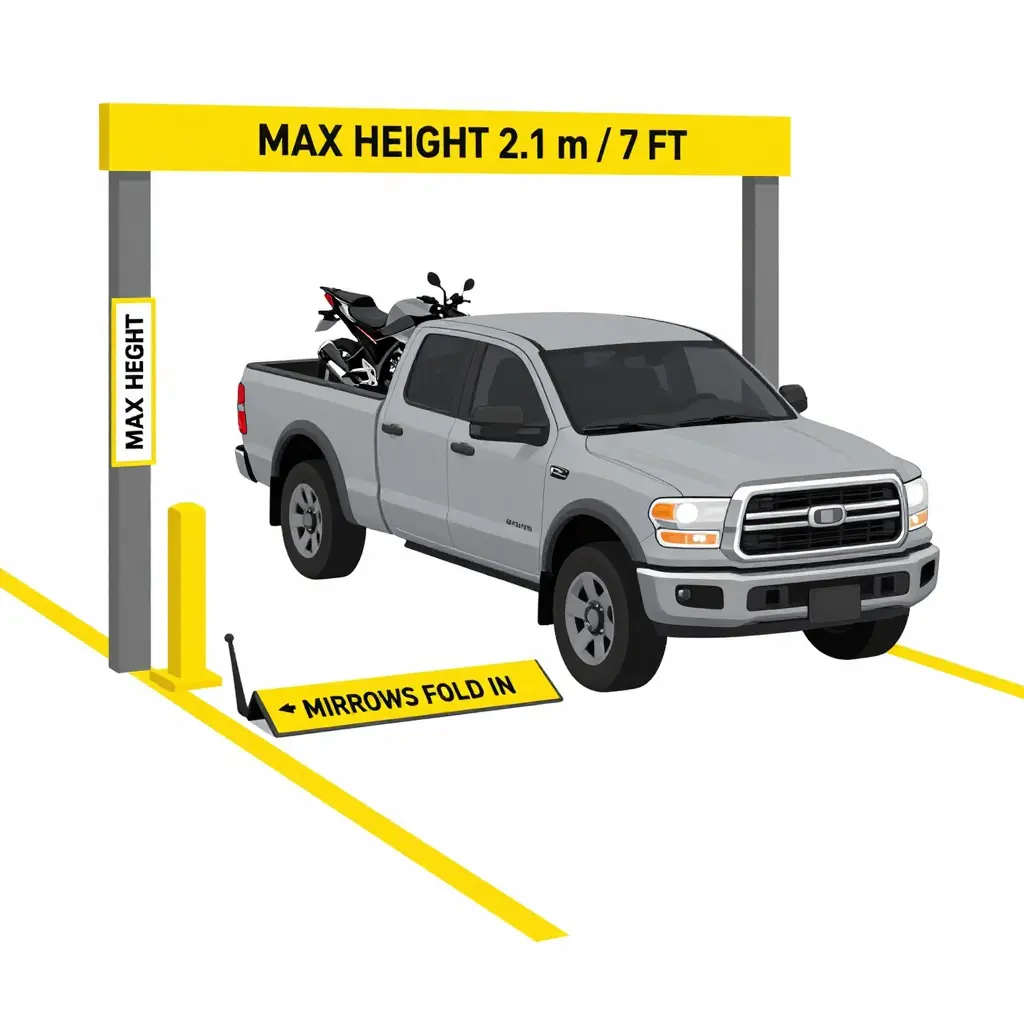
What the Posted Limits Actually Mean
Start with the bay limit board. It usually lists a maximum height, a maximum track or tire width, and exclusions such as dual rear wheels, roof racks or cargo extending above the roofline. Treat every number as a ceiling, not a target.
Height bars are the honest measure. The bar hangs at the lowest obstruction in the tunnel, which is often lower than the entrance arch, so measure at your tallest point with the load on and the tires inflated. Roof racks, light bars, antennas and a fairing stack in the bed all count.
Mirror guard markings, the yellow-and-black paddles and painted arrows on the floor, show where the machine expects your mirrors. Fold them in where marked, and ask before entering if they do not fold.
Warning signs near the ticketing kiosk carry the rest: no racks, no open beds, no trailers. Photograph the board if you use a site regularly and keep the photo for your next visit.
Four Questions That Settle an Ambiguous Case
When the board is vague or the equipment looks newer than the signage, walk to the attendant and ask these in this order.
- What is the maximum height at the lowest point of the equipment, not just at the entrance?
- Do mirrors need to be folded in, and will the sensors cope if they are not?
- What tire width or track limit applies to the guide rails at this bay?
- Are racks, bed cargo or trailer loads permitted on this pass?
Clear answers to all four take under a minute. Guessing takes the same minute and can cost a mirror housing, a fairing or a whole load.
Touchless vs. Soft-Cloth: Where the Margins Change
Touchless clearance is generally more forgiving at the sides, because nothing swings outward past the vehicle envelope, though the overhead rail still sets a firm height and the system expects accurate centering on the rails. Soft-cloth brushes wrap around mirrors, antennas and anything loose, so lateral tolerance shrinks and contact risk rises sharply.
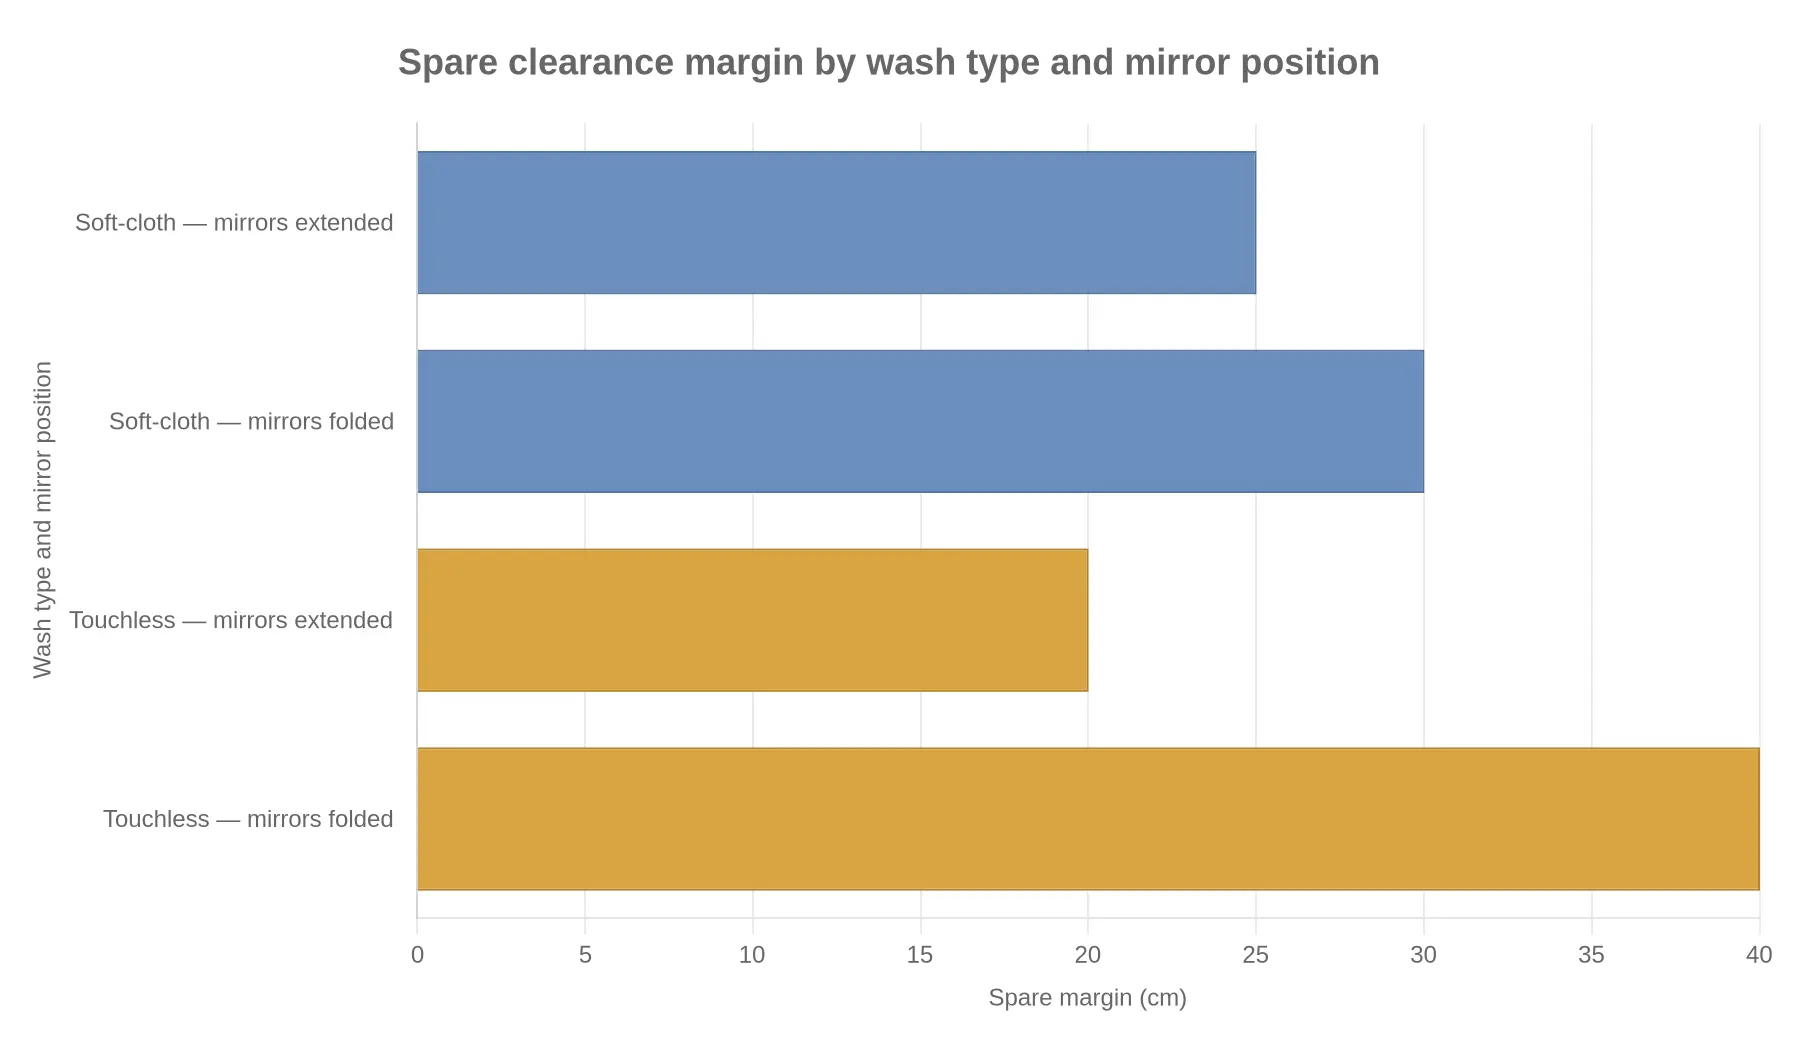
| Check | Touchless (no contact) | Soft-cloth (brush) |
|---|---|---|
| Height tolerance | Tight to the overhead rail; measure at the lowest point | Brushes follow the roofline but snag racks and antennas |
| Mirrors | Sensors may register extended mirrors; still follow the arrows | Fold in – the brush wraps and can crack housings |
| Tire and track width | Confirm rail capacity for wide or oversized tires | Brushes swing past the body; extra side margin helps |
| Loose items | Jets can lift unsecured covers and straps | High risk to straps, covers, antennas, fairing edges |
| Suits | Lifted or accessory-heavy pickups | Stock-height trucks with light road film |
Whichever type you choose, the rule holds: an automatic car wash safety check is only as good as the measurements you take yourself. If the truck is caked in grease, tar or baked-on highway grime, deal with that film first. See this guidance on removing heavy road film before an automatic pass so the brushes and jets work on fresh dirt rather than grinding grit across your paint.
Post-Wash Inspection and Damage Documentation
Pull clear of the exit arch, set the parking brake and take two minutes before you drive away. A post-wash inspection catches small things while they are still small: a mirror housing knocked a few degrees off center, a trim clip popped loose, a faint brush swirl along a roof panel edge. Once you leave the lot, the story gets harder to prove.
Run the same route every time so nothing gets skipped:
- Mirror housings and antenna bases. Brushes and blower nozzles reach these first. Check for cracked plastic, bent mounts, or a mast that no longer sits straight.
- Roof panel edges and bed rails. Clearance-sensitive zones that collect scuffs. Look for dents, loose rail caps and lifted trim along the roofline.
- Fairing panels and aero trim. Your fairings and any aero panels should sit flush. A gap that was not there before means a fastener is missing.
- Wheel arch trim and mud flaps. Confirm the clips are seated and the flaps still hang square.
- Underbody components. Glance beneath for hanging splash shields, exhaust hangers or wiring that a high-pressure pass knocked loose.
- Glass and light lenses. Micro-scratches and hairline cracks show up best on a wet-then-dried surface.
If something is damaged, shoot three frames: a wide shot showing your truck relative to the wash bay exit, a close-up with your hand or a coin for scale, and a second angle with the timestamp visible. Note the bay number and the time, then report it before you leave the site. Ask staff to pull the camera footage and bay log while you are still there, which is stronger than a phone call from home the next morning. Sites that run disciplined inspection and maintenance routines tend to resolve these claims quickly, and knowing how a facility structures inspection and maintenance tells you what to ask for.
Two minutes at the exit is cheap insurance for a truck and a load of fairings.
Frequently Asked Questions
Can a lifted pickup use an automatic car wash?
Yes, if it measures inside the facility’s posted limits. Measure total height from the ground to the highest point, light bars, antennas and roof accessories included, and compare that number with the maximum printed at the entrance. Lifted trucks often clear the height gate and fail the track width check, so confirm both dimensions with an attendant before you pay.
Do I need to fold my mirrors?
Yes. Fold or retract both before the vehicle rolls forward. On a full-size pickup the mirrors sit well outside the body line, and wrap-around cloth or spinning brushes will grab them at speed. Retract power-fold mirrors as a matter of course, and reopen them only after the dryer arch has passed.
Can motorcycle fairings stay in the truck bed during a wash?
Not in a brush bay. Fairings are thin ABS or fiberglass panels, and high-pressure jets plus rotating brushes can lift, crack or tear them loose. If panels have to travel in the bed, strap them under a rigid cover and keep the truck out of the automatic tunnel; a touchless wash or a hand wash is the safer route. Pad every painted surface and secure the load so nothing shifts when the vehicle stops.
What happens if a vehicle exceeds the posted height limit?
The site should turn it away and send it to a self-serve bay or an outdoor hand-wash area. Running a tall vehicle through anyway damages the wrap-around brushes, the dryer arch and your own roof-mounted equipment, and the driver normally covers those repair costs. Attendants do not catch every oversized vehicle at a busy site, so checking the posted figure is your job, not theirs.
Must roof racks be removed entirely?
Remove any rack that pushes past the posted clearance or sits above the roofline. Low-profile racks that stay inside the limit can usually remain, but crossbars and cargo baskets should come off, because they trap brushes and hold dirty water against the paint. When the measurement is borderline, take the rack off. It is a five-minute job against a four-figure repair bill.
Do touchless systems have different clearance requirements?
Yes, and the numbers change from bay to bay. Touchless equipment has no spinning brushes to damage, so some sites allow a little more vertical room, but the sensor arch demands accurate centering and adequate side clearance. Ask for the posted figure at that specific bay, because automatic car wash clearance depends on the installed equipment, not just the site address.
A Repeatable Clearance Routine
Clearance checks work better as a habit than as an improvisation. Same sequence on every visit, and the stop stops being a gamble.
- Read the posted limits. Note height, width and length clearances at the entrance before you commit to the lane.
- Measure the truck as loaded. Tallest point with fairings, ramps and tie-downs in place.
- Compare your numbers with the envelope. Subtract your measurement from the posted height and keep a margin for suspension travel.
- Secure the cargo. Re-check straps and pads so nothing shifts or lifts once the brushes and blowers start.
- Retract or remove what you can. Antennas, roof racks and loose hardware should come off or fold down.
- Check the approach path. Watch for rails, mirror guards and guide posts on the way in.
- Enter slowly and stay centered. Engine off, windows up, transmission in neutral where the wash requires it.
- Inspect after the wash. Walk the truck and the fairings for scrapes, water intrusion or loosened straps before you drive on.
Measuring with the cargo loaded is the most reliable safeguard in pickup truck wash safety. Posted heights describe an empty vehicle; your fairings, ramps and tie-down hardware are what actually meet the brush and the dryer hood. Apply the same discipline on every visit, however many times you have driven the same route with the same load, because a strap that sits differently changes your tallest point.
For standardizing these checks across several vehicles, see the guidance on fleet standardization and emergency response.