
Transporting a washing machine securely in a pickup truck is essential for fleet managers and logistics professionals. Proper lifting techniques, adequate preparation, and appropriate tools can prevent damage to appliances and ensure worker safety. This article covers crucial steps for preparing washing machines, the essential tools required for lifting, and a detailed step-by-step process that professionals in the transportation and construction sectors can rely on.
Coordinated Readiness: A Practical, Safe Path to Lifting a Washing Machine into a Pickup Bed

Preparing to lift a washing machine into a pickup truck is as much a test of planning as it is of strength. The goal is not to heroically heave a huge appliance and call it good, but to orchestrate a sequence of careful moves that protect the machine from internal damage and protect the handlers from strain or injury. When this chapter speaks to readiness, it is describing a mindset as much as a procedure. The process begins long before the first contact with metal and plastic. It starts with a clear plan, a tidy workspace, and a recognition that several small decisions can prevent a single catastrophic outcome. The moment you decide to move a washer, you enter a shared responsibility: the appliance is a heavy object that needs respectful handling, the vehicle is a moving environment that demands secure restraint, and the people involved are stewards of both equipment and safety. A successful lift requires total scene control and a calm, measured rhythm that travels through every step of the job. In this frame, preparation is not a trivial preface but the essential core of a smooth, damage-free transition from home to truck bed and onward to the next destination.
First comes the cleanliness and dryness of the load. An empty drum reduces weight and minimizes the risk of leaks or drips during transit. This is not just about housekeeping; a partially filled drum shifts the balance and can throw a lift off. Drain any remaining water by running a brief cycle or by manually draining if the model permits. If there is standing water in the sump or hoses, siphoning or absorbing it with towels ensures the washer feels lighter in practice, even if the actual mass math remains unchanged. A dry machine also guards against slippery floor surfaces during setup and helps crew members maintain firm footing at every stage of the maneuver. As you prepare, keep in mind that a damp or waterlogged appliance can complicate the grip of straps and the stability of a dolly, so dryness is a small but powerful ally right at the start.
Next, power and water must be decoupled safely. Unplugging from the electrical outlet is nonnegotiable. But the work does not end there. Close the water supply valve to stop the flow of steam and liquid, and disconnect the hoses from the back of the unit. Coil or secure those hoses so they cannot snag a passerby or spill into the truck bed or the workspace. This step is about establishing a path of least resistance for everyone involved; loose hoses are not only a tripping hazard, they can cause sudden leaks that complicate the move and create unnecessary messes inside a vehicle. If your washer employs transit bolts, this is the moment to reinstall or reseat them, ensuring the drum is firmly secured during transit. These bolts act as tiny guardians for the internal components, restricting drum movement and dampening the rattling that otherwise accompanies a bumpy ride. If bolts are missing or loose, the risk of post-move rattling or misalignment grows, which could translate into performance issues after the load has arrived at its destination.
Protective padding comes into play after this foundational work. Wrap the exterior with moving blankets, foam padding, or bubble wrap, focusing attention on the corners, edges, and around the control panel and doors. A washer is a delicate combination of heavy mass and polished surfaces; even a small impact can leave a lasting impression on the finish or create a dent that echoes along a long, rough ride. Padding serves a dual purpose here: it cushions the impact of any accidental snag during movement and shields the truck’s interior from scuffs and scratches that can accumulate with repeated use. Pay particular attention to the control panel area, which is prone to damage when the unit shifts or tilts even slightly. If you have extra blankets, lay one as a bottom layer in the truck bed to create a friction-reducing plateau that helps the washer sit securely once loaded. These steps also provide a quiet reminder that the vehicle’s interior is not a showroom; it is a moving workspace where surfaces must be protected for both aesthetic and functional reasons.
With the machine dressed for the task, gather the tools that transform the lift from a brute force effort into a precise operation. A moving dolly with sturdy wheels and a broad base is the best ally here, offering stable support and reducing the bending and twisting that would be required if the appliance were maneuvered by hand alone. Straps or ropes of adequate strength are essential to secure the washer once it sits in the truck. A non-slip mat or a tarp on the truck bed helps prevent the washer from sliding or shifting during transport. Plush padding can be placed around the sides once the unit is loaded, further reducing the chance of movement caused by driving vibrations and road irregularities. Finally, a plan to manage the exit path—whether you use a ramp or you perform a controlled manual lift—ensures you know how to bring the machine from the dolly into the truck without sacrificing balance or control. This combination of protective materials and practical equipment is not about luxury; it is about predictable, repeatable results that keep people safe and the appliance intact.
If the movement is to be done with two or more people, this is the moment to coordinate. Clear communication is a prerequisite. Assign roles: one person guides the dolly and keeps the path open, another follows behind to manage the transfer into the truck bed, and a third can handle the straps to secure the unit once it rests in position. The team approach matters because a single misstep multiplies risk. From the outset, remind everyone that the goal is to move as a synchronized unit rather than to improvise a string of individual lifts. A well-coordinated trio can maintain the washer in a true vertical alignment, a posture that minimizes stress on the drum and bearings. When you lift, bend at the knees, not at the waist, and keep the back neutral. The legs do the heavy lifting, not the spine. This fundamental rule may feel obvious, yet it prevents back injuries and keeps the crew moving in a way that preserves energy for the actual loading into the truck bed.
Rolling onto the dolly is a pivotal moment. The machine should sit firmly on the dolly with enough clearance to prevent any contact between the appliance and the dolly’s frame or wheels. Give the machine a gentle push to confirm it is balanced before you start rolling. If the drum has any residual movement, the bolts you reinstalled earlier should have restrained it, but a quick check is prudent. Once seated securely, you can begin to roll toward the truck with careful, controlled motions. Do not rush; the dolly should glide, not skid. Keep the route free of loose cords, hoses, or debris that could snag a wheel, and ensure you have a clear sightline to the loading area. If you encounter tight corners or a narrow doorway, reassess and adjust the approach rather than forcing the machine through a space that cannot accommodate it. A little patience here buys you safer passage through the home and into the vehicle’s vicinity.
Positioning for loading requires a careful eye for space and angle. The goal is to bring the washer close to the rear edge of the truck bed, ideally on a slight incline if the ramp is available. An incline may seem counterintuitive, but when used properly it reduces the vertical lift required during the final transfer onto the bed. The key is to control the machine as it reaches the edge and to align the dolly so the washer is oriented crisply toward the bed, not at a skewed angle that would encourage slippage or binding. If a ramp exists, set it on a stable surface and secure it against movement. Confirm that the ramp’s grip is clean and dry, and that its height matches the wheelbase of the dolly so the transition remains smooth. Communicate with your teammate to time the final approach; a coordinated count or cue keeps the lift steady and minimizes jerky motions that could crack a panel or bend a door. Each small adjustment—shifting a few inches here, advancing a few inches there—adds up to a safer, more controlled transfer that preserves the machine’s finish as it slides into place.
Loading into the truck bed deserves the same discipline as the rest of the process. If you are using a ramp, align the dolly with the bed edge and ease the washer onto the ramp with a straight, evenly distributed push. If the lift must be manual, keep the load near the body’s center of gravity and move in unison to prevent any misalignment. Do not permit the washer to tilt more than 45 degrees during this transfer; exceeding this limit risks internal component damage and can also place undue stress on the drum’s bearings and seals. Once the washer is in the bed, the team should pause briefly to verify that it is still upright, that the dolly is not entangled with the straps, and that there is no obstruction or interference with the tailgate or doors. The moment of truth arrives when you lift the appliance from the dolly onto the bed and secure it in place. At this stage, friction between the padded washer and the bed’s surface becomes a friend; it reduces sliding and dampens any minor shifts that could occur during the ride. A careful, deliberate lift from the dolly to the bed sustains control and minimizes the risk of a jolting impact that could reverberate through the drum, potentially compromising seals or internal components.
The layout inside the truck matters almost as much as the lift itself. Once the washer sits on the bed, secure it against movement with ratchet straps or equally robust ties anchored to the truck’s tie-down points. The objective is to eliminate any freedom of motion during travel. If possible, place the machine against a wall or a fixed surface so that it becomes a barrier to other items sliding back and forth. Use cushioned supports around the washer to prevent contact with the truck bed’s metal or wood surfaces—foam pads or folded blankets work well for this purpose. The combination of straps and cushioning creates a solid, inert package that will not rattle, bounce, or shift position as the vehicle moves, slows, or accelerates. You should also check that the tailgate is fully closed and latched, and that no strap endpoint or loose end can whip toward the cab or into the driver’s line of sight. The aim is to deliver a unit that appears almost as if it had been installed in the truck from the factory, with no signs of rough handling and no risk of damage to the appliance or the vehicle.
Final checks before departure are not afterthoughts; they are a crucial part of the preparation. Confirm the washer’s stability by testing whether it budges when you try to nudge it with a light but firm push. Revisit the strap anchors to make sure they remain tight and that there is no slack that could allow the washer to slip. Double-check the disconnects: no hoses, no cords, and no loose hardware that could snag or come undone on the road. It is also wise to do a quick walk-around to ensure the rest of the cargo area is clean and that the truck bed is free of small tools or clamps that could shift during travel. With the washer restrained and the area tidy, you can lean back and take a moment to acknowledge that the lift was performed with intention and care. There is a quiet satisfaction in knowing that this step, though physically demanding, was executed with a steady plan, the right equipment, and a respect for the machine’s integrity.
All along this path, the guidance you followed aligns with established safety practices and with broader guidance about handling heavy household appliances. The essential principle is consistency: take the same careful steps each time, regardless of the model or the truck. Even if you have moved washers before, revisiting the basics before every move reinforces safe habits and reduces cumulative wear on joints and muscles. Weaving together preparation, technique, equipment, and secure loading creates a reliable workflow that protects both people and property. It is a dependable sequence that makes the chapter you are reading not merely a list of actions but a shared ritual of careful practice. When the next chapter turns to secure transport and post-move checks, you will find that this foundation—clear initial steps, used with deliberate coordination—pays dividends in both efficiency and safety. The goal is not to make a single move feel easy, but to make every move feel predictable and manageable, a mindset that translates into fewer injuries and fewer damaged appliances as you navigate similar tasks in the future.
For further alignment with industry best practices on safe appliance handling, practitioners often turn to guidelines that situate appliance moves within a broader safety framework. A practical reference point is the guidance for safe appliance handling in industry contexts, which emphasizes planning, securing loads, and protecting both workers and equipment. These guidelines reinforce the idea that preparation, not brute force, drives successful outcomes when moving heavy appliances in confined spaces and variable vehicle environments. As you continue to advance through this article, you will see how those principles echo in the steps described here and how they connect to a broader set of standards that govern professional movement of large household machines. The emphasis remains the same: measure twice, lift once, secure firmly, and transport with care.
Internal resource for practice guidance: Truck Wash Industry Compliance and Emissions Regulations
Truck Wash Industry Compliance and Emissions Regulations. This internal reference offers a contextual reminder that safety practices are part of a wider operational framework. While the topic here focuses on the mechanics of lifting and loading, the underlying ethic is consistent with responsible handling in related workflows where vehicles and heavy equipment intersect with daily routines. The discipline of securing loads, selecting the right equipment, and maintaining stable, protected environments extends beyond a single move and echoes through the entire operation, from dock to destination. It is this continuity that makes the careful preparation described in this chapter relevant not only to a one-off load but to ongoing practices that aim to reduce risk, protect equipment, and support efficient, sustainable work.
As you proceed to the next phase of the article, you can carry forward the lessons of readiness and the care you have shown in preparing to lift. The following sections will build on this foundation by addressing secure transport, road handling considerations, and post-mando checks that help ensure the appliance remains in sound condition throughout its journey. The trajectory from preparation to transport represents a complete cycle: the washer is not merely moved; it is safeguarded through a sequence of deliberate, repeatable steps that reflect a prudent, professional approach to household appliance relocation. In that sense, this chapter serves both as a technical guide and as a reminder of the value of procedure-driven work in any task that involves heavy objects, sharp edges, and moving vehicles.
External resource for deeper understanding of moving appliances: https://www.consumerreports.org/appliances/moving-appliances-what-you-need-to-know-a191124/
Gear Up for the Lift: Essential Tools and Tactics for Loading a Washing Machine into a Pickup Truck
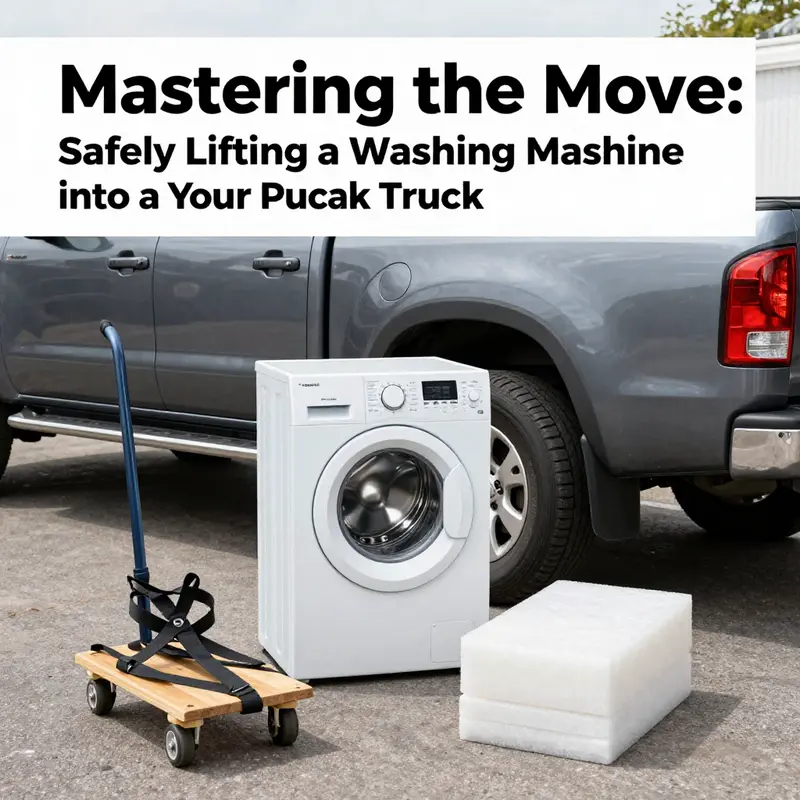
A washing machine is built to endure cycles and spins, not rough handling in a truck bed. Yet with careful preparation and a smart set of tools, the move from curbside to tailgate becomes predictable, manageable, and safer for both you and the appliance. This chapter threads together practical equipment with a calm, methodical approach, showing how the right gear turns a potentially awkward two-person dance into a routine operation anchored by balance, leverage, and restraint. The essentials you gather before the first lift will color every moment that follows, shaping not only the outcome but your confidence while you work. The goal is not simply to get the washer into the truck; it is to protect its delicate interior bearings, drums, hoses, and seals while keeping your own spine intact and your grip steady throughout the process. When you step into the task with a coherent toolkit, you reduce guesswork and elevate safety in a way that feels almost effortless, even as you negotiate weight, friction, and space constraints.
Begin with a mindset of preparation rather than impulse. The work begins long before the machine leaves the curb. It begins with choosing the right tools and examining the environment where the lift will occur. A moving dolly or hand truck sits at the core of the operation, a platform that converts a stubbornly rigid appliance into a wheeled, navigable object. The dolly’s wheels must be sturdy, ideally with rubber treads and a low profile, because a high center of gravity on rough pavement or a protruding curb edge invites wobble and risk. A good dolly gives you rolling stability, which is a prerequisite for anything more complex than a straight push. Yet even with a dolly, momentum must be controlled. The plan calls for a ramp or at least a safe bridge between ground and truck bed—something that can be driven onto rather than lifted over. If you don’t have a dedicated ramp, solid, level planks can serve in a pinch, but the safest option remains a purpose-made foldable ramp that accommodates the washer’s width and the dolly’s chassis.
The list of must-haves continues with high-strength tie-down straps or ratchet binders. Once the washer is in the bed, you need to prevent shifting during transit. Straps that bite securely into fabric or strap material prevent the machine from stepping one inch to the left or right, and they also create a boundary that keeps you from over-tightening and risking distortion. When you secure the washer, you’re not only protecting the appliance; you’re also preserving the truck’s payload geometry, which affects handling in corners and on uneven pavement. Foam padding or blankets are your second line of defense for finish and interior components. Wrapping the sides and corners keeps metal from rubbing against paint, and it cushions any micro-movements that might occur during bumps on the road. Bubble wrap, if available, adds an extra layer of protection around exposed edges and hoses that might vibrate loose if left unprotected. These layers of cushioning are not a cosmetic touch; they are a practical safeguard against scratches, dents, and fragile internals that could suffer from even small impacts.
The gloves and lifting gear you choose are more than fashion. A pair of sturdy gloves protects the hands from pinch points and the metal edges of the washer and dolly. A back support belt is a prudent inclusion if you’ve had any history of back strain or if the appliance’s weight makes the lift more strenuous than a typical day’s chore. The belt doesn’t replace proper lifting technique, but it acts as a reminder to keep the core engaged and to distribute loads more evenly through the hips and legs. When you pair gloves with a belt, you’re aligning your body’s mechanical advantage with the task’s demands, which often translates into a smoother, less exhausting lift.
A non-slip mat or pad under the washer once it rests in the truck bed resolves a very real problem: sliding. Truck beds can be slick when you move a heavy object onto them. A rubber mat, a piece of heavy-duty fabric, or a non-slip pad provides a friction layer that helps keep the washer from sliding during acceleration, braking, or minor road irregularities. It’s not glamorous, but it is effective, and it reinforces a simple principle: every contact point between appliance, dolly, and truck bed should be treated as an anchor rather than a slip risk.
To integrate all these tools into a smooth workflow, you must first clear and inspect the space. The truck bed should be clean and free of debris, with a stable, level surface. Rough surfaces or lingering grit create an uneven foundation for a rolling load and increase the chances of a sudden tilt. A quick sweep and a wipe-down remove obstruction and reduce the possibility of abrasion. If the bed has ridges, you’ll need to position the dolly so the weight rests on flat areas or use padding to bridge gaps. The washer itself demands a measure of respect: you should know its weight distribution, where the drum is mounted, and where the hoses and electrical components are concentrated. A mental map of the appliance helps you place the dolly with the drum centered over the wheelbase, minimizing the chance of tip-back when you begin to roll up and into the truck bed.
With the space prepared, you’re ready to align the equipment. The dolly is loaded with the washer as you might load a stubborn suitcase onto a travel cart: the front wheels engage first, then the rear wheels. The loader should observe two essential practices: turn the dolly’s handle away from the washer to maximize control, and keep the washer’s center of gravity aligned with the dolly frame. As you roll toward the ramp, you maintain a steady rhythm, letting your legs do the lifting work rather than your back. Even with a dolly, this step benefits from two pairs of hands. One person guides the machine, the other person stabilizes the dolly’s frame and ensures the wheels stay on the ridgeless stretch of the ramp. This is not the moment to improvise with a single, awkward shove. A measured, coordinated effort dramatically reduces risk while improving predictability of the machine’s ascent.
The moment you reach the edge of the truck bed is when you shift into a second mode of focus: positioning and loading. The washer should sit close to the tailgate or bed lip, but not so close that you’re forced to lift at an extreme angle. The goal is to minimize the angle of ascent, which in turn reduces the torque placed on the drum’s mounting and seals. If you can manage a slight incline, that is ideal, because gravity assists the forward motion instead of fighting you. The transition from dolly to truck bed should feel like a single, continuous motion rather than two separate lifts. When you roll the washer onto the bed, keep the drum’s axis parallel to the ground, with the top of the machine facing inward. The lift should be a calm, controlled succession of small movements rather than a dramatic, forceful surge.
At this point, you may consider using a ramp of reasonable length to get the washer up without overstressing any joints. A foldable ramp is a worthy addition to any tool crib because it converts a potentially heroic lift into a measured, gliding transfer. If you are using a ramp, make sure it is secured at both ends; a loose ramp is a hazard as the dolly tires seek to drift off the surface. The wheel engagement on the ramp must be consistent, with the dolly experiencing uniform contact from start to finish. Correct alignment here matters as much as the initial lift because you want to avoid any side shift that could pinch hoses or misalign the drum. As soon as the washer is inside the bed, you switch to a securing phase. The straps or tie-downs are laid out in a cross pattern to hold the appliance toward the anchor points. The cross pattern distributes any movement evenly and prevents the washer from pivoting during transport. Use the straps to snug the washer down gently rather than cranking them tight in a way that could deform the cabinet or compress hoses. If you notice any wobble after the first strap is tightened, place a cushion under the location that moves and re-tighten. Sometimes a second layer of padding can stop micro-motions that would otherwise become travel hazards over long distances.
The remaining minutes of preparation are critical. A quick stroll around the vehicle to confirm the straps’ bite points, the blanket layers, and the mat’s placement ensures you have not overlooked a single potential problem. Double-checking is a small, budget-friendly habit that pays off in fewer surprises once you’re underway. If you’ve managed to secure the washer with sensible tension and symmetrical padding, you’re ready for the final checks: confirm the lid is latched, hoses are stowed or disconnected as appropriate, and the power cord is secured to avoid catching on the tailgate or bed rails. If the washer has transport bolts, reinstalling them before loading is prudent; they limit drum movement during transit by stablizing the interior. Having re-checked all connections and fasteners, you can take a step back and survey the operation with a calm, confident perspective. The task has not been rushed; it has been rehearsed in small, deliberate moves that align weight, space, and control.
An essential but sometimes overlooked element is the mental model you bring to the lift. You’re negotiating a space that is not designed for moving heavy, awkward machines. The more you anticipate friction and mitigate it with the right tools, the less you will feel at the mercy of a stubborn appliance or a shifting load. If you keep the motion slow and deliberate, your body remains the primary instrument—hips bending, knees bending, abdominals braced—while your arms guide the dolly with gentle steering. The weight on the dolly should feel steady, not like it is fighting to tip or buck anywhere along the path. If the drum feels sloshy or the machine makes a tight turn, pause to re-center the load. Small adjustments now prevent bigger challenges later, especially on an uneven driveway or when a corner requires a tight turn into the truck bed. As you move, you’ll notice the difference between brute force and orchestrated effort. The difference is not just the absence of strain; it is the sense of command you feel when you are in control of momentum, contact points, and balance.
Once the washer is inside the bed, the process moves from motion to stabilization. The belongings of the truck bed, the pad, the blankets, and the straps form a quiet, layered defense that keeps the washer from shifting during road vibrations. The internal checks you perform here are simple, practical, and repeatable: ensure the appliance sits level relative to the bed, verify there is no contact between metal and paint except where intended, and confirm the door or lid remains closed and secured. If the truck will be driven over rough streets or long distances, consider placing a second layer of padding around the sides to absorb any prolonged vibrations. You want to craft an environment in which every component of the washer remains in its intended orientation, with no harmful pressure points that might damage the drum, seals, or hoses.
The final step is to reflect on the entire operation and draw parallels to broader safety habits. It is possible to approach any heavy-lift task with a plan that extends beyond a single moment of endeavor. The approach you apply here—planning, tool selection, space preparation, incremental lifting, careful loading, and secure fastening—serves as a blueprint for nearly any similar task. It is a practical discipline that can be transferred to other out-of-reach items in the home or in a workplace, where careful deployment of equipment and measured, collaborative effort reduce risk and improve outcomes. And it is worth noting that safety guidelines from recognized authorities reinforce this approach. For a broader context on safe appliance handling, refer to the official guidance provided by safety resources, which emphasizes planning, proper equipment, and respect for the unique geometry of each appliance.
As you finish the operation, you’ll realize the tool collection wasn’t a vanity project but a map of safety and efficiency. The dolly, the ramp, the straps, the blankets, the gloves, the belt, and the pad all function like instruments in a well-tuned orchestra. Each contributes to a single, cohesive performance in which the washer moves from curb to truck bed with grace rather than force. The effectiveness of the entire undertaking rests on a simple truth: the work is safer and more predictable when the tools you rely on are chosen for their compatibility with weight, friction, and space. In the end, you don’t just transport a washing machine; you translate a difficult physical challenge into a sequence of controlled steps, guided by a toolkit that makes sense for the task at hand. This is the practical core of any reliable moving job, and it begins with the right tools, thoughtful preparation, and a steady, measured pace.
For a quick reminder of the ongoing relevance of equipment care in moving tasks, you can connect to related operational practices that keep trucks and their loads in good shape. And if you want a concise checklist that mirrors the ethos of this chapter, the phrase to hold in mind is simple: prepare, protect, perform, and protect again. That last protection is not just for the washer—it is for you and anyone else who shares the workspace. When you treat the lift as a collaborative process, the risk of injury or damage declines, and the experience becomes less intimidating and more repeatable. In other words, you’re not just moving a machine; you are cultivating a method that can be revisited, refined, and ultimately shared with others who need to move heavy appliances with confidence.
Note: The internal cross-reference to related materials emphasizes practical maintenance practices and safety culture in vehicle handling. For those who want to explore a broader context of trailer and vehicle readiness, consider reviewing the linked resource on trailer maintenance as part of your pre-move routine: importance of regular trailer maintenance. And for a comprehensive external reference focusing on safe appliance transportation, see: How to Move a Washing Machine.
Hoist with Care: A Safety-First Path to Loading a Washing Machine into a Pickup Bed
When a heavy appliance has to move from a curbside floor to the pickup bed, the task quickly shifts from a routine chore to a deliberate act of balance, leverage, and respect for mechanical limits. The goal is not merely to get the washer into the truck but to do so in a way that protects the machine’s delicate internals, preserves the safety of the people involved, and preserves the integrity of the vehicle. This chapter weaves together the practicalities of space, weight, and technique with the quieter, often overlooked rhythms of preparation and rhythm—how one breath, one stance, one well-placed dolly wheel can make the difference between a smooth transition and an afternoon of back strain or dented metal. To approach this task well is to acknowledge that an invisible ledger is being settled: the washer’s drum, seals, and bearings owe their longevity to disciplined handling, while you owe your body a clear plan and a measured pace that never pretends gravity can be defeated with hustle alone. The following narrative offers a cohesive, safety-forward path that begins long before the first contact with the appliance and ends only after the last strap is cinched and the tailgate is secured. It is a map for moving with intention rather than speed, and it remains firmly anchored to the critical idea that care yields efficiency in the long run.
Preparation is not a separate act but the silent backbone of the entire operation. Emptying the machine is not merely about lightening the physical load; it is about removing the potential for spillage, slipping, and horizontal chaos inside the truck bed. Before any lifting begins, ensure the washer is completely free of clothes, detergent, and fabric softener. Drain any residual water by disconnecting the drain hose and allowing the tub to vent to the environment rather than pooling inside the drum. If your model has a built-in drain pump, run a brief cycle to expel any last vestiges of water, then wipe the interior dry to a polished, still sheen. The goal is to leave the interior as bare as possible so that the drum’s inertia is predictable and not armed with a reserve of water that could slosh, shift, or surprise you when the vehicle begins to roll.
Next, disconnect power and water with a measured hand. Unplug the washer from the electrical outlet and close the water supply valve. Remove hoses, and coil them neatly so they cannot snag on a corner or tangle with a leg of the dolly. When hoses are left dangling, they invite leaks and cordoned fingers in the same breath; proper stowage reduces the risk of a sudden tug or a partner’s misstep. If there are transport bolts on the back—those stout little anchors designed to hold the drum steady during transit—reinstall them. They lock the internal components in place, mitigating the risk of a drum collide with a sudden jolt that could echo through bearings and seals. The act of engaging transport bolts is not a ritualistic flourish; it is a deliberate decision to respect the machine’s internal geometry.
With the washer unburdened and secured, gather the essential tools that will neither overpromise nor underdeliver. A moving dolly or hand truck with large, sturdy wheels becomes the bridge between ground-level stability and the truck bed’s vertical challenge. Straps or ropes of high strength are your anchors, chosen not for flash but for the predictability of their grip. Foam padding, blankets, or bubble wrap soften edges and corners to spare both metal and paint. A non-slip mat or a tarp on the truck bed creates a friction field that reduces shifting and scratches when the machine finally lands. The rule of thumb is simple: a well-padded surface and solid restraints are cheaper than a rushed save that ends with a dented washer and scuffed paint.
As the plan takes shape, the space itself begins to dictate the tempo. Before lifting, take a careful inventory of the truck bed. Measure your washer’s height, width, and depth against the available space and allowance for the dolly’s footprint. Confirm there is enough clearance for your route—from the driveway to the tailgate, and from the tailgate to the bed’s interior. Clear the truck bed of debris, nails, or any sharp object that could nick a panel or puncture a strap. A clean stage reduces the number of improvisations you must perform and keeps your attention fixed on the process rather than on minor hazards. The path should feel like a smooth line on a map—flat, unobstructed, and predictable. If the route involves a grade or a curb, plan for it with a ramp or a sturdy wooden plank to even the transition. In the mind’s eye, you are not racing up or down a small hill; you are following a deliberate corridor that respects the washer’s weight distribution and the truck’s geometry.
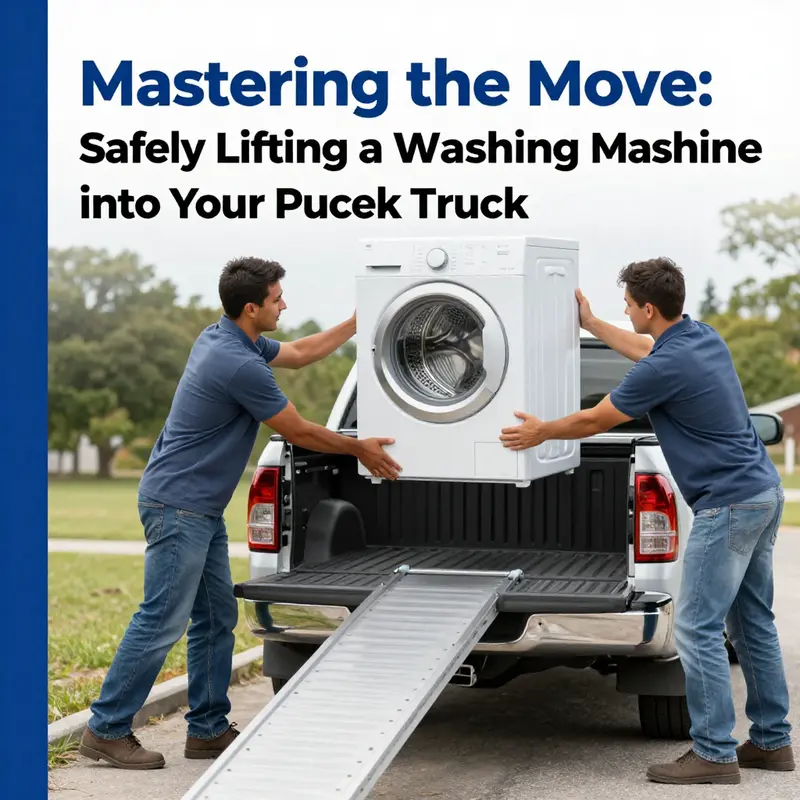
The moment of lift is the heartbeat of the chapter. Use two people and anchor your stance in a shared, quiet sense of purpose. Begin with a safe, firm grip that engages the entire surface of the washer rather than a precarious hold on a single panel or corner. Place hands on the sides or bottom of the outer casing in a way that distributes the load evenly. It is not the front panel where delicate plastic components or control boards lie that you should grip most securely; those are the weak points that invite damage if you misjudge the weight shift. Keep your back straight and your core engaged, and bend at the knees rather than the waist. The legs, not the back, provide the power to rise. Lift in a smooth, controlled arc, keeping the object close to your body to preserve balance and reduce the leverage that multiplies a back strain. Avoid twisting or turning the torso mid-lift; if you must change direction, pivot your feet and move the feet as a unit.
For heavier models, a dolly becomes more than a convenience; it becomes the central axis around which the entire maneuver rotates. Roll the washer onto the dolly with careful alignment, ensuring the wheels are under the center of gravity and the load sits evenly on the platform. A secure placement is essential; if the washer sits too far forward or too far back, the dolly will respond with unplanned wobble that can escalate into a fall. Once on the dolly, perform a final check of balance and strap the unit to the dolly if available. The dolly’s purpose is not simply to move weight; it is to transform the vertical task into a controlled horizontal movement that your legs and arms can sustain without compromising posture. When you push toward the truck bed, keep the dolly’s wheels aligned with the path and maintain a slow, steady pace. Quick, jerky motions invite the possibility of tipping or losing control, especially on uneven surfaces.
Positioning for loading is a choreography of angle and intention. Approach the edge of the truck bed with the dolly aligned to a gentle incline. If a ramp is available, use it; if not, a stable plank can serve as a temporary lift, provided it is wide, non-slip, and supported at both ends. The aim is to achieve a transition where the washer slides onto the bed with minimal resistance and no abrupt acceleration. Roll the washer toward the bed, paying attention to any wobble or resistance from the wheels. When you’re ready to transition from the dolly to the truck bed, coordinate the lift with your partner so that you lift smoothly and in unison. Avoid lifting straight up for an extended period; instead, perform a short, controlled lift onto the bed, then settle the load so it sits securely on non-slip padding.
Inside the truck bed, the work shifts from a dynamic lift to a session of restraint and stabilization. Lower the washer onto a prepared surface of foam blocks or blankets, ensuring it remains upright as you settle it into position. The goal is not to park the appliance at any tilt but to place it with its axis vertical and its weight evenly distributed. If the bed is narrow or the space around the machine is tight, consider placing the washer against a side wall so it becomes less likely to roll during transit. This is where the non-slip mat plays a critical role. It acts as a friction buffer, preventing shifts when the vehicle begins to move. Once the washer rests where it should be, secure it with straps attached to the truck’s tie-down points. Run the straps over the top of the machine and snug them down, but do not overtighten. The aim is a firm hold that resists movement yet preserves the washer’s exterior and inner components. If you can, place foam or blankets between the washer and the truck bed’s interior walls to absorb minor impacts and keep the surface from becoming marred by vibration.
The act of securing is not an afterthought; it is the moment when confidence solidifies into safety. Check that the machine remains upright, that the straps are tight, and that there is no visible way for the washer to shift during motion. A gentle shake test—tiny, controlled, and with a watchful eye—can reveal hidden slack that could turn into a problem at highway speed. Ensure the power is completely disconnected and that the electrical inlet is protected from pinching or rubbing against metal edges. Finally, close the tailgate and confirm that it latches securely. A tailgate that pops open mid-journey is the last thing you want on a road where every inch of distance could be a risk. The entire sequence—from preparation to final restraint—should feel like a well-rehearsed routine in which every step has a clear purpose and a specific outcome.
Beyond the mechanical steps, there is a philosophy that underpins success in this kind of task. It is a discipline of pacing and awareness, a refusal to cut corners when a single moment of rushed decision could undo hours of careful planning. When you treat the lift as a process with measurable stages—emptying, disconnecting, padding, lifting, loading, and securing—you create a reliable framework that can be repeated with different appliances and in different trucks. This mindset matters not just for the act itself but for the broader culture of safety in any fleet operation. The same logic that governs the careful handling of a washing machine will apply to many other tasks that involve heavy loads and fragile equipment. By internalizing a method that prizes controlled movement, attention to detail, and conservative risk-taking, you lay the groundwork for a broader safety ethic that strengthens the entire operation.
It is helpful to view this task through the lens of practical psychology as well. Fear often arises not from the weight itself but from uncertainty about the steps that precede the lift and the fear of losing balance. The antidote is a predictable routine—checklists, a partner, and clear objectives for each moment. The moment you accept that there is no shortcut through the center of this process, you will find the confidence needed to approach the task with calm and certainty. You will also notice that the actual time spent moving the washer is a small fraction of the total effort; most of the energy expended is spent on planning, protecting the surfaces, and ensuring each anchor point is ready to perform its function.
As you move forward in the sequence, it is worth anchoring a reminder to consult established safety resources. The logic here is straightforward: professional guidelines are built from years of experience, failures avoided, and injuries prevented. They represent a distillation of practical wisdom that can prevent the kind of misstep that seems plausible in a single moment but has consequences that extend far beyond the immediate task. The guidance is not ambiguous or extreme; it is conservative and pragmatic—precisely the stance that keeps people safe and keeps equipment working. If you wish to explore standardized approaches to safe appliance handling and fleet safety more broadly, you can refer to internal guidelines that emphasize consistent adherence to best practices across the team. For additional context and safety principles that underpin this chapter, consider examining our broader resources on fleet safety and emergency readiness, which echo the same emphasis on measured, deliberate action over improvisation.
The culmination of this process is a stability that can survive the travel itself. With the washer secured, the truck should feel almost inert to the driver—like a load that has found its natural resting place within the vehicle. The moment of truth comes with the first few road miles, when vibration and minor bumps test the restraints. If the load remains solid, there is little to address. If you notice any movement, revisit the straps and padding. Do not assume a single adjustment now will suffice for the entire journey; check again at each rest stop or every few miles on longer trips. The honesty of ongoing checks is what separates a cautious operation from one that invites risk.
In closing, the path from a bare curb to a secured washer in a pickup bed is a sequence defined by preparation, balance, and restraint. It rewards a measured pace, thoughtful use of equipment, and a partner who shares the same commitment to safety. The steps are straightforward, but execution requires mindfulness, a willingness to pause, and a respect for the machine’s internal architecture. A well-executed lift does not merely move an object; it preserves it, preserves the people involved, and preserves the trust that makes any fleet operation possible. If you carry this mindset into other moves—whether loading a refrigerator, a dryer, or a similarly weighted appliance—you will find that the same discipline yields consistency, efficiency, and fewer setbacks. The chapter, and the move itself, become less about force and more about precision, control, and safety—principles that travel with you long after the truck doors close and the journey begins.
Internal resource reference: For more on structured safety practices that support this approach, see our discussion on fleet safety and emergency readiness here: https://tripleatruckwash.com/fleet-standardization-emergency-response/
External resource: For formal safety standards and guidelines that underpin responsible appliance handling, consult the official safety guidelines at this external resource: CPSC safety guidelines.
Final thoughts
Successfully lifting a washing machine into a pickup truck requires careful planning, proper tools, and adherence to safety practices. By following the guidelines detailed in each chapter, logistics and freight managers can ensure that their team handles appliances securely while minimizing the risk of damage. Adopting these techniques not only protects your assets but also enhances workplace safety and efficiency.