
Maintaining a clean truck fleet is crucial for logistics and freight company managers, trucking company owners, and construction supervisors. A well-kept vehicle not only enhances the company’s image but also prevents potential maintenance issues that arise from neglect. This article will provide a comprehensive approach to washing your trucks, ensuring they remain in optimal condition. We will cover essential preparation steps, the pre-rinse process, effective washing methods for both the truck body and wheels, and final touches for rinsing and drying. This structured approach will aid in protecting the vehicles’ surfaces while reinforcing a professional appearance.
null

null
The Pre-Rinse Foundation: Why Starting Clean Sets Up a Scratch-Free, Long-Lasting Truck Wash

The pre-rinse is more than a quick spray to loosen dirt. It is the essential foundation that determines whether the rest of the wash will shine, or end in micro-scratches and dull, uneven finishes. When you think of washing your truck, imagine laying a clean canvas for the soap and mitt to work on. Without a proper pre-rinse, grit and grime ride along with every stroke of your wash mitt, acting like a tiny abrasive, grinding away at clear coats and old wax. Daniel Reeves, a Certified Detailing Technician with extensive training in surface care, puts it plainly: “Even a soft cloth can cause scratches if it traps grit. Clean tools and proper pre-rinsing are non-negotiables in safe car washing.” His words illuminate a simple truth that too many neglect: you cannot out-scrub embedded dirt. You must dislodge it first, and you do that with the right tool, the right approach, and the right sequence.
The pre-rinse is not a ceremonial step. It is a calculated move designed to minimize the risk of introducing abrasive particles into your cleansing phase. It begins with the easy part—the equipment—yet its effectiveness rests on technique and intention. Start with a high-pressure hose or a pressure washer capable of delivering a steady, controlled spray. The goal is not to blast dirt off with brute force but to loosen and carry away loose matter without forcing it into crevices or deeper into undercuts. The nozzle should deliver a broad, gentle spray when you’re over sensitive areas, and you should adjust the pressure so that it descends dirt rather than lifts and smears it. Think of the water as a conveyor belt that carries away what the mitt can’t lift on its own. This approach reduces friction and minimizes the chance that gritty particles are dragged across painted surfaces during the subsequent wash.
The second component is direction. Begin at the top and work downward, a habit that serves two purposes. First, gravity naturally helps dirt flow away from higher panels toward lower ones, where it can be rinsed away rather than re-deposited on cleaned surfaces. Second, washing top to bottom creates a natural sequence that you can repeat, keeping you organized and methodical. The roof, then the pillars, then the doors, and finally the lower panels—this order helps prevent recontamination of already cleaned areas. In practice, you’ll find this approach feels almost ceremonial, but the outcome is practical: fewer streaks, less soap need, and a smoother path for the mitt to glide across the paint without dragging sand or grit along it.
Certain zones demand extra attention during the pre-rinse. Wheel wells, undercarriages, and areas around bumpers accumulate more grime due to road spray, brake dust, and mud. These spots are where the risk of embedding grit into the paint is highest, and therefore they deserve a measured, patient pass with the high-pressure spray. You don’t need to hover in one area for long; you simply ensure that water coats the surface and carries away the loosened particles before you touch the surface with any soap or mitt. When you encounter tar, bird droppings, or stubborn road grime, your pre-rinse should still be the first line of defense. It won’t remove the stain entirely, but it will soften the surface and loosen the bound particles enough that the following wash can do its job without creating micro-scratches from trapped grit.
A practical nuance in this stage involves the cleanliness of your tools themselves. Pre-rinse your wash mitts or sponges before they ever touch the paint. If your mitt is already contaminated, you are simply moving grit from the dirt to the surface you intend to clean. A quick rinse of the mitt with clean water helps ensure that the tool you’ll rely on to lift grime is itself free of gritty contaminants. This is not a fancy extra step; it is an essential safeguard against introducing micro-scratches during the wash. The idea is straightforward: use clean water to rinse the tool, then use the rinsed tool on a surface that has been pre-rinsed and is free from loose debris.
In a broader sense, the pre-rinse is also an early diagnostic of the day’s wash. As you rinse, you can visually scan for areas that might require special attention in the following steps. A particularly stubborn patch of road grime near the wheel well, a patch of sap on the tailgate, or heavy insect residue near the grill can guide how you approach the next phase with targeted care. It’s a moment to calibrate your technique, not just a mechanical step. If you treat the body as a whole and allow the pre-rinse to inform your approach, you reduce the risk of unintended damage and improve your odds of achieving a uniform, glossy finish after the full wash.
This is where the research body’s practical wisdom comes into play. The pre-rinse is the bridge between dirt and detail, a bridge that relies on three pillars: the right equipment, the top-to-bottom flow, and the focus on problematic zones. When you combine these with a vigilant eye for tool cleanliness, you set a tone of care that will carry through the entire wash. In practical terms, this means you can skip the temptation to skip straight to soap and mitts. You will be less likely to encounter stubborn streaks after you rinse, because you began by loosening the worst of the grime rather than smearing it around with a damp cloth. It is simple, patient, and effective, and it is the foundation on which a scratch-free, showroom-worthy finish rests.
As you move through the pre-rinse, you may find a moment to reflect on the broader lesson of careful washing. The choice to pre-rinse is a decision to treat your truck with respect, recognizing that paint is a delicate surface that rewards deliberate, repeatable process. You are not just cleaning; you are preserving a vehicle’s value, its aesthetic appeal, and the pride that comes with well-kept equipment. The act of pre-rinsing, then, becomes a ritual of quality control in miniature: a brief, disciplined pause before soap and brush take over, ensuring that every subsequent step builds toward a flawless finish instead of a compromised one.
To connect this practice to broader guidance, consider how expert detailing emphasizes the same core principle: remove the worst of the dirt before applying any cleansers; use clean tools; and respect the order of operations. The pre-rinse is the first line of defense against the abrasive nature of road grime, and its effectiveness depends on attentiveness, technique, and consistent habits. The result is a smoother wash that minimizes the risk of micro-scratches and ready-to-buff shine after drying. For readers seeking further strategies that complement this approach, there are proven strategies for cleaning grease and tar off your trucks fast, a resource that expands on efficient surface preparation and targeted cleaning techniques that align well with a careful pre-rinse routine. proven strategies for cleaning grease and tar off your trucks fast.
In sum, the pre-rinse is the quiet hero of a successful truck wash. It is not glamorous, but it is indispensable. It prepares the surface, protects the paint, and helps ensure that the following steps—soap application, targeted spot work, wheel and tire cleaning, and the final rinse—achieve their best possible results. It makes the act of cleaning more predictable, more efficient, and more respectful of the vehicle you care for. Paying attention to the pre-rinse—the tool selection, the top-down progression, the careful focus on high-debris zones, and the discipline to keep wash mitts and towels free of grit—will transform a routine wash into a careful, staged process that yields superior results and longer-lasting protection for the truck’s finish. For anyone who participates in regular truck maintenance or fleet cleaning, adopting this disciplined pre-rinse mindset is the most practical investment you can make in the integrity and appearance of your transport asset. And as you move forward through the rest of the wash, you’ll find that the clean slate created by the pre-rinse makes the entire job feel simpler, more effective, and less risky to the paint you’re protecting. For those who want to explore additional insights, an external resource discusses how machine-based car washes compare to hand washing and reinforces the idea that starting with a thorough pre-rinse can influence outcomes across different washing approaches. See the linked external resource for more context: Automatic car wash vs hand wash does the machine really scratch your paint?.
Polish and Protect: Comprehensive Techniques for Washing Your Truck’s Body and Wheels
A clean truck is more than a show of care; it’s a shield for its finish and a foundation for longer life. When you approach washing as a deliberate ritual rather than a quick rinse, you gain control over dirt, grime, and the tiny threats that creep into paint if left unchecked. The body and wheels, being the parts most exposed to the elements, demand a method that respects the finish while delivering a thorough cleanse. This chapter weaves together the practical steps with the mindset that every swipe of a sponge is an investment in appearance, resale value, and structural health. The rhythm should feel less like labor and more like a practiced routine you could perform with your eyes closed after a long day, because the best results come from consistency and clean technique, not brute effort.
Preparation begins long before the nozzle pops to life. You gather what you need—an adjustable high-pressure washer, soft sponges or microfiber wash mitts, a soft-bristled brush for the wheels, a bucket of clean water, and a cleaner formulated for automotive finishes. The choice of soap matters. A truck-specific or neutral automotive soap is gentler on clear coats and waxes than household detergents. Dish soap, for example, can strip protective layers and leave the paint looking dull, especially if you wash frequently. The right cleaner lifts dirt without dissolving the protective oils that keep the finish vibrant. Location matters, too. A shaded, flat area with good drainage protects against water spots and runoff. Sun exposure can dry soap too quickly, leaving streaks and film behind. If you must wash near a surface where drainage is questionable, place a shield or lay down a clean mat to direct runoff away from soil and grass. With the scene set, you move into the careful, almost meditative act of cleaning.
The first contact with the truck should be a thorough pre-rinse. A high-pressure rinse from top to bottom—not just a quick spray—lofts away loose dirt, dust, and mud that would otherwise act like sandpaper during the wash. Start at the roof and sweep downward. This top-down flow prevents soiled water from dragging across pristine areas. It’s tempting to jump straight to soap, but that initial rinse reduces the risk of micro-scratches by removing particles that could grind into the paint if agitated by a mitt or brush. When the water drains away, you’re left with a clearer canvas on which the soap can work its magic.
Next comes the choice of cleaner and the careful application that defines a successful wash. Mix the cleaner in your bucket according to the manufacturer’s directions, then immerse your sponge or wash mitt. Begin at the roof again, applying the soapy solution in gentle, overlapping strokes that move downward in small sections. The soap should be allowed to work on the surface for a moment, but not so long that it dries before you rinse. This is where the top-down philosophy earns its keep: lingering soap on the upper panels would otherwise run down onto already cleaned sections, potentially leaving streaks and requiring a second pass to maintain consistency. For stubborn grime—tar, bird droppings, or decades of road grime—a soft brush can be employed. The key is gentleness; a soft-bristled brush is forgiving and minimizes the risk of micro-scratches that harsher tools might cause. If you come across say, a stubborn spot, treat it with a light touch rather than applying brute force, and rewash the area if needed. In fact, many experienced wash enthusiasts keep a small bottle of a targeted degreaser on hand for such instances, applying it directly to the spot and allowing a short dwell time before a careful scrubbing. There is a balance between patience and efficiency, and that balance emerges from repeated practice.
As you proceed, you’ll notice the ease of maintaining a fresh solution on the mitt matters. Re-dip as needed, but avoid ponding soap on the panels for extended periods; the soap should stay fluid and actively lifting dirt instead of drying into a film. When the surface begins to look clean, perform a thorough rinse again with the high-pressure wand. This second rinse ensures all soap and loosened debris wash away. If any residue remains, a follow-up rinse can prevent dull patches or water-spotting from minerals in the water. The importance of a complete rinse cannot be overstated, since residue acts like a magnet for new dirt and dust that will cling to the finish as soon as you step back from the truck.
Drying is not an afterthought but a crucial step that preserves the gloss you’ve spent time building. Don’t let the vehicle air-dry in the sun, where sunlit water beads can leave spots that are tedious to remove later. Immediately dry the body with a clean microfiber towel or a chamois, working from the top down. This sequence mirrors the wash itself and helps prevent water spots by catching moisture before it has the opportunity to pool. A soft drying method also reduces the risk of dragging minerals across the paint, which, over time, could contribute to micro-marring. If you encounter heavier drips or water beading in recessed areas, a secondary pass with a dry towel will bring those corners to a pristine finish without forcing more friction on the paint.
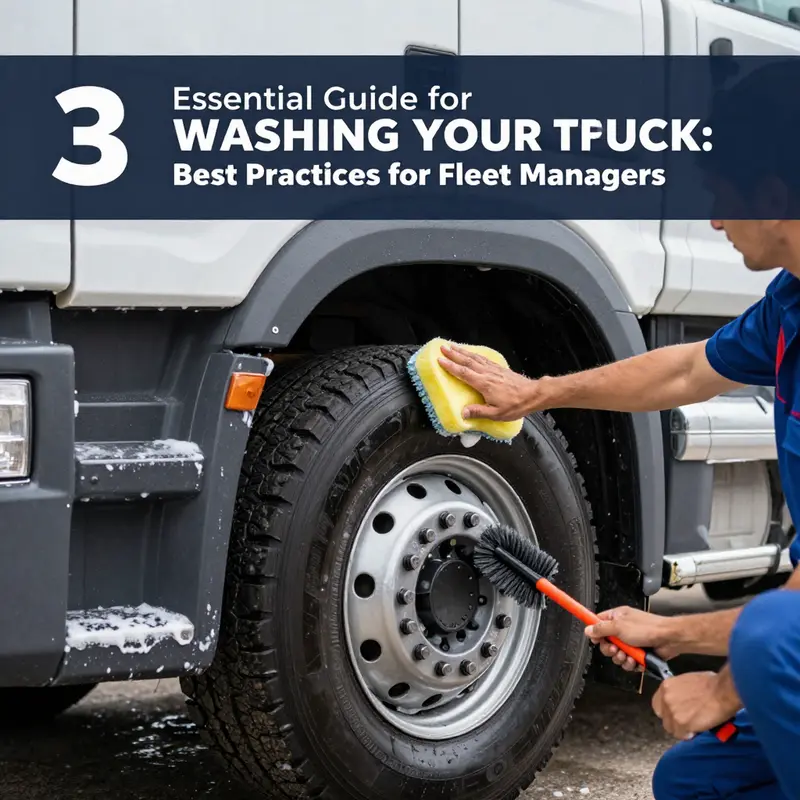
While the body receives most of the attention, the wheels and tires require a different approach because they accumulate brake dust, road grime, and oil that cling tenaciously. A separate pre-rinse for wheels helps loosen brake dust and caked grime before any cleaner is applied. Use a dedicated wheel cleaner—one formulated to break down brake dust and grease without harming rubber or wheel finishes. This is not a time to improvise with a general cleaner, since wheels demand products designed to handle harsher contaminants without risking corrosion to the rims. Apply the cleaner directly onto the tires and rims, and let the product do the heavy lifting for a moment. Then turn to the wheel brush, ideally a stiff-bristled tool robust enough to scrub the inner rims and deep grooves where grime hides. The grooves in the tires and the crevices around the brake dust colonies are where you’ll gain the most improvement; a thorough agitation helps lift embedded material that a rinse alone cannot remove. Rinse thoroughly again, ensuring no cleaner remains on the wheel surfaces where it could degrade the protective coatings on the rubber or finish on the rims.
Drying the wheels separately with a clean towel helps prevent water spots on the metal components. It’s easy to neglect this step, but water spots on wheels can be stubborn and detract from the overall look. The practice of keeping a second towel dedicated to wheels minimizes cross-contamination of any residues that might transfer from the rims to the painted body and vice versa. A small, dedicated tool kit for wheels—brushes, towels, and a wheel cleaner—helps keep your washing routine efficient and focused. As with the body, avoid aggressive scrubbing. Gentle, confident strokes with the right tools will yield a better finish without risking scratched chrome, painted accents, or matte finishes.
After the body and wheels have dried, the wash season isn’t quite finished, but the maintenance phase takes on a different tone. A wax or sealant can provide a protective layer that not only enhances shine but also repels water and makes future washes easier. This optional step becomes an investment in long-term upkeep, helping prevent minor swirl marks and making dirt have a smaller grip on the surface during subsequent washes. Even if you decide not to apply a protective layer every time, a periodic wax or sealant can be a wise choice, especially if you drive on rough or salty roads where the finish endures daily exposure to harsh elements. The goal is not only cleanliness in the moment but a lasting shield that keeps the truck looking newer longer.
In this flow, there is room to acknowledge the nuanced decisions that arise when you wash with a fleet mindset or a personal habit. For instance, some practitioners emphasize technique over tools, focusing on the order of operations, the spacing of passes, and the constant habit of topping up clean water and fresh soap. Others lean into the specifics of wheel care, recognizing that the brake dust found on wheels is not equivalent to ordinary road grime and may respond better to a double-clean or a separate set of brushes. The best approach is a balanced one: follow the standard steps for the body and wheels, respect the finish, and adapt when you encounter unique contaminants. If you want to explore more refined techniques, you can consult proven strategies for cleaning grease and tar off your trucks fast, which offers targeted tips for stubborn deposits while preserving surface integrity. Proven strategies for cleaning grease and tar off your trucks fast
Beyond the practical steps, the mindset you bring to the wash matters. Treat the process as a maintenance ritual rather than a chore. Move slowly, breathe, and keep your tools organized so you can maintain a steady cadence. Resistance to rushing is not stubbornness; it’s a strategy that reduces the likelihood of mistakes that could scuff paint or injure sensitive components. If you’re a fleet operator or a weekend warrior who wants the truck to look consistently sharp, set aside time for a regular wash schedule. The payoff is not only aesthetic; paint that stays clean longer resists oxidation and fading, while well-maintained wheels resist corrosion and brake dust buildup that can compromise braking performance and heat dissipation.
Finally, think about the environmental and safety aspects. Always work in a location with good drainage to prevent soapy run-off from contaminating soil or waterways. Protect electrical components and sensitive areas by avoiding direct spray into engine bays or electrical housings. When you do need to give the engine compartment a quick, cautious wipe for a dusty finish, use a damp cloth rather than a spray, and never direct a high-pressure stream at the engine itself. If you live in regions with strict environmental rules, be mindful of the runoff and use water-recycling wash bays or equipment that minimizes waste. The goal is to leave the road cleaner and not to introduce new hazards into the ecosystem or the vehicle’s critical systems.
As you read this, you may realize that each stage links to broader considerations about how you maintain a truck for the long term. The body wash protects the paint’s integrity and gloss, while the wheel wash preserves the mechanical aesthetics and helps keep the braking surfaces clear of stubborn grime. This integrated approach aligns with the broader practice of careful fleet maintenance and the professional standards that guide how trucks are kept in top condition. If you’re seeking additional context on how maintenance practices fit into fleet operations, you can explore related resources on facility management for truck wash businesses, which offers deeper insights into how regular cleaning routines translate into efficiency and reliability across an operation. (Internal link: https://tripleatruckwash.com/facility-management-for-truck-wash-businesses/)
To close this section, the methods for washing the body and wheels should feel like a single, cohesive routine rather than a collection of discrete tasks. The aim is a clean finish, protected by thoughtful technique, supported by the right cleaner, and executed with care for the surfaces and components that make the truck function at peak performance. When done correctly, the appearance of the truck mirrors the meticulous maintenance that keeps its mechanicals healthy and its value preserved. The drive that follows a proper wash becomes smoother, and that smoothness is a small but meaningful reward for investing time and attention into the process. For further guidance and nuanced perspectives, you may refer to authoritative sources that summarize best practices in washing trucks and maintaining their exterior without compromising the finish. For deeper reading, consider the linked external resource on technique and safety in a comprehensive automotive care guide: https://www.caranddriver.com/ownership/a40897882/how-to-wash-your-truck/.
Final Rinsing and Drying: The Subtle, Science-Backed Finishing Touch That Preserves a Truck’s Shine

The final acts of a thorough wash are often the most overlooked, yet they are the guardians of that deep, reflective shine. Rinsing and drying are not mere aftercare; they are the decisive steps that prevent water spots, mineral deposits, and the dulling of clear coats. When done with care, the truck looks showroom-clean long after the soap has dried, and the paint remains protected against the microscopic wear that can accumulate from residual residues. After the work of scrubbing and degreasing, the rinsing phase acts as a final sieve, washing away loosened dirt, soap film, and every trace of debris that could otherwise etch into the finish. The drying phase then seals the result, locking in that clean appearance while minimizing the chance of streaks or micro-scratches. This is where technique matters as much as effort, because the difference between a flawless finish and a shallow, spotty one often comes down to how you rinse and how you dry.
Rinsing is more than a quick spray to rinse off foam. It is a deliberate, top-to-bottom process that uses the strength and precision of a high-pressure rinse to carry away contaminants that have loosened during washing. Start at the roof and work downward, keeping the nozzle at a steady distance so you don’t force water under seals or into cracks. This top-down approach reduces the chance that dirty water from the lower panels runs back onto surfaces you’ve already rinsed, which can create micro-streaks that spoil the overall look. The hose or rinse wand should be selected for its pressure range and spray pattern, but the goal is consistency: a uniform flow that covers every surface without turning the wash into a pressure wash that risks forcing water into gaps and crevices. Pay extra attention to problem zones where grime tends to gather. Wheel wells, undercarriages, and around trim joints are notorious for harboring road dust and brake residue. Although these areas were treated during washing, their stubborn deposits can cling on, requiring a deliberate pass with a slightly longer, steadier rinse to ensure nothing lingers.
The ritual of rinsing also serves a practical purpose: it ensures that any residual soap, degreasers, or cleaning agents are fully flushed away. When soap film dries on the surface, it can leave a hazy, dull cast and, in some cases, interfere with the bonding of wax or sealant later on. The final rinse should be generous, thorough, and free of angle-driven shortcuts. If you notice water sheeting off the panels in a single, smooth motion, you’re likely rinsing effectively. If instead you see tiny beads or streaks forming as the water dries, you may need a more deliberate pass over those areas or a slightly longer rinse duration. In environments with very hard water, the risk of mineral deposits increases, making the timing of the rinse crucial. In such cases, consider the sequence of rinsing passes to ensure every surface is flushed before the final drying begins.
As the water recedes, drying becomes the moment when the shine is preserved and the finish is protected from micro-scratches. The best practice is to dry immediately after rinsing. Allowing water to linger invites mineral spots, which in sunny conditions can bake onto the paint and become nearly impossible to remove without compounding. The hero of drying is the microfiber towel—soft, lint-free, and highly absorbent. A premium automotive microfiber towel is designed to lift and trap moisture without dragging abrasive particles across the paint, which can happen with old rags or cotton towels. The idea is simple: use clean, dedicated towels, and separate those used for drying from any towels that may have picked up grit earlier in the wash. This is where the dual-towel system truly shines. One towel is employed to remove the bulk of the moisture, moving with a smooth, deliberate motion from top to bottom. The second towel then acts as a finish buff, absorbing residual moisture and smoothing the surface to a uniform gleam. This two-step approach helps prevent water spots and ensures a more even finish after every rinse.
The top-to-bottom drying motion, starting from the highest panels and moving toward the lower sections, is more than habit; it is scientific principle at work. When moisture is left to dry on the surface, it can leave tiny, mineral-encrusted spots in direct sunlight or on textured surfaces such as the edges of trim and around weather-stripped windows. A careful, continuous wipe across the roof, pillars, hood, and finally the bumper prevents this. The drying process is also a good time to check for hidden streaks or missed spots—areas where water clings to the seams, around door handles, or in the corners of panels. A quick, thorough pass with the microfiber can save the appearance from dulling. If you encounter stubborn water beads around trim or in the wheel wells, a gentle pass with a lightly dampened microfiber can remove them without introducing new scratches. The keystone is attention rather than speed; calm, deliberate strokes produce the best, most uniform finish.
Beyond the act of drying, a well-executed rinse-and-dry routine sets the stage for future maintenance. A high-quality rinse removes not only surface dirt but also the residues left by foams and cleaners that could, over time, dull the color or affect the adhesion of wax. When the truck emerges from the final rinse, the reflection should be crisp, the paint depth visible, and the overall look should carry a smooth, continuous sheen. In the context of maintenance, the drying phase is also the moment to consider protective options. A wax or a sealant applied after drying can add a protective layer that repels water and resists contaminants, extending the life of the finish between full washes. The choice of product is a topic unto itself, but the principle remains consistent: a protective layer is most effective when the surface is clean, dry, and free of residual contaminants that could compromise adhesion.
To expand the practical toolbox a bit, those who wash vehicles regularly may choose to invest in a premium car wash kit. Concentrated shampoos designed for trucks, complementary microfiber tools, and durable wash mitts build a predictable, repeatable routine. Such kits reduce the guesswork and help maintain consistency across washes, which is especially valuable for fleets or for owners who wash their trucks on a monthly cadence. For operators seeking additional convenience, an in-bay automatic system or a touchless truck wash can offer a balance between efficiency and cleanliness. These systems rinse with high-pressure jets and detergents, minimizing physical contact with the paint while delivering consistent results. Although automatic systems are not a universal substitute for hands-on care, they can be appealing for frequent wash cycles or for achieving uniform cleaning across multiple vehicles.
As you incorporate these practices, remember the care you take in rinsing and drying reverberates through the truck’s appearance and longevity. A meticulous rinse eliminates the last traces of soap and loamy residue that dulls color and invites future staining. A careful, immediate dry locks in the shine and prevents the formation of water spots that can mar a finish over time. The synergy between these steps—thorough rinsing, deliberate drying, and optional protective treatments—creates a durable, glossy surface that stands up to sun, road grime, and the elements. It is here, in the quiet rhythm of rinse and dry, that the most visible return on attention to detail reveals itself.
For those who want to explore further refinements while maintaining a practical scope, consider the notion of problem-specific approaches. A stubborn film of grease, tar, or industrial grime may require targeted pre-treatments before the rinse. In those cases, the broader practice remains the same: apply the specialty product to the spot, allow it to dwell for a few minutes, then rinse thoroughly. The effectiveness of these spot treatments depends on the rinse that follows—if any residue is left behind, it can undermine a flawless finish. The idea is not to rush the rinse or to skip the finishing pass; rather, it’s to integrate a focused step into the overall cycle so that the final appearance remains unblemished after every wash.
As you wrap up the rinsing and drying, you may also think ahead to the next wash. A well-documented routine enables you to anticipate how different weather conditions or water hardness will affect your process. If you know you’ll be dealing with particularly mineral-rich water, you might plan an extra thorough final rinse or a shorter exposure time to avoid mineral deposition. If you anticipate strong sunlight immediately after washing, you may choose to dry sooner, or you may work in a shaded area to prevent rapid drying that can leave streaks while you’re finishing the wipe-down. The goal is consistency and care, not speed alone. In practice, this means building a routine that remains effective across seasons and varying water quality, so the truck’s finish remains resilient and visually striking with each wash.
To connect this guidance with practical resources, many shops and experienced drivers lean on proven strategies for cleaning grease and tar off your trucks fast. These targeted approaches complement the rinse-and-dry sequence by providing efficient, surface-safe ways to handle stubborn spots without compromising the overall finish. Proven strategies for cleaning grease and tar off your trucks fast is a concise reference for spot work that integrates smoothly with the routine outlined here, ensuring you can handle exceptions without derailing the method for the rest of the vehicle.
In the end, the rinse-and-dry routine is the quiet workhorse of truck aesthetics. It is where science meets craft: the physics of water sheeting and the art of unblemished, glossy paint. When you do it with intention—rinsing from top to bottom, focusing on the hard-to-clean zones, drying immediately with clean microfiber towels, and applying a protective layer when appropriate—you preserve not just color and gloss but the integrity of the clear coat itself. You build a habit that pays dividends in reduced maintenance, a longer-lasting shine, and a truck that looks better for longer, even after many miles of road exposure. The final touch is not merely about looking good; it is about respecting the vehicle’s finish and the investment you’ve made in keeping it in top condition. As such, practicing a careful rinse and dry is not an optional flourish, but an essential discipline of responsible truck care.
External resource: Understanding Automatic Truck Wash: Grades, Properties, and Engineering Applications. https://www.greenshield.com/automatic-truck-wash-systems/
Final thoughts
Washing your truck fleet is not just about aesthetics; it plays a vital role in maintaining vehicle integrity and prolonging service life. By following the outlined preparation steps, pre-rinse techniques, effective washing methods, and proper drying practices, you can ensure your trucks remain in excellent condition. This level of care reflects positively on your business and enhances operational efficiency. Implement these strategies to maintain a professional image and mitigate long-term maintenance costs.