Maintaining the cleanliness of truck engines is crucial for logistics and freight companies. A well-washed engine not only enhances operational efficiency but also prolongs the life of essential components, significantly reducing repair costs. In this guide, we will delve into the critical steps necessary for washing a truck engine, focusing on crucial preparation and precautions to protect sensitive parts, selecting appropriate cleaning agents designed for automotive use, and employing effective techniques for removing grime while safeguarding performance. Each chapter builds upon the previous one to present a holistic view of the engine cleaning process, helping fleet managers and operators achieve optimal results.
Ahead of the Spray: Preparation and Precautions for a Safe Truck Engine Wash

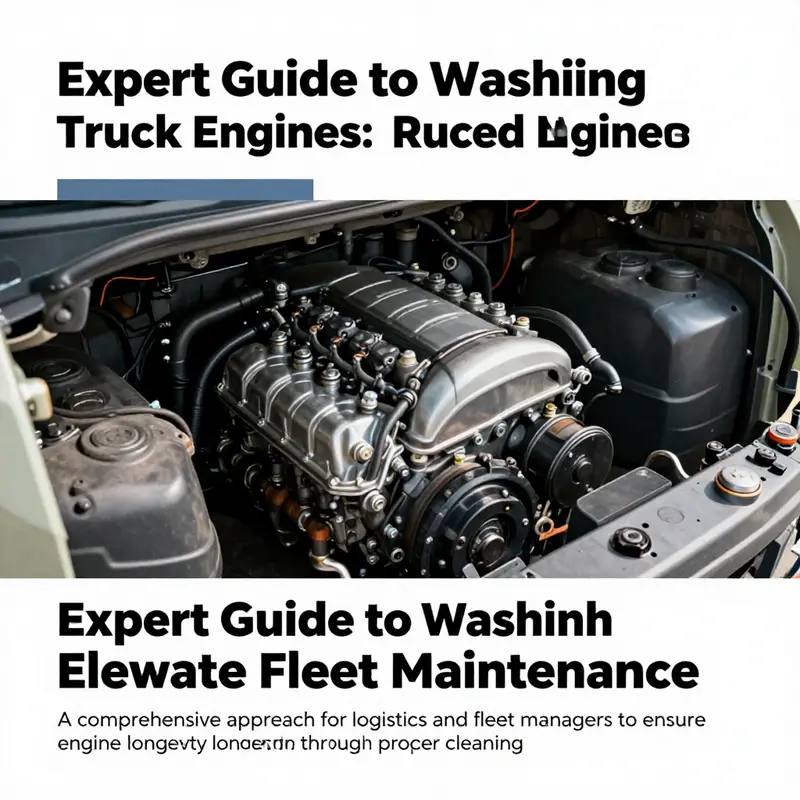
Washing a truck engine is not a test of brute force, but a careful ritual that protects what keeps the machine moving. The engine bay is more than metal and hoses; it is a compact ecosystem of heat, lubricants, sensors, electronics, and precision seals. When water and cleaners enter that space, the goal is not to flood away grime alone but to manage the interaction between cleaning agents, temperature, and sensitive parts. The most important work happens before you turn on the spray. Preparation forms a shield—quiet, methodical, and deliberate—that reduces risk and improves results. In this chapter, the focus is preparation and precautions, the foundations that make every subsequent cleaning step safer and more effective. The process begins with patience, then moves into protection, material choices, and mindful handling of water. As you read, imagine your engine bay as a delicate workshop where the wrong move can cause cracks, shorts, or accelerated wear. The aim is to keep that workshop intact while you remove grease, dust, and grime with steady hands and calm judgment.
First comes the cooling, a condition you should never break. A hot engine is a weak point in any wash. The metal, plastics, and rubber components can suffer thermal shock when suddenly cooled by water or cleaning agents. The guideline that steady hands follow is simple: wait until the engine is cool to the touch, ideally bringing the temperature down well below the danger threshold. In practical terms, that means allowing the engine to cool to a comfortable, touchable state—cooler than warm but not so cold that you risk condensation on electrical surfaces. In some technical guides, a specific temperature range is suggested, such as below 80°C (176°F), but the core principle remains the same: give metal and seals time to relax after heat. This waiting period reduces the chance of cracks, warping, or gasket stress when water finally meets the metal or plastic edge seals.
Next, the choice of location matters as much as the technique. Park the vehicle in a clean, dry, and well-ventilated space. A garage with a drain is ideal, or an open area where water can be contained and disposed of responsibly. Direct sunlight should be avoided when possible because rapid drying can cause uneven heat distribution and potential paint damage around the engine bay. A shaded, controlled environment helps maintain consistent conditions during cleaning, which contributes to a more predictable outcome. If you’re working outdoors, consider shelter or a canopy to reduce sun exposure and maintain a steady pace. The surrounding setup should minimize slip hazards and provide convenient access to a waste-collecting point, since even careful washing sweeps away fluids that can become environmental concerns if left unmanaged.
In tandem with location, gathering the right tools and materials is a quiet but decisive step. Start with an engine-specific cleaning detergent designed for degreasing without attacking plastics or rubber. General household cleaners may seem convenient, but they can strip protective coatings or degrade hoses and connectors over time. The emphasis here is on non-corrosive formulas that are safe for the materials you find in an engine bay. A low-foaming degreaser often works best because it clings to grime without flooding the space with suds. Alongside the cleaner, assemble soft brushes, microfiber towels, and clean rags. Soft-bristled brushes are essential for tight corners, around hoses, and under valve covers where bristles must reach without abrading surfaces. Microfiber materials lift residue rather than grind it into the texture of metal or plastic. A spray bottle or sprayer with a gentle setting helps manage the cleaner application, while a damp cloth can wipe away residues after treatment. A low-pressure water source—such as a garden hose with a spray nozzle set to mist or a gentle stream—is preferable to high-pressure jets that can push water into places it shouldn’t go. A compressed air gun becomes a valuable optional ally for drying and blowing out dust from crevices, but it should be used with care to avoid forcing moisture into sensitive areas. Protective coverings are not optional accessories here; they are part of the shield. Plastic bags, old rags, or purpose-made engine covers protect critical components when water and cleaner begin their voyage through the bay.
The most critical phase, however, is the specific precautions you enact to shield electronics and sensitive components. Electrical safety is the backbone of a successful engine wash. Before you touch any surface, cover the alternator, distributor cap and ignition coil (if applicable), brake master cylinder reservoir, mass airflow sensor (MAF) and air intake ducts, fuse box, electronic control units (ECUs), and battery terminals. Exposed wiring harnesses, connectors, and sensor plugs deserve the same treatment. The goal is not to seal these parts as if they were in a rainstorm but to keep moisture and solvent exposure at bay long enough for the grime to loosen and be wiped away. Plastic bags or specialized engine covers can be tucked around these components, leaving vents and essential openings accessible while creating a moisture barrier. When you do this, you create a boundary that helps prevent shorts, corrosion, and delayed failures that could otherwise emerge after the wash.
Equally important is the restraint you exercise with water pressure. High-pressure washing is not your friend in this context. The engine bay contains many seals and small openings that can harbor hidden leaks. The force of a powerful spray can push water deep into bearings, into wiring connectors, or past seals designed to contain lubrication or air. Instead, adopt a controlled approach: use a nozzle that produces a fine mist or a gentle stream, and stay at a safe distance from the most delicate spaces. The exterior surfaces should bear the brunt of the action, while interior corners and weather-stripping receive precise, light contact. If you must rinse, do so with caution, directing the spray only at the outer surfaces and keeping spray away from sensors, exposed wiring, and open air intakes. This restraint pays dividends later when you reassemble and start the engine without worry.
Another pillar of precaution is the careful selection of cleaners. Harsh solvents and household detergents can strip protective coatings and degrade rubber hoses and plastic connectors over time. A dedicated engine degreaser, formulated to be non-corrosive and safe for plastics, is the prudent choice. In addition to the cleaner itself, the manner of application matters: apply generously to oily zones, then let the product dwell for five to ten minutes to break down stubborn grime. For heavy buildup, a slightly longer dwell can be acceptable, but you should avoid letting the cleaner dry on the surface. In this way, the chemical acts as a facilitator rather than a stubborn foe. Scrubbing should be gentle and selective: a soft brush or microfiber cloth can lift grime without scratching paint or metal. Wire brushes and abrasive tools have no place in this process, as they can mar surfaces and create micro-abrasions that hold onto dirt more tenaciously in the long run.
A practical, understated discipline during preparation is water management. You want to remove grime, not flood the engine bay. Limit water usage by focusing on dampening surfaces rather than soaking them. After the cleaner has done its work, wipe away the residues with microfiber towels while keeping the engine side dry. If you need to rinse, employ the gentlest technique available and only on exterior surfaces that are free of wiring or seals. It’s often wise to perform a dry phase first: wipe away loose dust and surface oil with a damp cloth, then proceed to the cleaning and rinsing steps. When you have finished cleaning, the drying phase must be thorough. Air compression can blow out moisture from crevices and connectors, but you must be careful not to force water further into gaps. Finish by drying every exposed surface with a clean, dry microfiber towel and allowing the bay to air-dry enough to feel dry to the touch before reactivating the electrical system.
An important nuance that blends preparation with long-term maintenance is the potential application of a protective coating after the bay is completely dry. A silicone-based engine protectant or a light, film-forming wax can help repel dust and future grime and shield rubber and plastic parts from UV exposure. The protective layer should be unobtrusive and not impede the movement of belts, hoses, or sensors. It is a finishing touch that, when done correctly, makes the next wash easier while providing a barrier against the elements that constantly challenge the engine compartment. Remember, the goal is not to create a glossy showroom engine but to maintain readability, cleanliness, and reliability through a simple, repeatable routine.
It is equally essential to avoid common missteps that can undermine the entire process. Do not wash while the engine is hot, as already noted, and avoid household cleaners or solvents that lack engine-specific safety formulation. Do not blast with high-pressure water near electronics or open ports, as discussed, and do not skip protecting sensitive parts—these are the quiet rules that protect your investment. The thrust of these cautions is not fear; it is a systematic shield that minimizes surprises when you start the engine again or open the hood during the next maintenance cycle. These foundations are not arbitrary; they reflect the experiences of professionals who have found that preparation, not brute force, determines the cleanliness and safety of engine-wash outcomes.
As you move toward the actual washing, you may want to consult broader guidance to ensure your approach aligns with industry best practices. For example, you can explore detailed, expert guidance that emphasizes methodical preparation and safety. Proven strategies for cleaning grease and tar off your trucks fast offers a perspective on how professionals coordinate detergents, dwell times, and careful scrubbing to maximize effectiveness while preserving components. Proven strategies for cleaning grease and tar off your trucks fast. This resource reinforces the core principle of preparation as a safeguard rather than a mere precursor to cleaning and provides additional context on how to tailor the approach to different levels of grime and different engine configurations.
With these measures in place, you create a stable platform for the next steps. The goal of preparation and precautions is not to create a barrier to cleaning but to enable a more precise, controlled, and durable wash. When you move past preparation, you will apply the cleaner with care, scrub away grime with soft tools, and manage rinsing and drying in a way that respects the integrity of electrical systems, seals, and sensors. The sequence—cooling, safeguarding, selecting the right product, and using measured water—builds momentum toward a clean, well-preserved engine bay. As you proceed, keep in mind that a well-executed preparation phase often translates into better justifications for doing this work yourself rather than handing it off to others. A thorough approach saves time, reduces risk, and yields results that endure through the next round of maintenance and miles on the road.
For a broader industry view on best practices and to see how professional settings align with what you’re doing, the MotorTrend guide on engine cleaning offers a comprehensive reference that complements these ideas. While individual trucks and engines vary, the underlying principles of cooling, protection, careful chemical use, and restrained rinsing apply across the spectrum. The link above points to a detailed resource that can inform your planning and execution, whether you’re washing a single vehicle in a shop corner or coordinating mid-sized fleet maintenance. By tying preparation to practical outcomes and long-term reliability, you establish a disciplined routine that serves both safety and performance. As you prepare for the actual wash, you’ll notice how this foundation makes each subsequent action more predictable and effective, reinforcing the value of a thoughtful, prepared approach instead of rushing through the task.
In the end, the engine wash is more than removing dirt; it is a maintenance moment that communicates care for the truck’s heart. Preparation and precautions are the language of that care. By cooling properly, selecting appropriate tools and cleaners, protecting electrical components, and controlling water use, you set the stage for a safer, cleaner bay. The result is not just a visually improved engine but a more reliable machine ready for the next highway horizon. As the bay dries and you finally reassemble what you had gently protected, you can anticipate a smoother start, fewer electrical issues, and a maintenance ritual that your team or fleet can repeat with confidence. When the next wash comes around, you will rely on the same calm sequence: assess, prepare, protect, and proceed with a measured, respectful approach that keeps your truck engine in peak operating condition. And with that, you’re ready to move into the cleaning phase, guided by a solid foundation and a safer, smarter workflow. External guidance and internal best-practice notes will continue to inform the process as you build momentum toward cleaner engines and longer service life, one careful wash at a time.
External reference (for further reading): https://www.motortrend.com/cars/repair-maintenance/how-to-clean-an-engine/
Choosing Cleaning Agents That Protect the Heart of the Truck: Safe, Effective Degreasers for Engine Washing

The engine bay of a truck is more than a mechanical workspace; it is the heart of the vehicle, a compact ecosystem where metal, rubber, plastic, and electronics coexist under demanding conditions. When you set out to clean this complex landscape, the choice of cleaning agents matters as much as the technique you use. A harsh solvent or an aggressive household detergent can strip protective coatings, soften gaskets, or push moisture into places it should not go. The right cleaning agents, on the other hand, break down oil and grime without compromising the integrity of seals, hoses, electrical connectors, or sensor wiring. This chapter follows that line of thinking: choosing cleaning agents that are effective, safe, and aligned with the broader goal of a clean engine bay that stays reliable for miles to come.
To begin, recognize that dedicated engine degreasers are not a luxury but a necessity when washing a truck engine. These products are formulated specifically for the unique environment of an engine bay. They are designed to cut through oil sludge, fuel residues, and baked-on grime while preserving the hard-won life of rubber hoses, plastics, and metal components. When evaluating cleaners, look for labels that emphasize non-corrosive properties, biodegradability, and compatibility with electronic systems. These three traits—non-corrosive action, environmental mindfulness, and electronic safety—address the most common failure modes observed after engine washes and reflect a growing industry sensitivity to the complexity of modern powertrains. In practical terms, this means selecting agents that can liquefy heavy grease without attacking the protective coatings that keep metal surfaces from corroding or the polymer seals from losing elasticity. It is in this selection that the concept of a thoughtful, protective wash starts to crystallize, and it is where the guidance from experienced operators converges with manufacturer cautions and legitimate safety concerns.
A practical way to ground these choices is to consult the product labels and datasheets with care. The best-engineered degreasers are sold as part of a system that includes clear dilution guidelines, contact times, and rinsing recommendations. They are often described as safe for electronic systems, or at least safe for the sensitive components that cluster around the alternator, fuse box, and wiring harnesses when used properly. The emphasis on electronic safety is not a mere afterthought; it is a recognition that the modern truck engine bay is tightly packed with sensors, solenoids, and electronic modules that rely on moisture-free exposure to function correctly. In this light, it becomes clear why the combination of biodegradable, non-corrosive formulators with explicit electronic-system compatibility marks a responsible and forward-looking approach to engine cleaning.
Another crucial consideration is the avoidance of household cleaners, and this point cannot be overstated. Dish soaps and other consumer detergents are designed for kitchen sinks and delicate fabrics, not the rugged realities of a diesel engine. They can strip protective coatings, degrade rubber hoses, and compromise gaskets or seals over time. The risk is not always immediate, but the cumulative effect of repeated exposure is a slower, steadier erosion of engine integrity. The same caution applies to general purpose solvents, which, while effective at dissolving certain hydrocarbon residues, can leave behind residues or react with plastics and elastomeric materials used throughout the engine bay. The discipline of selecting a purpose-built engine degreaser, therefore, emerges not only from a desire for a cleaner engine but from a strategy that protects the engine’s long-term reliability.
In today’s landscape, waterless engine cleaners have grown in popularity, particularly among mobile service providers who must balance efficiency with environmental stewardship. These products allow for a wipe-down that can remove a significant portion of grime without introducing water into electrical components or open air intakes. They can be especially advantageous for fleets that operate in areas with water restrictions or where rapid turnarounds are needed. Waterless formulations must still meet the criteria of being non-corrosive and safe for electronics, and they should be used in accordance with manufacturer guidelines to avoid leaving oily residues that could attract dust or mud. The choice to lean on waterless options is not a nod to laziness; it is a calculated option that can reduce moisture exposure to critical electrical assemblies and limit cleanup times, all while supporting sustainability goals that are increasingly important to fleet operators.
Beyond the cleaner’s chemical profile, you should heed the guidance of the vehicle’s manufacturer. Owners manuals and service guides often include explicit recommendations or cautions about the types of cleaners that are compatible with the engine and its ancillary systems. If the manual provides a clear list of approved products or general guidelines, those should anchor your selection process. When in doubt, a conservative approach—prioritizing products marketed as safe for engines with electronic components and rubberized connections—tends to minimize surprises. This is not a restriction but a safeguard that aligns with the best practices described by seasoned technicians and engineers who have learned from experience that a compromised seal or a damaged connector can lead to leaks, sensor faults, or misreads that degrade performance.
Within these guidelines, you will encounter a spectrum of degreasers that serve different roles. Alkaline engine degreasers are common because they are powerful against grease and oil. They are typically formulated to lift hydrocarbon residues from metal surfaces and plastics without aggressively attacking flexible components when used as directed. Solvent-based cleaners, sometimes chosen for stubborn, baked-on deposits, can be highly effective but demand careful handling. The key to balancing effectiveness with safety is to follow the label’s dilution instructions, apply evenly, and avoid prolonged contact with sensitive components. In practice, this means preparing the engine bay so that you can concentrate the cleaner on oily regions—the valve cover seams, around the oil filler cap, the turbo housing if present, and the areas where grime tends to accumulate—while shielding the alternator, fuses, and wiring as part of your pre-cleaning protection plan. The end result should be a surface that looks visibly cleaner, with grime loosened and ready to be rinsed away, yet with no signs of chemical damage around hose clamps or connector seals.
A robust wash plan also involves integrating the cleaner selection with the overall workflow that follows. After applying a degreaser, you want a dwell time that is long enough to loosen the tenacious film but not so long that the cleaner acts on itself, evaporates, or dries and leaves residues. The dwell time can vary with grime intensity; lighter soils may respond to a short interval, while heavy, baked-on residues can justify a longer contact period. The next step—careful scrubbing with soft tools—benefits from having a cleaner that remains effective within that dwell window. When you scrub, you want a cleaner that lifts, emulsifies, and suspends residues so that rinsing or removal with a microfiber cloth becomes straightforward. A cleaner that dries into a gummy film is not just annoying; it can trap dust and create a surface that invites further contamination once the engine heat returns. The synergy between a properly chosen cleaner and an appropriate dwell time becomes a discipline that reduces re-cleaning and minimizes the risk of leaving residues that can attract grime back into the crevices.
In this context, the guidance to lean toward products labeled as non-corrosive, biodegradable, and safe for electronics is echoed by many industry practitioners. It is not merely a marketing claim but a prudent approach to protecting seals, gaskets, and wiring insulation. You may encounter formulations that are specifically described as safe for rubber hoses and plastic connectors; when such statements are present, they signal attention to the elastomeric materials used throughout the engine bay. These materials are particularly vulnerable to cracking or drying when exposed to harsh solvents or aggressive detergents, especially under temperature fluctuations when the engine is cooled after a wash. The practical upshot is straightforward: choose a cleaner that respects these materials, and you reduce the risk of long-term damage that might otherwise require expensive repairs or part replacements.
To weave these ideas into a single operating principle, consider this: your engine wash should be a controlled process that honors the engine’s complexity. The cleaner is a tool whose properties determine how easily grime comes off and how safely it can be removed. A well-chosen degreaser helps you achieve a cleaner base without forcing you to scrub harder than necessary, which in turn reduces the chance of scratching paint or wearing away protective coatings around vulnerable areas. It is a quiet, predictable partner in the cleaning routine, one that supports the observation that a well-maintained engine bay is not just about appearances but about preserving the performance and longevity of the powertrain and its supporting systems.
The discussion would be incomplete without acknowledging the evolving landscape of cleaning agents. The modern truck fleet—often tasked with long routes, heavy loads, and varied climates—benefits from cleaners that offer consistent performance, minimal environmental impact, and compatibility with a broad range of configurations. This is where the intersection of expert recommendations and practical experience becomes valuable. Manufacturer guidance, field-tested practices, and the insights shared by experienced technicians collectively shape a higher standard for engine cleaning. In practice, that means choosing a cleaner that demonstrates reliable performance across grime types, while also providing clear instructions that help you avoid common missteps—such as applying cleaner to hot components, neglecting to shield electronics, or skipping the rinse when water exposure could threaten seals or bearings.
Among the practical ways to reinforce these principles is to incorporate a deliberate, repeatable selection checklist into your wash routine. Before you begin, confirm that the cleaner you intend to use is appropriate for your engine type and age, and check whether it is compatible with the materials used around the engine bay. Confirm that it is non-corrosive, biodegradable where possible, and safe for electronic components. Ensure you have the right tools for application—soft brushes, microfiber cloths, and, if necessary, a low-pressure rinse that won’t push water into sensors or open ports. The goal is not to chase a perfect shine in a single pass; it is to establish a sustainable practice that keeps the engine clean, protects components, and reduces the likelihood of damage over time. Within that practice, the specific agent you select becomes a central piece of the puzzle, guiding how you apply, dwell, scrub, and rinse as part of a cohesive, professional cleaning routine.
In closing this thread of thought, consider how you might communicate these choices within your fleet or team. The best results often come from aligning on a shared standard for engine cleaning—one that emphasizes safe, effective agents and a disciplined process. By adopting cleaners that are explicitly non-corrosive, biodegradable, and safe for electronics, you set expectations that support consistent outcomes across different trucks and operators. You also create a clear path for training new team members, who can build confidence by following a standardized approach to product selection and handling. This standardization matters because engine cleanliness is not merely cosmetic; it is a practical maintenance practice that supports better heat management, more reliable electrical performance, and longer engine life. The cleaner you choose is an investment, and that investment pays dividends in fewer repairs, less downtime, and a cleaner, more accountable maintenance culture within the fleet.
For readers seeking a concise, field-tested reference framed by industry authority and practical know-how, the approach described here aligns with established guidance on engine cleaning and degreasing. It is worth noting that the conversation about cleaning agents continues to evolve as new formulations are developed and field experiences accumulate. When in doubt, consult the manufacturer’s recommendations and rely on proven strategies for cleaning grease and tar off your trucks fast, such as the linked guidance from experienced practitioners who have tested these products under real-world conditions. proven strategies for cleaning grease and tar off your trucks fast. This reference point helps ground your practices in a broader, cautious, results-oriented framework that supports cleaner engines and longer-lasting components.
External reference for further guidance on engine cleaning practices is provided by a well-regarded automotive resource, which offers expanded context on method, safety, and product selection. You can explore the expert tips at MotorTrend, which cover many of the same principles described here and provide additional industry perspectives and recommendations. MotorTrend: How to Clean an Engine.
Engine Bay Cleaning Mastery: A Complete, Safe Technique for Washing Truck Engines

Step-by-step Engine Wash: Preparation to Finish
Cleaning a truck engine is a careful process. It balances the need to remove oil, grime, and road salt with the need to protect delicate electronics and seals. Follow a measured routine and you will restore appearance, reduce corrosion risk, and improve inspection access. The method below walks you from initial preparation through final touches, covering tools, techniques, and the thinking behind each step.
Begin by letting the engine cool completely. Never work on a hot engine. Hot metal plus cold water or chemicals can cause thermal shock. That can crack components or make seals fail. Park the truck in a shaded, ventilated area. Engage the parking brake and place wheel chocks if needed. Wear protective gloves and eye protection. Prepare a clean workspace and have towels, plastic covers, and tools at hand.
Before you apply a single drop of cleaner, disconnect the battery. Remove the negative terminal first, then the positive. This reduces the risk of electrical shorts while you work. If removing the battery entirely is impractical, at minimum cover the terminals with waterproof material. Next, identify and protect sensitive electronics. Use plastic bags, cling film, or purpose-made waterproof covers over the alternator, fuse box, exposed wiring, brake fluid reservoir, and any open sensors. Seal the bags with elastic bands or tape so water cannot seep in. Do not rely on thin, loosely tied coverings; they must stay secure while you work.
Choose a cleaning agent designed for engine bays. Automotive degreasers break down oil and baked-on grime without attacking rubber or painted surfaces. Look for biodegradable, non-corrosive formulas when possible. Avoid household detergents and solvents. Those products can strip protective coatings and swell rubber hoses. Use a product labeled for engine cleaning and read the instructions before use.
With protection in place, begin the degreasing stage. Spray the cleaner generously onto greasy areas, focusing on the valve cover, oil filler cap, intake manifold, around the oil filter, and any sections with visible tar, road film, or thick soot. Allow the product to dwell for the time recommended on the label. For light dirt, five to ten minutes is usually enough. For heavier buildup, extend the dwell time to fifteen or twenty minutes, but do not let cleaning agents dry on the surface. If the cleaner starts to dry, gently mist the area with water to keep it active.
While the degreaser works, gather soft cleaning tools. Use soft-bristled brushes designed for automotive detailing. Microfiber cloths and non-abrasive sponges work well on painted and plastic surfaces. For deep crevices, a detailing brush with flexible bristles or an old toothbrush gives control without scratching. Do not use wire brushes. They will mark metal and can strip protective coatings.
Agitate the grime gently. Scrub only enough to lift dirt. Apply moderate pressure on metal areas and lighter pressure on plastic and rubber. Work methodically, moving from one section to the next. Pay attention to the underside of the hood and exposed fasteners. Keep the degreaser active and avoid letting cleaner pool near sensors or open ports.
Rinsing demands patience and control. High-pressure washers are a blunt instrument for engine bays. They can force water into bearings, seals, and electrical connections. For most jobs, a garden hose on a gentle stream is sufficient. Maintain a safe distance of several feet while rinsing. Direct the spray across surfaces rather than into seams. Work from the top of the engine bay downward so grime runs away from protected components.
If you must use higher pressure, attach a fan-style nozzle and keep the pressure low. Do not point a spray directly at the alternator, wiring harness connectors, or any taped or bagged components. Avoid spraying near the air intake or open throttle body. For trucks with exposed turbocharger housings or intercoolers, be particularly careful to avoid pushing water into the intake system.
After rinsing, remove as much water as possible with clean microfiber towels. Wring towels frequently and replace them when saturated. Use compressed air at low pressure to blow water from tight spots and connectors. Keep the air source on a moderate setting; excessive air pressure can damage small connectors or push water deeper into assemblies. Work methodically across the bay until surfaces are visibly dry.
Many technicians leave the truck to air-dry in a warm, dry environment for thirty minutes to an hour before reconnecting the battery. When you are confident the engine bay is dry, remove all protective coverings and inspect harnesses and connectors. Check battery terminals for moisture. Reconnect the battery, positive terminal first, then negative.
Start the engine and let it run for several minutes. Watch for unusual noises or warning lights on the dash. A smooth idle and no error codes indicate you likely kept moisture out of sensitive areas. If a warning light appears, turn the engine off and investigate. Moisture in a sensor connector or a dislodged cover can trigger a code. Dry and reseal the area before attempting to clear the code.
Once the engine is clean and fully dry, consider finishing touches. Apply a protective dressing formulated for rubber and plastic parts. These products restore appearance and provide short-term protection from dust and UV. Use a light application and avoid aerosol products that overspray into unintended areas. Wipe away excess dressing to prevent attraction of dirt.
Regular cleaning prevents the slow accumulation of corrosive deposits. For trucks in corrosive climates or on salted roads, increase cleaning frequency. A clean engine bay makes early detection of leaks easier and helps extend hose and wiring life. Keep a simple maintenance checklist. Note any degraded wiring insulation, brittle hoses, or cracked clamps while cleaning. Address these items promptly to avoid costly repairs.
When greasy or tar-like residues resist normal degreasers, a staged approach works best. Start with a standard engine cleaner and repeat the degreasing step if necessary. For persistent tar and heavy grease, consult resources on aggressive removal techniques. One useful reference on cleaning stubborn deposits offers stepwise strategies and visuals for heavy soiling. Read that guide before attempting stronger solvents. For trucks with heavy tar, consider professional assistance to avoid damage.
For fleet operators, the scale and environmental impact of engine washing matter. Mobile truck wash services offer specialized equipment and water reclamation systems. They use low-water techniques and biodegradable chemicals to comply with environmental regulations. Investing in scheduled engine bay cleaning for a fleet reduces downtime and prevents the gradual degradation of components. When choosing a service, evaluate their waste-water management and chemical handling.
Environmental responsibility matters even for individual owners. Capture runoff and avoid washing in storm drains. Use products labeled biodegradable and follow local rules for disposal. Some facilities offer reclaim systems that filter wash water for reuse. If you operate in a commercial setting, document your cleaning procedures to show compliance with local regulations.
Common mistakes can undo careful cleaning. Never use a high-pressure washer at close range. Avoid using household degreasers that contain caustic ingredients. Do not skip the step of protecting electronics. Replacing an alternator or control module is far more expensive than the time spent bagging it properly. Also, do not assume the engine is dry because surfaces look dry. Moisture can hide in connector housings and crevices. Use compressed air and a short drying period to ensure complete dryness.
Troubleshooting is straightforward if an issue appears after cleaning. If warning lights illuminate, check connector housings and the battery. Dry connectors with low-pressure air and a lint-free cloth. Inspect grounds and battery cables for corrosion. If a sensor remains unreliable, allow additional drying time before replacing components. Sometimes a simple reconnection or drying solves the problem.
Tools and materials list, in brief, for easy reference: protective gloves and goggles; plastic bags or certified waterproof covers; automotive engine degreaser; soft-bristled brushes; microfiber towels; gentle garden hose with spray nozzle; low-pressure compressed air; and a silicone-free protective dressing for plastic and rubber. Carry spare elastic bands and tape to secure covers. For heavy-duty jobs, a stepladder gives better access to large engine bays.
Safety is an ongoing concern. Keep solvents and cleaners away from open flames. Dispose of used towels and disposable covers properly. Many cleaning products are flammable when soaked into rags, so place used materials in sealed metal containers until you can dispose of them according to local guidelines. Maintain a fire extinguisher in your work area and know how to use it.
Finally, document the cleaning session. Note any leaks, new noises, or parts that need replacement. Regular logs help you track wear patterns and identify recurring problems. For commercial operators, documented cleaning schedules provide proof of maintenance and can increase resale value. Simple records also make future cleaning sessions faster and more effective.
A well-executed engine wash leaves the truck easier to inspect and safer to operate. It also shows professionalism and care. With careful preparation, the right products, and controlled rinsing, you can remove heavy grime without damaging vital systems. Prioritize protection of electronics and thorough drying. If conditions exceed your comfort or expertise, seek a professional truck wash that uses water-reclaim systems and experienced technicians. For heavy tar and embedded grease, consult practical resources that show stepwise removal techniques and pictures to guide the work. One such resource with clear, photo-driven instructions is available here: https://www.instructables.com/How-to-Wash-an-Engine-Bay-6-Steps-with-Pictures/.
For additional guidance on dealing with stubborn grease or tar on trucks, review professional removal approaches described in this piece on proven strategies for cleaning grease and tar. That article outlines effective mechanical and chemical steps for heavy contamination and can complement the engine-bay-specific techniques covered here. For fleet managers, it also offers context on operational efficiency and cost control when cleaning at scale: proven strategies for cleaning grease and tar off your trucks fast.
Use this chapter as your practical roadmap. Follow the order: prepare, protect, degrease, agitate gently, rinse with low pressure, dry thoroughly, then inspect and finish. Keep tools and materials ready. Protect electronics first and always. With steady technique, you will achieve a clean engine bay without harm. The result is a safer, more serviceable truck that shows care and attention to maintenance.
Final thoughts
Washing a truck engine is a vital aspect of fleet management that directly impacts performance, reliability, and operational costs. By adhering to the outlined preparation and precautions, selecting the right cleaning agents, and employing effective techniques, fleet managers can ensure their engines remain clean, efficient, and protected from potential damage. Investing time in this process enhances the longevity of equipment and contributes to overall fleet success, preserved through diligent maintenance.