
Unloading a washer from a truck is a critical task that requires careful planning and execution. It’s vital for logistics and freight companies, trucking operators, and fleet managers in the construction and mining sectors to understand how to handle this equipment safely to avoid damage and injuries. Each chapter of this guide will delve into essential aspects of unloading: preparing the area for safety, checking the washer’s position for secure transport, using proper lifting techniques, securing and moving the washer safely, and final placement and setup after unloading. Mastering these areas ensures streamlined operations and enhances overall efficiency.
Preparing to Unload a Washer from a Truck: Safety, Space, and Steady Hands

Unloading a large washer from a truck is less about brute force and more about deliberate balance, clear thinking, and controlled moves. The moment the tailgate drops, assumptions can turn into hazards in seconds. A successful unload begins not at the end of the driveway but at the planning table, where the team aligns on the path from truck bed to final resting place. The goal is simple in theory: keep the washer upright, protect it from impact, and move it through the space with steady, coordinated actions. In practice, that requires a careful assessment of the site, the equipment available, and the people who will handle the load. When these elements come together, the operation becomes predictable rather than improvisational, reducing the risk of back injuries, dropped objects, or damaged floors and walls. And since heavy machines can behave unpredictably on uneven ground, the only safe approach is to treat the unload as a controlled session rather than a sprint to the door.
A robust unload plan starts with a clear picture of the area. The ground should be flat, level, and solid, free of loose gravel or soft spots that could cause a shift in weight or a sudden tilt of the truck. Soft ground near a loading dock or curb is a red flag, because it can compromise both the vehicle and the equipment used to move the washer. If the surface shows any sign of instability—mud, frost, or ice—wait for conditions to improve or postpone the operation. Even a small slip can escalate quickly with a machine this heavy. The path from the truck to the designated resting place must be wide enough to maneuver a dolly, pallet jack, or forklift, plus room for a team to work without jostling the load. This means removing obstacles such as hoses, cords, tools, and any stray carts that could snag a leg or a wheel.
Wind and weather add another layer of risk. High winds can affect control when you’re wrestling a large, tall object, and rain or snow can create slick, unpredictable footing. If the forecast implies adverse conditions, postpone the unload. When weather is acceptable, take a moment to map the route indoors as well. Doorways, hallways, and stairwells should be measured for clearance, and any thresholds or tight turns should be identified in advance. For indoor moves, consider temporary protective measures on floors and walls to avoid scuffs or dents. Lighting matters too; dim areas hide hazards that are obvious in brighter conditions, so ensure the path is well lit. This is not a place to rely on memory alone; a quick walk-through helps the team see the load from different angles and spot potential pinch points before the first move is attempted.
Once the site is prepared, attention shifts to securing the washer itself and the truck that will carry it. The vehicle should be immobilized with the parking brake set and wheel chocks placed behind the wheels to stop any accidental roll. For a slope or uneven surface, additional restraints or wedges may be warranted. Inspect the securing restraints that hold the washer to the truck bed. If straps, chains, or binders show signs of wear, fraying, or damage, replace them before any movement begins. The goal is to release only what is necessary and in a controlled fashion, so the washer remains upright and stable as it transitions from moving vehicle to stationary ground.
The people involved in the unload must be properly equipped and trained. Protective equipment is not optional when moving heavy appliances. Steel-toed boots protect feet from dropped components, gloves reduce the risk of pinching and abrasion, and high-visibility vests help the team stay conspicuous in busy environments. Those around the load should communicate in a clear, concise manner. Verbal cues and agreed signals reduce the chance of miscommunication when a line is being formed or when the load needs to be shifted a few inches to clear an obstacle. When the job is large or complex, professional equipment—such as a forklift, pallet jack, or hydraulic dolly—should be used instead of manual lifting. Manual lifting of heavy washers carries a high risk of back strain and should be avoided unless absolutely necessary and performed with multiple trained teammates.
With preparation complete, the unloading sequence can begin. If there are any detachable components, such as hoses or control panels, remove them first and set them aside on a clean, stable surface. This reduces the effective weight and helps balance the washer during the main movement. The mover at the truck should take the lead, guiding the load with steady, controlled movements. The washer must remain upright at all times; laying it on its side or upside down is a decision that should only be followed if the manufacturer’s guidelines explicitly permit it, but for most commercial machines, upright transport is the rule. Lift points should align with the natural stance of the team, not with the quickest strand of movement. When a dolly or pallet jack is available, the washer should be placed onto the dolly with the front facing forward. The team should verify the center of gravity is well within the wheelbase and that the load sits on the dolly’s platform without overhangs that could catch on a doorway or threshold.
From the truck bed to the ground, the movement must be slow, deliberate, and free of sudden jerks. A smooth roll minimizes the risk of a wheel slipping or a strap loosening under load. If a route involves corners, turns, or thresholds, the crew should anticipate the obstacle by coordinating a light lift at the edge, ensuring the washer does not collide with the frame of the doorway or with any nearby equipment. The emphasis is on continuity and balance rather than speed. In a pinch, a second person can assist, but the secondary worker should use proper lifting techniques and stay in a position that never places their hands between the load and a potential pinch point.
As the washer begins to traverse the route, the team keeps a careful eye on the alignment of the dolly and the stability of the restraints. Avoid leaning the load or bending the stock to negotiate a tight turn; if space is insufficient, reassess the route rather than forcing a maneuver. The team should maintain a straight path, with the dolly guiding the motion and the hands providing counterbalance only where needed to stabilize the unit. If any obstacle is encountered, stop, reassess, and communicate a revised plan. The moment the unit reaches the intended location, the team slowly lowers it to the ground on a level surface. The final placement should be on a firm, level floor or pad, away from water sources and away from walls that could transfer impact if the machine settles unexpectedly.
After placement, a thorough check is essential. Confirm the washer sits level and does not lean against walls or furniture. Reconnect any removed components only after the machine has a stable base. Remove packaging or protective materials and dispose of them in a safe manner that keeps the work area tidy and free of debris that could interfere with the washer’s operation or future movement. The surrounding area should be scanned for any loose tools, straps, or cables that might pose tripping hazards. A final safety briefing can help the team confirm that everyone understands their role should the unit require service or adjustment before it is connected and commissioned.
The broader context of a safe unload goes beyond the single maneuver. It ties into a culture of thoughtful, standardized procedures that minimize risk in every phase of equipment handling. When the process is documented and rehearsed, new team members can contribute with confidence, and the organization benefits from fewer injuries, less equipment damage, and smoother transitions between job sites. That mindset—where safety and space planning are not afterthoughts but prerequisites—also aligns with ongoing practices in fleet management and emergency readiness. For teams building a resilient operation, integrating unloading protocols with wider safety standards creates a cohesive system that supports efficiency without compromising protection. As a practical reminder, this approach echoes the value of disciplined, team-based execution and can be reinforced through established training modules and site-specific safety briefings. For more about integrating safety into fleet operations and emergency response planning, consider how these practices interlock with the broader standards used in professional logistics environments.
Internal reference: fleet-standardization and emergency response. This approach emphasizes how safety and preparedness are shared responsibilities across operations, reinforcing the idea that a well-planned unload is part of a larger, resilient workflow. Also worth noting is that careful unloading dovetails with general handling guidelines that apply to heavy equipment and building services, ensuring consistency across tasks that involve moving large appliances through constrained spaces.
External resource: for additional, authoritative guidance on safe handling and site safety, consult the OSHA general industry standards. This resource provides detailed criteria for worker protection, equipment use, and risk assessment that can support on-site decision making during unloading operations. https://www.osha.gov/SLTC/generalindustry/
Ensuring the Stance Before the First Step: Checking the Washer’s Position for a Safe Unload from the Truck

Unloading a washing machine from a truck is not a simple matter of lifting and rolling. It hinges on a careful, methodical check of the machine’s position before any offloading begins. The goal is to prevent movement that could crack the chassis, strain the drum bearings, or topple the unit during the transfer. This chapter focuses on the moment right after the truck has paused or come to a complete stop and the crew assesses whether the machine is ready to move. A thorough confirmation of secure fastening, level alignment, and the removal of shipping restraints sets the stage for a controlled, predictable offload and a safe path to its final resting place. When these checks are done well, the rest of the process—whether you’re bringing the washer into a home, a basement laundry, or a commercial space—proceeds with greater confidence and far less risk of damage or injury. In the broader frame of facility management for truck wash businesses, these steps are part of a safety culture that treats every move as an opportunity to preserve equipment and protect personnel. See how this approach integrates with broader operations at facility management for truck wash businesses.
Begin with the simplest, most telling test: confirm the machine is securely fastened inside the truck bed. If straps or ropes were used to stabilize the washer for transit, they should be visibly taut and firmly anchored to the vehicle’s bed or tiedowns. A quick hand check—gently tugging at the corners and sides of the unit—will reveal any give. If there is noticeable movement, do not attempt to unload. Re-secure the machine with additional straps, ensuring the tension is distributed evenly to avoid concentrating force on any single point. The goal is a solid, nonmigrating hold that can withstand the first inch of movement into offload. This step speaks to a broader safety habit: never assume a load is secure just because it looks correct. Movement can happen in the blink of an eye, especially on uneven terrain or when the truck is on a slight incline. The responsibility for secure fastening lies with the team at the tailgate and the person guiding the unloading.
Once you are certain the washer cannot shift, turn attention to leveling and orientation. A quick check of leveling feet may be possible if the unit is accessible after the journey, but the truck may still be in motion or just have stopped briefly, so don’t rely on a perfect level during transit. If you can access the top of the machine safely, a practical test is to place a small cup of water on a flat surface. If the water remains level and undisturbed, the machine’s top is relatively true, and the chassis is not severely twisted. While this is not a substitute for a full professional leveling, it provides an immediate, low-effort indicator of how well the machine has settled during transport. Vibrations during transit can turn a slightly off-level installation into a louder, more problematic startup, so this quick check helps you gauge potential issues before the load moves again. Remember, even a seemingly minor tilt can translate into uneven wear on the drum and motor bearings when the machine starts operating, so treat any discrepancy as a cue to pause and reposition if necessary.
The next critical factor is the status of transport bolts, particularly for new machines. New models are shipped with these bolts to hold the drum in place and minimize internal movement. If these bolts remain in place, they will induce severe vibrations and noise once power is applied, potentially causing damage to the bearings, motor, or suspension of the chassis. Before attempting any unload or repositioning, confirm that transport bolts have been removed and stored safely for future moves. If the bolts were not removed during prior steps, do not proceed with operation or offloading until they are extracted in accordance with the manufacturer’s guidelines. Even if you think you recall removing them, a quick double-check is worth the time and protects the machine from a costly misstep. This precaution, while straightforward, often saves teams from damaging the unit’s core components and from creating unnecessary downtime for repairs.
With securing and level indicators in place, shift focus to planning the offload route. A straight, obstacle-free path is the ideal. If the destination involves narrow doorways, tight hallways, or staircases, the importance of the preliminary check increases. Measure the aperture and compare it with the washer’s widest dimensions, including any protrusions such as door handles or side panels. If there is any doubt about the clearance, pause to clear a pathway, remove loose packaging, and, if needed, detach or reposition nearby furniture that could snag the unit. Planning also means anticipating counterweights and thresholds. A small ramp may help if the truck bed is higher than the receiving floor, but it must be placed securely and tested before the machine crosses it. Any compromise here invites slips or jolts that could move the washer unexpectedly, so ensure the ramp is stable, correctly aligned, and locked in place.
Position is not simply about being straight; it’s about maintaining the machine’s integrity as it transitions from vertical stability to controlled movement. Placing the washer on a dolly before starting the offload is a common and highly effective technique. The dolly should be clean, with smooth wheels suitable for the surface you will traverse. If a dolly is not available, coordinate with a teammate to balance the load evenly, keeping a steady grip and maintaining the unit upright. Start by tilting the machine only enough to engage it with the dolly or the teammates’ hands, then lean into a controlled roll, avoiding jerky starts or sudden direction changes. Move slowly, listening for shifts in weight or odd sounds that could indicate strap slippage or frame flex. When negotiating tight turns or thresholds, lift just enough to clear the edge and reduce the risk of tipping. The emphasis throughout this stage is on deliberate, incremental movement rather than speed. A slow approach reduces the likelihood of minor misalignments becoming major issues at the moment of placement.
The actual transfer from the truck to the final resting place is the culmination of these checks. A level, secure, and properly oriented machine advances with a measured roll onto the destination surface. The final position should be stable, not leaning against walls or furniture, and should allow for adequate clearance around the appliance to facilitate operation and maintenance. Once the washer is in place, re-check its level and footing. The slightest tilt can propagate during the first test run, so a brief, careful verification before connecting water and power is wise. If the destination demands conversion to another format, such as a different base or platform, handle that transition with the same care applied during the initial setup.
Finally, these practices link expressly to safety culture and operational efficiency. The checks described here—secure fastening, post-transit level assessment, removal of transport restraints for new machines, and thoughtful route planning—are part of a cohesive approach to unloading that protects equipment and people. In practice, this means documenting the checks as part of a standard operating procedure, reinforcing the habit across shifts, and ensuring all team members understand their individual roles. Clear communication, explicit signals, and mutual confirmations help prevent missteps. The result is not only a safer unload but a smoother move into the next phase of installation or interior relocation. For teams that routinely move large appliances, adopting these checks as a routine reduces the probability of damage and boosts confidence as each job begins. The real payoff comes when the crew can move through a carefully choreographed sequence with minimal improvisation—because the path has already been validated and the machine’s position confirmed ready for offload. As you continue to the next steps of installation and connection, the same discipline that protected the washer during unloading will guide you toward a successful, secure setup in its new location. To learn more about maintaining a safety-driven operations framework that supports equipment moves across facilities, see the broader discussions on facility management for truck wash businesses, which contextualize these unloading practices within everyday workflows and safety expectations.
External safety reference: for detailed lifting and material-handling guidelines, consult OSHA resources at https://www.osha.gov.
From Bed to Floor: Mastering Safe Lifting When Unloading a Washer from a Truck
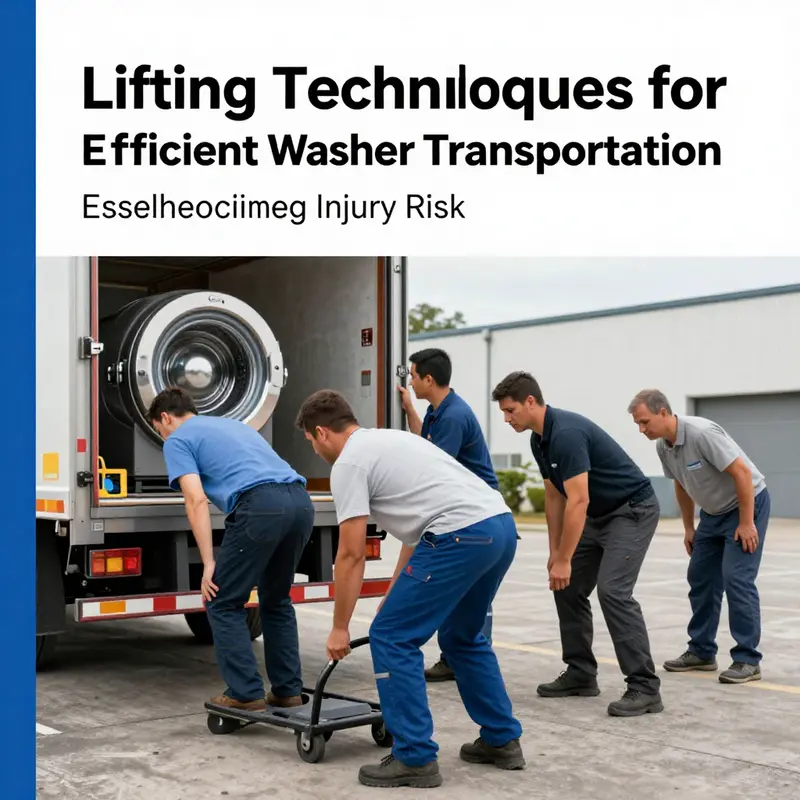
When a washer sits in the back of a pickup, careful planning matters more than brute force. The moment to act with care is before you touch it. The goal is to move it safely from truck bed to floor without twisting the spine or letting it slam into doorframes, walls, or furniture. A measured approach reduces risk for everyone involved and protects the machine itself from dings or balance loss that could lead to a topple. This chapter threads practical technique into the rhythm of a safe unload, showing how posture, leverage, and teamwork synchronize for a smooth transition from truck to home or workspace.
Begin with a quick assessment. Look over the area where you will work and the path to the final resting spot. Confirm the landing surface is flat, stable, and dry. If you anticipate moving indoors, visualize tight doorways, narrow hallways, and any staircases along the route. Clear obstacles, secure loose mats, and ensure no cords or hoses clutter the floor. If the washer is already strapped in the truck, confirm the straps are snug and intact. If packaging remains, remove it only after you have a firm grip plan. These steps might seem obvious, but they set the stage for safe lifting and prevent unexpected shifts once the machine begins moving.
The moment you begin to engage the lift, your body posture matters as much as the equipment you use. The most important rule is simple: bend at the knees, not the waist. A squat stance keeps your spine aligned and uses the powerful muscles of the legs. Think of lifting with your legs first, then letting your arms guide the machine rather than pull it with your back. Your core should feel engaged, providing a solid brace against the load. When the load is heavy or you suspect you cannot lift with proper form, pause and seek help rather than pushing through pain. If a dolly or hand truck is available, position it so the washer rests on its edge and the front is forward. A dolly reduces sheer weight on the back and shoulders while offering controlled movement across thresholds and uneven surfaces.
If no dolly is available, enlist a partner or two. Two people can share the load, lifting evenly and maintaining balance as they guide the washer onto a stable surface. Communicate clearly about timing and direction. Decide who will handle the initial lift and who will steer, then coordinate your steps. Maintain eye contact and verbal cues such as “lift,” “steady,” and “move.” Once the washer is off the truck, immediately transfer it to the dolly or to a stable platform if possible. Do not attempt to slide the machine across the floor by dragging it with arms alone; friction and sudden jerks can cause injuries and damage to the appliance.
Keeping the unit upright is a nonnegotiable rule through the entire move. Avoid laying the washer on its side or back unless the manufacturer’s instructions explicitly permit it. Upright transport preserves internal components and suspension integrity, and it reduces the chance the drum will shift and cause imbalance during the roll. Use straps, bungee cords, or tie-downs to secure the washer to the dolly or to the vehicle. The goal is to prevent any tipping, sliding, or abrupt stops that could jolt the internal mechanism or cause the unit to bounce off a stand or pallet. If you encounter a corner or threshold, approach slowly, take a moment to plan the angle, and lift slightly to clear the edge. A practiced crew will tilt just enough to glide the wheel over the obstacle while keeping the machine balanced.
Rolling the washer requires a calm, controlled tempo. Place the washer on the dolly with its front facing forward and the HEAVY side centered over the axle. Move in short, deliberate strides rather than long, hurried pushes. Keep your steps even and measured, and maintain a comfortable pace that allows you to respond to shifts in surface height. On smoother floors, you can maintain a steady roll, but on carpeted thresholds or door gaps, pause to recheck balance before crossing. If a doorway is tight, temporarily reposition the dolly’s handle to gain leverage and ease the machine through the opening. Never squeeze the load through a space that would force you to twist your spine or stretch your arms beyond comfortable reach.
As you near the destination, begin the set-down sequence with the same care you used to lift. Stop, verify the landing surface is level, and confirm there is no clearance issue with walls or furniture. Slowly lower the washer onto the floor, keeping it upright and stable. If you must tilt to clear a corner, do so gently and only as much as required. Release any straps only after the unit is fully settled. Be alert for any creeping movement; if the washer begins to tilt, pause and reposition rather than forcing it into place. Once the machine rests, give it a gentle nudge to confirm it sits squarely and does not lean against a wall or obstacle. A level surface helps ensure proper operation when you eventually power up the appliance and reduces vibration during use.
Throughout the process, prioritize communication and safety checks. Before any lift, confirm that all participants understand the plan and the sequence of actions. If a helper experiences discomfort or fatigue, pause and reconsider the approach. Short breaks can prevent cumulative strain and protect joints from repetitive loading. The pace should adapt to the team’s comfort and the machine’s weight; enthusiasm should never override caution. In instances of extreme weight or awkward dimensions, do not improvise. Instead, reassess the route, consider alternative equipment, or call for professional assistance. The extra time spent planning is a practical investment in preserving the washer’s integrity and your personal safety.
The preparatory steps—clearing the path, verifying stability, and removing packaging—serve as a foundation for the lifting technique itself. A well-executed lift relies on three pillars: posture, leverage, and partnership. Posture begins with a neutral spine and a strong brace from the core. Leverage comes from bending the knees, keeping the load close to the body, and using the leg muscles to initiate the lift. Partnership ensures control, balance, and steady progression through each stage of the move. Each element reinforces the others, creating a seamless workflow from truck to destination.
Incorporating additional safeguards aligns with established safety resources and best practices. If you have access to a dolly, use a strap or tie-down to secure the washer to the dolly base. This prevents the unit from rolling or shifting unexpectedly during the movement. Be mindful of the floor surface you traverse; slick tiles, loose mats, or uneven concrete can undermine stability even with a careful plan. Keep the work zone well-lit so you can see potential tripping hazards and adjust as needed. If the washer must pass near water sources or in damp areas, tread deliberately and maintain a light grip to avoid slips. The more you anticipate potential trouble spots, the less likely you are to encounter troubling surprises during the unload.
When the work concludes, perform a brief post-lift review. Confirm the washer is on a level surface, upright, and free of clutter that could impede its operation. Recheck that there are no loose straps or cords that might snag feet or tripping chargers. If you plan to relocate the appliance again, reset your route and reestablish a safe, clear path. This final check helps ensure the unit remains secure as you finalize the installation or transition to service, and it provides a moment to reflect on the lift’s execution. For ongoing safety and equipment care, consider the broader context of trailer and unloading maintenance. As you progress through your projects, you may find practical value in integrating a routine that emphasizes consistent checks, proper gear, and clear communication.
For readers seeking a broader perspective on safety and upkeep related to the tooling and routines used in loading and unloading, a related discussion on trailer maintenance can be helpful. Importance of regular trailer maintenance.
These practices are practical, scalable, and adaptable to various contexts. They reflect a disciplined approach to handling heavy appliances without compromising personal or equipment safety. Though no two lifts are identical, the underlying principles remain constant: plan, posture, leverage, and teamwork. By internalizing these ideas, you build a repeatable method that reduces injury risk and supports smoother transitions from truck to final resting place. If you ever question your ability to handle a particular load, remember that seeking help is a sign of responsibility, not weakness. The goal is a safe unload every time, with both people and machines preserved for the next job.
External resources for deeper study emphasize body mechanics and safe lifting practices. Consult authoritative guidelines, such as those provided by occupational safety authorities, to reinforce your understanding and adapt the technique to specific appliances or environments. For more detailed recommendations on body mechanics and equipment use, you can refer to the NIOSH Safe Lifting Guidelines: https://www.cdc.gov/niosh/docs/2004-135/pdfs/2004-135.pdf
From Ramp to Right Place: A Steady, Safe Unload of a Washer from a Truck

Moving a washing machine from the back of a truck to its final spot in a home or laundry room is more than a simple lift. It is a coordinated sequence that balances safety, equipment, and spatial awareness. When handled with a measured plan, the process protects the appliance from jarring movement and protects the people involved from injury. The scene begins long before the first hand touches metal. It starts with assessment: an unobstructed, level work area; a path clear of doors, corners, and thresholds; and a plan for how the machine will travel from truck bed to floor. Even when the truck is still warm from the day, a brief mental rehearsal can prevent a stumble after the tailgate drops. The goal is simple in theory but precise in execution: keep the washer upright, control its momentum, and place it firmly on a stable surface. With that mindset, the actual unloading unfolds as a single, continuous motion rather than a chain of abrupt moves. Preparation anchors the whole operation, and a single misstep can cascade into damage to the unit or to someone nearby.
First comes the secure start. Before any movement, verify that the washer is properly fastened inside the truck. Straps and ratchet belts should be snug and attached to fixed points so the machine cannot shift or topple during transit. If packaging remains, remove it only after the machine is stabilized and the path is prepared. The machine should sit upright as it was during loading, never angled or laid on its side. Upright positioning protects the inner components and reduces the chance of post unload tipping once it rests on a new floor. A quick visual check should confirm there are no loose parts that could snag a strap or shift during the transfer. This initial step—the contrast between a secured, upright unit and a vulnerable, unsecured one—often determines the entire ease of unloading.
Next comes the path and the tools. The route from truck to destination must be free of loose items, cords, and slick surfaces. A flat, stable surface is essential, and if the washer must navigate a doorway or hallway, those spaces should be measured in advance for width and clearance. The preferred tool for moving heavy appliances is a dolly, a simple device with a broad base and wheels that distribute weight. If a dolly is available, position it behind the washer so the front of the unit rests on the dolly base and the back wheels contact the floor. If a dolly is not available, assembling a two person team is critical. Lifting should be a shared, synchronized effort, with each person using proper technique to prevent twisting or uneven load. Extra straps can be helpful to secure the washer to the dolly after it is loaded. The goal here is to create a controlled, secure bridge between truck and final location, a bridge that minimizes the chances of tipping or sudden shifts.
With the machine secured and the path mapped, the unloading itself is a careful sequence of lifting, balancing, and guiding. A cardinal rule governs every move: never lift the washer by its door or control panel. Those parts are delicate and poorly suited to support the weight, and a mishap can cause cosmetic or functional damage that is not readily repaired on site. Instead, the lifting begins with the knees and the core. Stand close to the washer, align feet with the load, bend the knees, and keep the back straight as you engage the leg muscles. If a dolly is used, the washer is slid onto the dolly with a smooth, deliberate motion. Balance is the watchword here; a centered load reduces the risk of tipping when turning corners or negotiating thresholds. Once the machine sits on the dolly, securing straps or ratchet belts around the unit and the dolly frame locks it in place. The goal of this step is simple: prevent any shift during movement, even when a doorway is narrow or a stair step looms ahead.
From there the movement itself requires calm, deliberate control. Push, not pull, the dolly whenever possible. Pushing keeps shoulders aligned and reduces the tendency to jerk the load. Move slowly, anticipate corners, and anticipate stairs as if you were guiding a fragile sculpture rather than a heavy box. When navigating tight turns, take the widest arc possible and then cradle the load to prevent sudden bounces. A second person should guide the front of the dolly to help steer past obstacles and to help judge clearance. If you must go up or down stairs, one person should stay ahead at the top or bottom to assist with balance while the other continues to push slowly from behind. The moment you encounter a step or threshold, lift the front slightly to clear the edge but do not lift so high that the unit can tip backward. Small adjustments keep movement smooth and predictable, and predictability is the backbone of safety in any unloading operation.
As the washer nears its destination, the focus shifts from transport to placement. The final location should be a flat, level surface with enough room to access the sides and rear for any future maintenance or hose connections. If there is a door to the space, ensure that opening and closing the door will not strike the machine or create a hazard. Remove the dolly only after the washer is in position and appears stable. Gently lower the unit onto the floor and give it a moment to settle. Check for any rocking or leaning, and if required, make fine adjustments by shifting the feet or sliding a small shim under one corner. The last step in this sequence is to recheck the machine’s level, make sure the area remains free of water or moisture sources, and confirm that it sits away from walls or furniture so ventilation and access are not compromised. That final check may seem minor, but it prevents nuisance issues such as vibration, door misalignment, or accidental scrapes during use.
The sensible conclusion to any unloading scenario is a pause for reflection and a plan for ongoing safety. If the route proved difficult, or if the washer is heavier than anticipated, a professional team may be the prudent path. When a single miscalculation could lead to personal harm or appliance damage, seeking help is not a sign of weakness but a prudent choice. The same careful approach you applied during securing, lifting, and moving should extend into the final placement and setup. Confirm the appliance is level, connect the necessary hoses and power correctly, and verify there are no kinks or leaks before the machine is used. Even after a successful unload, a few extra minutes dedicated to testing can prevent a host of problems later on. The aim is a smooth transition from truck to home where the washer operates quietly and reliably without presenting new hazards in the living space. The benefits of this approach multiply: the appliance remains in good condition, the movers stay safe, and the space remains clear for other tasks that follow during a move.
In the end, unloading a washer from a truck is less about brute strength and more about disciplined technique, proper tools, and a quiet, steady rhythm. It is a small operation with outsized consequences, and when performed with care, it becomes almost automatic. The motion—secure, upright, controlled, and deliberate—echoes the broader ethos of handling large, heavy appliances: plan thoroughly, move thoughtfully, set down gently, and inspect before use. The process becomes a model for other heavy moves, a reminder that the success of a single loading or unloading task rests on preparation, respect for the equipment, and awareness of the surrounding space. For those who face routes that test their patience, there is no shame in opting for professional help. The goal remains the same: to bring the washer from truck to home safely, without incident, and ready for years of reliable service.
External resource: https://www.osha.gov
null

null
Final thoughts
The safe unloading of a washer from a truck involves meticulous attention to detail, from preparing the unloading environment to ensuring the final setup is secure and level. Emphasizing safety and proper techniques not only prevents injury but also enhances the efficiency of operations in logistics and transportation. By adhering to these guidelines, fleet managers and operators can ensure that their equipment arrives at the destination safely, ready for use.