
Motorcycle Fairing Fitment: Why Bolt Holes Misalign and What to Check Before Buying
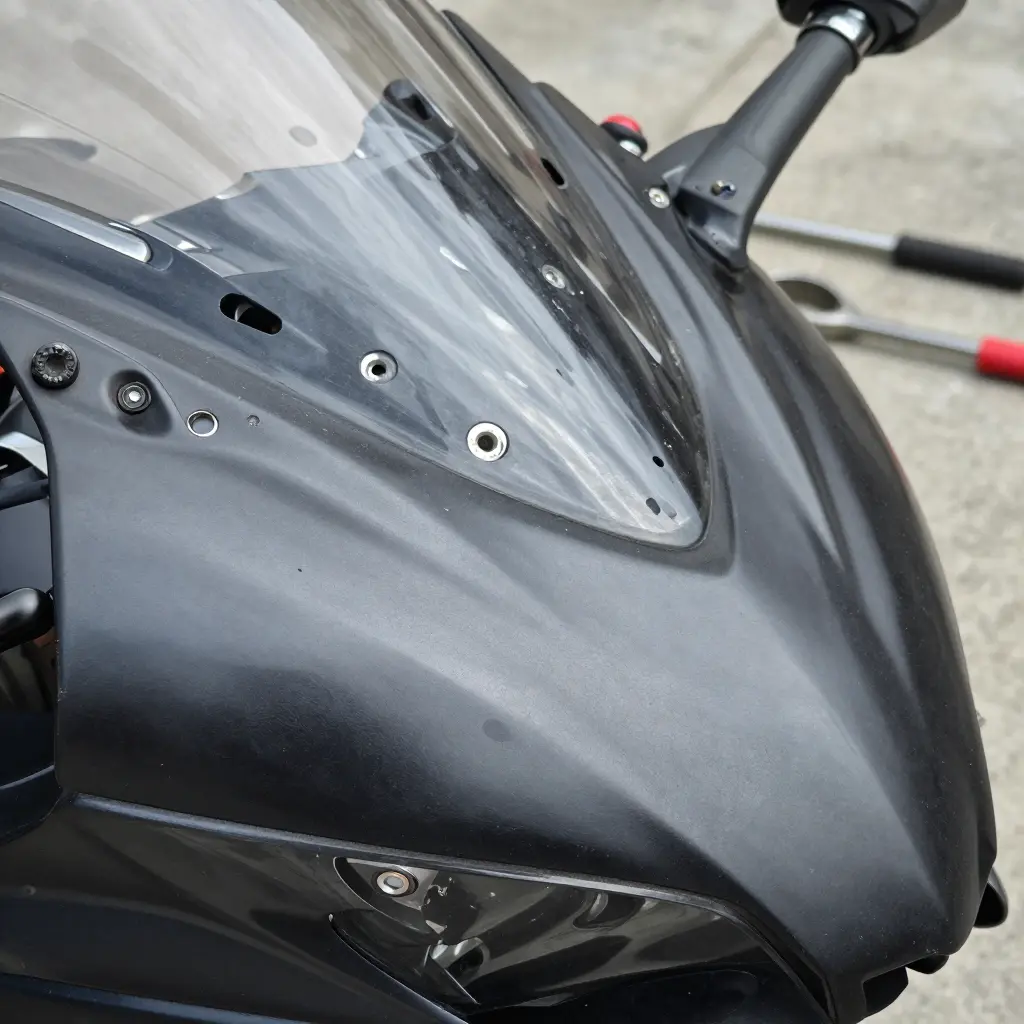
Motorcycle fairing fitment is the degree to which a fairing, or a full body panel set, aligns with your bike’s frame, mounting brackets, headlight housing, and neighboring panels without stress, gaps, or drilling. In plainer terms, it describes whether the part actually bolts onto the motorcycle the way the manufacturer intended. The recurring problem is that bolt holes on fairing kits frequently misalign. Riders who unwrap a set of aftermarket fairings often find two or three mounting points that will not meet, holes sitting a few millimeters off center, or panels rubbing where they should join cleanly. Minor re-drilling is common enough that many owners simply accept it.
This article is written for motorcycle enthusiasts doing their own spanner work, motorcycle shop owners who stock and sell bodywork, and motorcycle repair technicians who fit panels every day. All three have to judge whether a misalignment is a minor inconvenience or a sign of poor manufacturing.
The sections that follow cover the common causes of misaligned mounting points, the technical checks to run on a frame and on a fairing kit before purchase, and what is worth confirming with a supplier. The diagnosis starts with where the tolerance sits.
Why Bolt Holes Misalign on Motorcycle Fairings: The Root Causes
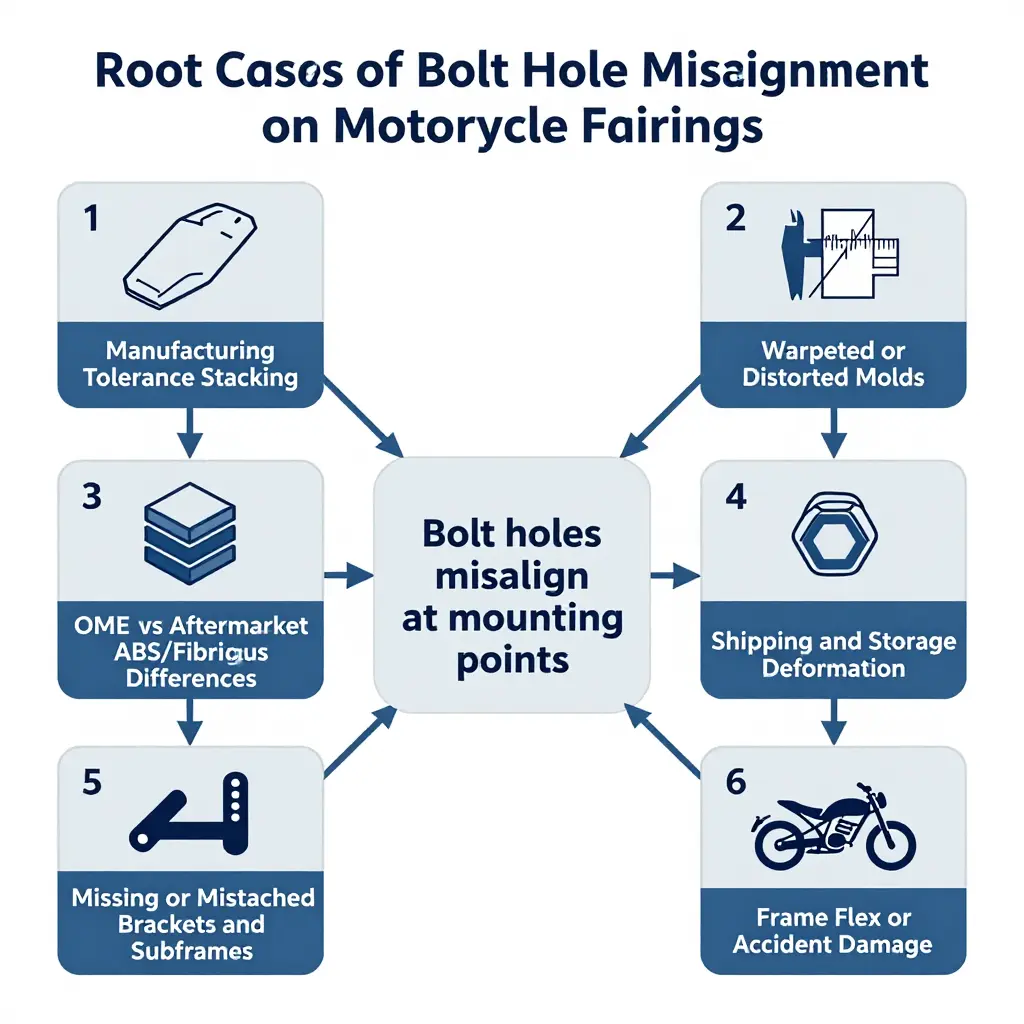
A fairing that will not sit flush is rarely a defect in the panel alone. When bolt holes misalign, the problem is usually the sum of several small errors upstream of the bolts themselves. Work through the causes below in order and you can diagnose the problem instead of forcing panels into place.
1. Manufacturing Tolerance Stacking
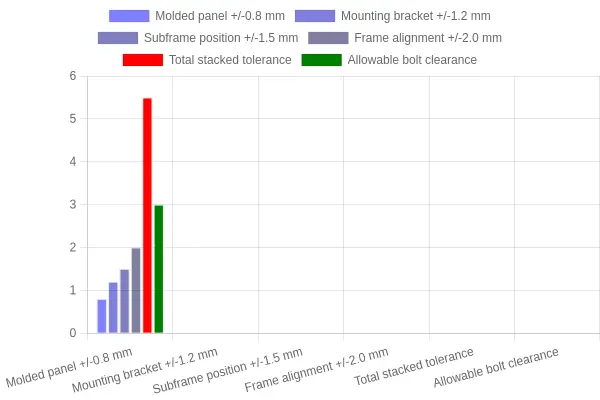
Every part on the bike is built inside its own tolerance band: the molded panel, the bracket, the subframe, the frame. Each one can be technically “in spec.” and still be slightly off. Put several together and the errors add up — four parts each half a millimeter out can push a hole nearly two millimeters sideways before any single component is actually wrong. That produces the classic symptom: one bolt drops straight in, a second needs a nudge, and the last two refuse to line up. Nothing is broken, but the stack has eaten your clearance.
2. Warped or Distorted Molds
Injection and fiberglass molds wear, overheat, or cool unevenly. Once a cavity has moved even a fraction, every part it produces comes out pre-stressed and out of shape, and the error repeats rather than varying at random. The same side or the same bolt always pulls away, and panel gaps look uneven. If every unit from one production run fights you, suspect the mold rather than the install.
3. OEM Injection-Molded vs Aftermarket ABS or Fiberglass
OEM panels are molded to a known shell and a known bracket set. Aftermarket shells are reverse-engineered, and the material behaves differently.
| Factor | OEM injection-molded | Aftermarket ABS | Aftermarket fiberglass |
|---|---|---|---|
| Shrink after molding | Low, controlled | Moderate | Low but resin-heavy |
| Flexibility | Moderate | High (creeps under heat) | Low (brittle, cracks) |
| Hole accuracy | Tight | Variable batch to batch | Hand-drilled, loose |
| Fitment risk | Baseline | High | High |
The material difference is where the table above comes from. ABS relaxes and creeps with heat and load; fiberglass depends on hand-laid layers of inconsistent thickness with holes punched by hand. Even a well-made aftermarket shell rarely matches factory hole positions exactly. Panels bow, edges lift, and motorcycle fairing fitment becomes a fight over millimeters — one of the main reasons aftermarket kits fit poorly out of the box.
4. Shipping and Storage Deformation
Large, thin panels are shipped unbraced and stored stacked or leaning. Heat plus sustained load lets the plastic creep into a new shape, so the panel takes a set that was not there at the factory. A fairing that fit on arrival no longer lines up weeks later, or arrives visibly twisted out of the crate. Store panels flat and supported, and let them settle before you judge the fit.
5. Missing or Mismatched Brackets and Subframes
The brackets and subframe are what actually position the holes. A bracket from the wrong year, model, or trim sits at the wrong angle, you lose your reference geometry, and every hole downstream of it is wrong. Holes end up off by centimeters, panels contact the tank or forks, and no amount of forcing helps. Check the bracket part numbers before you blame the shell.
6. Frame Flex or Prior Accident Damage
A bent subframe, a tweaked headstock, or a crash-damaged frame rail shifts the mounting points. Frames also flex under load, so a stressed shell can bind as the chassis moves. The bolt circle no longer matches the true frame geometry: a brand-new fairing still will not fit, and one side sits tight while the other gaps. Before ordering parts, put the bike on a stand and confirm frames and brackets are straight through routine maintenance and inspection practices.
Quick Diagnosis Order
- Check the frame and subframe for straightness first.
- Verify bracket part numbers and presence.
- Dry-fit the shell with no bolts and look at gap symmetry.
- Only then start enlarging or slotting holes.
Those six causes account for most fitment failures. When bolt holes misalign, the answer almost always sits upstream of the bolts, and getting motorcycle fairing fitment right starts with the frame and brackets, not the panel.
Explainer Diagram: How Fairing Mounting Points Cause Bolt-Hole Misalignment
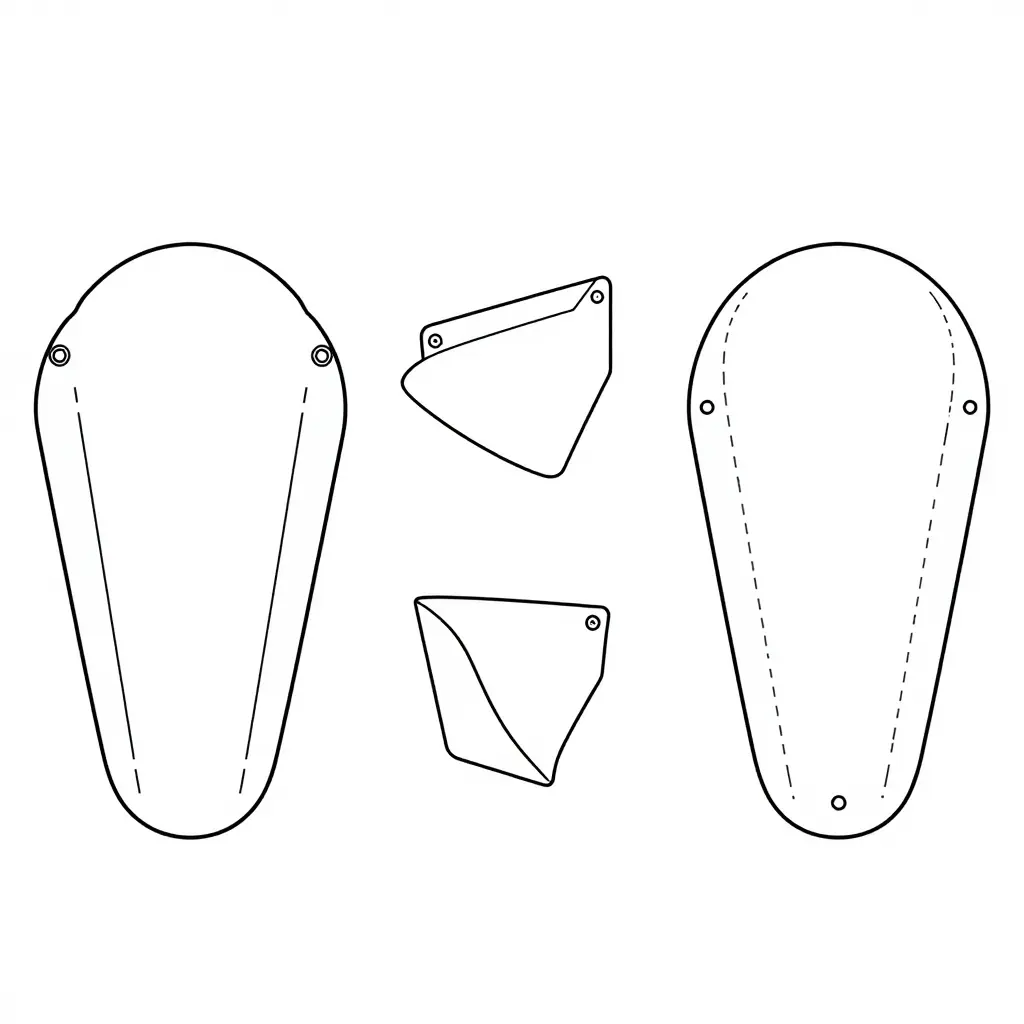
Image-Generation Brief (hand this to the designer or image tool)
Goal: A single schematic figure that lets a technician see why a tiny tab-vs-hole offset becomes a big, visible gap at the far edge of the panel. No photorealism, no real bike, no text baked into the artwork.
Layout (left to right, three panels on one canvas):
- Far left – context view. A simplified side-view outline of a side fairing panel, with three small mounting tabs drawn along its inner edge. Keep it flat and iconic so the shape reads instantly as a body panel.
- Center – the root cause. Two stacked close-up insets. Top inset: a single tab with its bolt hole sitting a hair offset from the frame’s matching hole, shown with a thin dimension gap between hole centers. Bottom inset: the same pair perfectly aligned for comparison.
- Far right – the cascade. The full panel again, now drawn with the small center offset exaggerated so the opposite (far) edge swings wide of the frame. Add dashed “ghost” lines showing the correctly aligned position for a direct visual comparison.
Line style: Thin, uniform black vector strokes on a plain white background. Precise geometry, sharp corners, flat fills only. No shading, gradients, drop shadows, or rendered metal. Think engineering drawing or CAD sketch.
Visual hierarchy: The offset dimension gap is the hero – give it the strongest contrast and the most breathing room. Panels read left to right as cause -> detail -> effect. Use a single dashed accent line for misalignment and a solid line for the aligned reference so the eye can compare in one glance.
Do not include: any letters, numbers, callouts, arrows with words, watermark, branding, or company name. All labeling is handled in the caption and surrounding copy.
Suggested caption: A small offset between a mounting tab and its bolt hole looks trivial at one point – but spread across the panel, it becomes a visible misalignment at the far edge.
Materials and Manufacturing Tolerances: Why Fitment Begins at the Factory
Before a single bolt is turned, the accuracy of a fairing kit is already decided by how its panels were made. Material choice and manufacturing method shape dimensional consistency, shrinkage, and warp risk, and those three factors decide whether bolt holes line up.
Material properties drive dimensional behavior
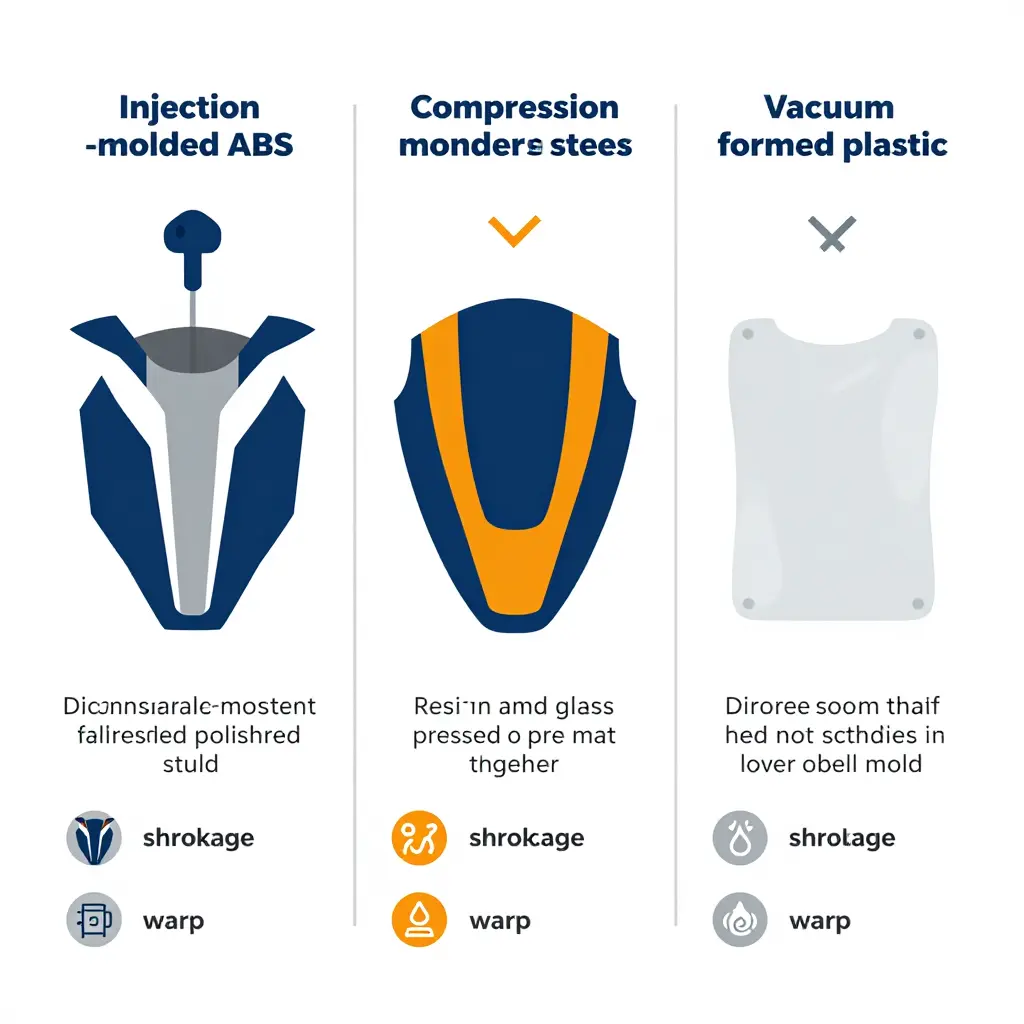
Injection-molded fairings start as molten ABS forced into a precision steel mold. The mold holds the part to a tight, repeatable shape, so shrinkage stays predictable and warp risk is low.
Fiberglass fairings are laid up from resin and glass mat, sometimes pressed under heat and pressure. That gives good strength and repairability, but thickness and cure can vary from panel to panel.
Vacuum-formed plastics are heated until soft, then pulled over a mold. They are cheap and light, but the sheet stretches unevenly, especially across complex curves.
Here is how the three methods stack up:
| Material | Manufacturing method | Shrinkage | Warp risk | Dimensional consistency |
|---|---|---|---|---|
| Injection-molded ABS | Molten plastic injected into a steel mold | Low and predictable | Low | High |
| Compression-molded fiberglass | Resin and glass mat pressed under heat | Moderate and variable | Moderate to high | Medium |
| Vacuum-formed plastic | Heated sheet pulled over a mold | Variable | High on complex curves | Low to medium |
Why a 2-3 mm deviation compounds
Manufacturing tolerances are the acceptable range of variation a part may have and still pass inspection. A 2-3 mm deviation sounds trivial on a single panel. Chain four or five panels together, though, and the errors add up. The first panel shifts the mounting point, the second magnifies it, and by the tail section the holes can be far out of line. That is why a fairing kit that lines up at the nose can fight you at the rear.
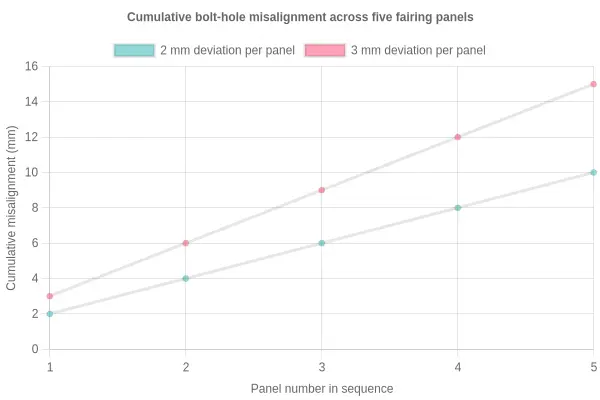
The reasoning chain: properties to behavior to bolt holes
Material properties create dimensional behavior, and dimensional behavior creates alignment outcomes. Stiff, mold-controlled ABS holds its shape; flexible resin-and-glass panels and stretched vacuum forms move. Once two panels move differently, their bolt holes no longer share a common centerline, and installation becomes a matter of force rather than a clean bolt-up.
Injection-molded fairings usually win on consistency; fiberglass fairings offer greater strength and repairability but demand more fitting work.
Manufacturers who understand standardization and consistency control these variables tightly, and the difference shows up the moment you thread the first bolt.
| Symptom | Likely Cause | Check or Fix |
|---|---|---|
| Panel sits high at the nose | Bent or tweaked front subframe | Measure subframe against OEM datum points; straighten or replace |
| One side gaps at the tank | Twisted main fairing stay | Compare left/right stay symmetry; realign or swap the stay |
| Bolt holes off by several mm | Aftermarket copy with sloppy tooling | Overlay OEM hole pattern; slot holes slightly or return part |
| Bracket tabs not lining up | Warped panel from heat or crash | Lay panel on a flat surface; check for twist and reshape |
| Stress cracks near mounting points | Overtightened fasteners / vibration | Inspect for cracks; torque to spec and add rubber grommets |
| Fairing rubs exhaust or engine | Wrong model-year part or sagging mounts | Verify part number; replace worn cushions and spacers |
| Windshield won’t seat flush | Mixed-brand panels / distorted nose cowl | Dry-fit without fasteners; adjust nose cowl before tightening |
OEM vs Aftermarket Fairings: Why Fitment Reliability Diverges
Why do some panels bolt on cleanly while others fight every hole? The answer rarely sits with the installer. It usually begins far upstream, with the tooling that made the part.
OEM fairings come from molds that original manufacturers developed alongside the motorcycle itself. Those molds are cut from OEM CAD data, machined to tight tolerances, and then validated on actual production bikes. Because the tooling is the reference standard, every panel that comes off the line is measured against the same geometry the factory uses to assemble the machine.
Aftermarket fairings enter the picture differently. Many aftermarket suppliers work from reverse-engineered molds, sometimes copied from a single used panel rather than the original drawings. If that donor panel was warped or repaired, the error gets baked into the tool. Mold quality then compounds the problem: inexpensive tooling wears faster, and as a mold degrades, the panels it produces drift further from spec.
Production consistency is where the gap widens. OEM plants run defined quality control checkpoints, sampling panels for thickness, mounting tab position, and hole alignment. Aftermarket operations vary widely. Some maintain disciplined QC; others ship whatever clears the packing table. The outcome shows up at the bike. Consistent OEM panels align because the molds, the process, and the inspection all reinforce the same dimensions, while uneven aftermarket output produces the misaligned bolt holes that send riders reaching for a drill.
Some export suppliers now offer OEM-level molds, which can narrow the gap when their tooling and quality control genuinely match original standards. Even so, buyers should treat tooling origin as the first signal of expected fit. Ask where the mold came from and how the parts are inspected, and alignment stops looking like luck.
Chart type: bar (vertical)
Title: Most Common Fairing Alignment Problems Reported by Riders and Shops
Axis labels:
- X-axis: Alignment Problem
- Y-axis: Frequency (% of reported cases)
Categories and approximate relative values:
| Category | Approx. Frequency (% of reported cases) |
|---|---|
| Bolt Holes Misaligned | 42 |
| Panel Gaps Uneven | 31 |
| Tabs Broken | 18 |
| Bracket Mismatch | 13 |
| Paint-Line Mismatch | 9 |
Notes: Values are illustrative estimates for comparison, not measured survey data. Bars are ordered from most to least common. Distinct color per bar; value labels displayed above each bar.
Generated chart asset: 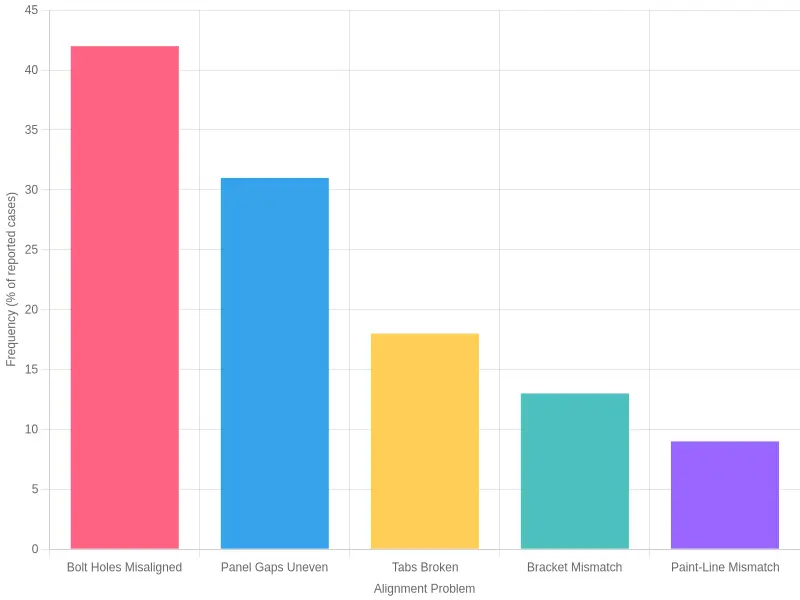
Test-Fitting Fairings Before Final Installation
A dry fit costs nothing but time, and it confirms that every panel, bracket, and fastener will actually line up before paint, decals, or torque is committed. Skip it and you invite cracked mounting tabs, cross-threaded bolts, and gaps that will not close.
Fairing panels flex, and holes that look “off” in a rough trial are often fine once every piece is in place and the brackets settle. The point of the test-fit is to let the whole assembly find its natural position at once, instead of forcing one panel to fit and distorting the next one in line.
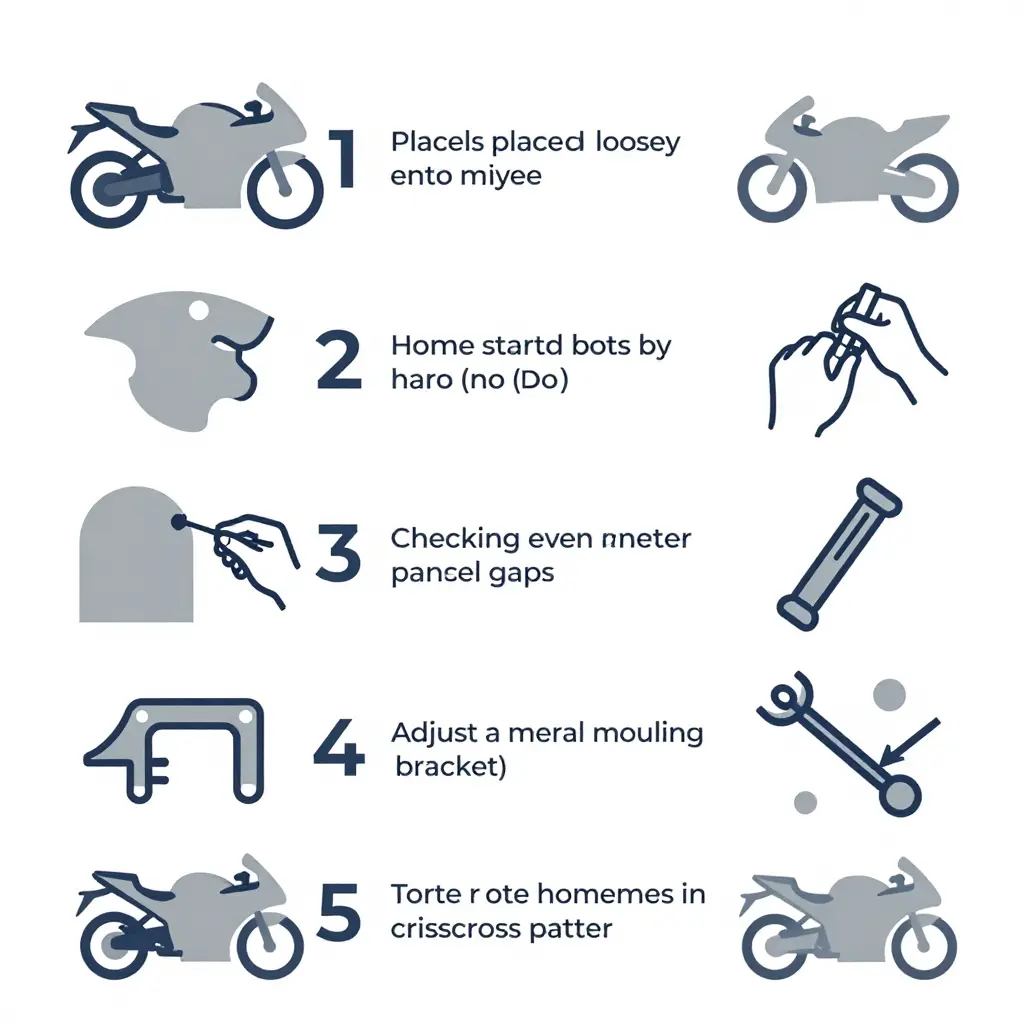
Work Loose First
Assemble the panels loosely. Set each piece onto the bike and start every fastener by one or two threads only, tightening nothing yet. That keeps the whole assembly mobile so panels can shift a few millimeters as the layout closes up.
Hand-thread all bolts before tightening. Run each bolt in by hand first to confirm the threads are clean and the holes align. If a bolt will not start, move the panel or bracket rather than forcing it. Cross-threading at this stage is expensive to fix.
Check Gaps in Stages
Inspect the seams between adjacent panels, then the gaps against the tank, seat, and frame. Work around the bike in one direction and note every tight or uneven area. Fitment problems usually appear in stages: a gap that closes up front often opens up at the rear, so re-check after each adjustment rather than trusting a single pass.
Adjust Bracket Alignment
Most misalignment traces back to brackets that are bent, mounted in the wrong position, or missing a spacer or rubber grommet. Loosen the bracket, reposition it, and re-check the gaps. Only when all gaps are even and every bolt starts by hand is the assembly ready for final fairing installation.
Tightening Sequence at a Glance
- Loosely assemble all panels.
- Hand-thread every bolt, no torque.
- Check and correct all panel gaps.
- Adjust brackets and alignment.
- Torque to spec in a staged pattern.
The same logic applies to the final torque stage. Tightening one fastener fully before the rest locks the assembly into a distorted shape, so work gradually around the whole kit instead.
| Stage | Action | Torque Applied |
|---|---|---|
| 1 | Loose panel assembly | None |
| 2 | Hand-thread all bolts | None |
| 3 | Gap check and correction | None |
| 4 | Bracket adjustment | None |
| 5 | Staged, crisscross torque to spec | Full spec value |
Tighten to specification only at the very end, in a staged, crisscross pattern. Working to the manufacturer’s torque values on a properly seated assembly preserves the panels, protects the threads, and produces the even, factory-style gaps you are after.
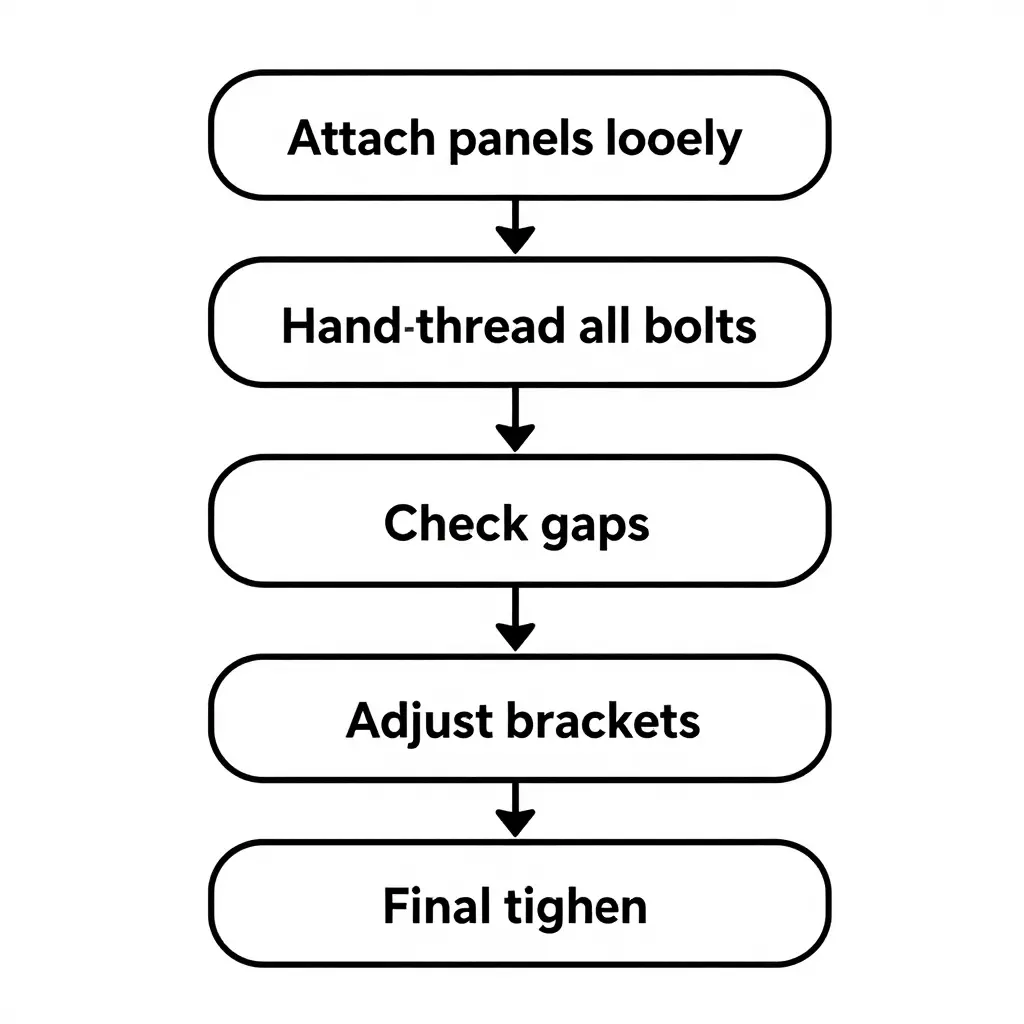
A schematic flowchart of the dry-fit sequence: attach panels loosely, hand-thread all bolts, check gaps, adjust brackets, then final tighten.
FAQ: Fairing Fitment
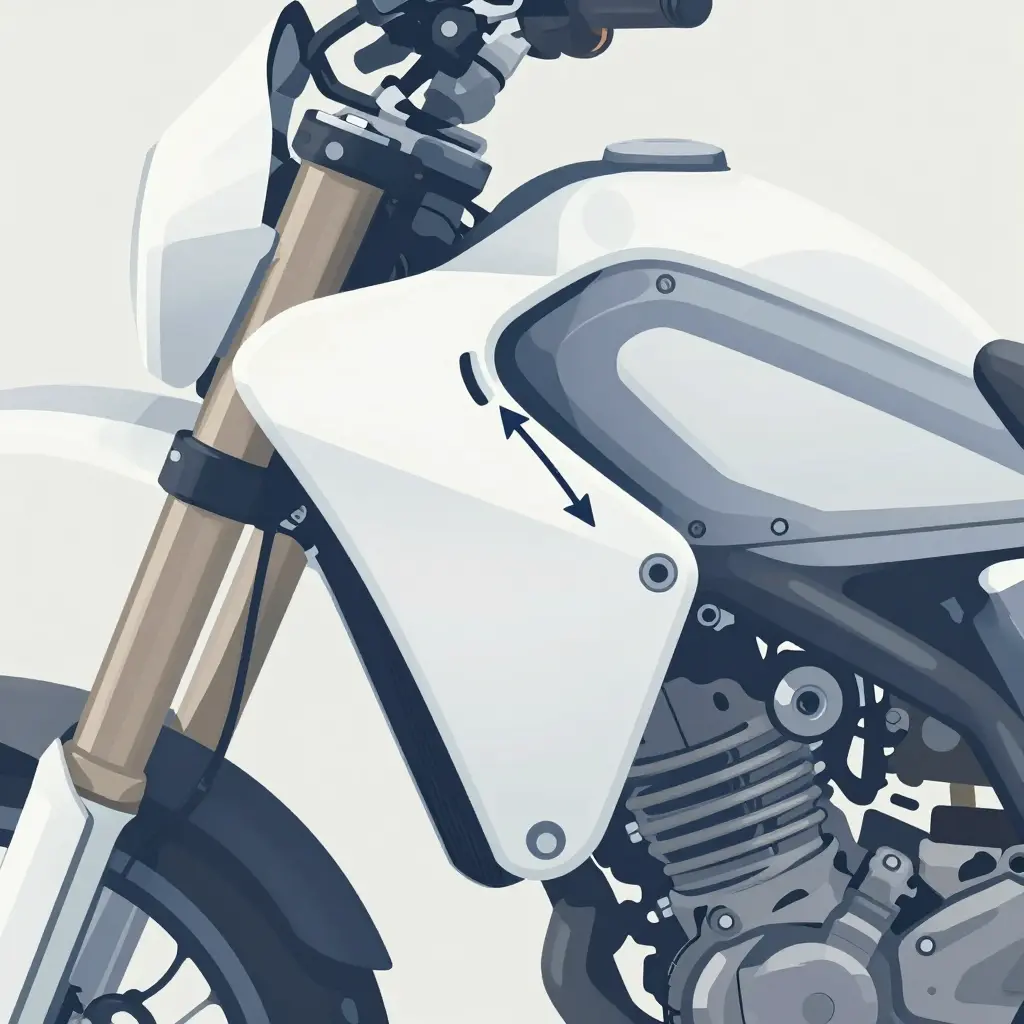
Why do aftermarket fairing bolt holes misalign?
Aftermarket fairings are frequently molded from a different master than the original OEM panels, so small dimensional differences build up across the assembly. Because each panel mounts onto the next, a few millimeters of variance at one point can push bolt holes far from their intended alignment. Heat cycling, shipping distortion, and inconsistent plastic thickness also cause bolt holes to misalign even on otherwise accurate kits.
Are misaligned bolt holes a sign of a bad fairing?
Not always. Minor misalignment can be a normal trait of replica fairings, since they are produced to a price point rather than OEM tolerances. However, if several bolt holes misalign by more than roughly 5 mm or the panels gap noticeably, that usually points to a low-quality mold or a warped part. A small amount of adjustability is expected; severe mismatch is a warning sign.
Can I fix misaligned bolt holes myself?
Yes, many technicians and riders correct bolt holes that misalign using simple techniques. You can enlarge a hole slightly with a round file or step drill, use rubber grommets and shoulder washers to absorb offset, or slot a bracket to regain adjustment range. For larger gaps, shimming or gently heat-forming the panel with a heat gun can help, but work slowly to avoid cracking the plastic.
Do fiberglass fairings fit better than ABS?
It depends on the manufacturer more than the material. High-quality fiberglass kits often fit well because the material is stiff and holds its molded shape, while cheap ABS can flex and distort. That said, fiberglass is less forgiving when bolt holes misalign, since you cannot flex it into place the way you can with ABS. For motorcycle fairing fitment, mold quality and brand reputation matter more than material alone.
How tight should fairing bolts be?
Fairing bolts should be snug, not cranked down. Most bodywork fasteners call for roughly 5 to 7 Nm (about 4 to 5 ft-lb), which is just past hand-tight. Over-tightening compresses rubber grommets, cracks plastic tabs, and can pull bolt holes out of alignment on the next install. Always use a small torque wrench or tighten by feel in a crisscross pattern.
Should I buy a fairing kit without seeing it fitted?
It is risky, but you can reduce that risk by buying from sellers who show the kit mounted on a real bike and offer fitment guarantees. Ask for photos of the panels installed, not just laid out flat, and check reviews that mention motorcycle fairing fitment specifically. If a seller refuses to provide fitted photos or a return policy, treat that as a red flag.
Chart Specification: Aftermarket Fairing Kits by Fitment Quality Tier
Chart type: Doughnut
Placement: Standalone, immediately after the FAQ section (separate from the table and image assets).
Title: Aftermarket Fairing Kits by Fitment Quality Tier
Purpose: Visualize how aftermarket fairing kits spread across four real-world fitment quality tiers, helping buyers set realistic expectations before purchase.
Segment labels and approximate percentage breakdown:
| Segment | Share | Color | Meaning |
|---|---|---|---|
| OEM-Level Fit (bolt-on, no adjustment) | 40% | Green | Holes and tabs line up out of the box; mounts like a factory panel. |
| Minor Adjustment Required | 35% | Blue | Slight trimming, slot widening, or gentle persuasion to align. |
| Moderate Rework Required | 18% | Amber | Drilling, re-tapping, or trimming of mounts before panels sit flush. |
| Poor Fit (holes badly misaligned) | 7% | Red | Significant rework or return; bolt holes and panels do not match at all. |
Data series:
- Labels: [OEM-Level Fit (bolt-on, no adjustment), Minor Adjustment Required, Moderate Rework Required, Poor Fit (holes badly misaligned)]
- Values (%): [40, 35, 18, 7]
- Colors: [Green, Blue, Amber, Red]
Display notes: Include a legend, show percentage labels on each segment, and note that percentages are illustrative estimates only, not industry data.
Asset: chart-aftermarket-fairing-kits.webp
Final Thoughts: Choosing Fairing Fitment You Can Trust
Misaligned bolt holes rarely come down to bad luck. Most trace back to the mounting side — a bent or non-OEM bracket, or a frame and subframe that are not straight — or to the panel side, where aftermarket mold tolerances are loose. Material choice matters too. Fiberglass, ABS, and injection-molded panels expand, flex, and drill differently under heat and vibration, so a panel molded to the wrong tolerance stack will never sit cleanly no matter how carefully you tighten it.
Before committing to any purchase, run the same checks that separate a good fit from a return:
- Confirm the fairing is listed for your exact year, make, and model.
- Verify mounting brackets and hardware are included in the box.
- Ask how the mold was produced and how quality is controlled.
- Request real installed photos rather than studio renders.
- Dry-fit the panels before painting: hand-thread every bolt, keep fasteners loose, and check panel gaps at several points before final tightening.
Run those checks first and reliable motorcycle fairing fitment becomes predictable instead of a gamble.
On the buying side, choose a supplier that offers a transparent fitment guarantee, with clear specifications, disclosed tolerances, and a stated commitment to resolving alignment issues. Summitfairings.com makes that promise explicit: the site states that any question gets an answer within six hours, giving you documented support before you buy and after installation.