
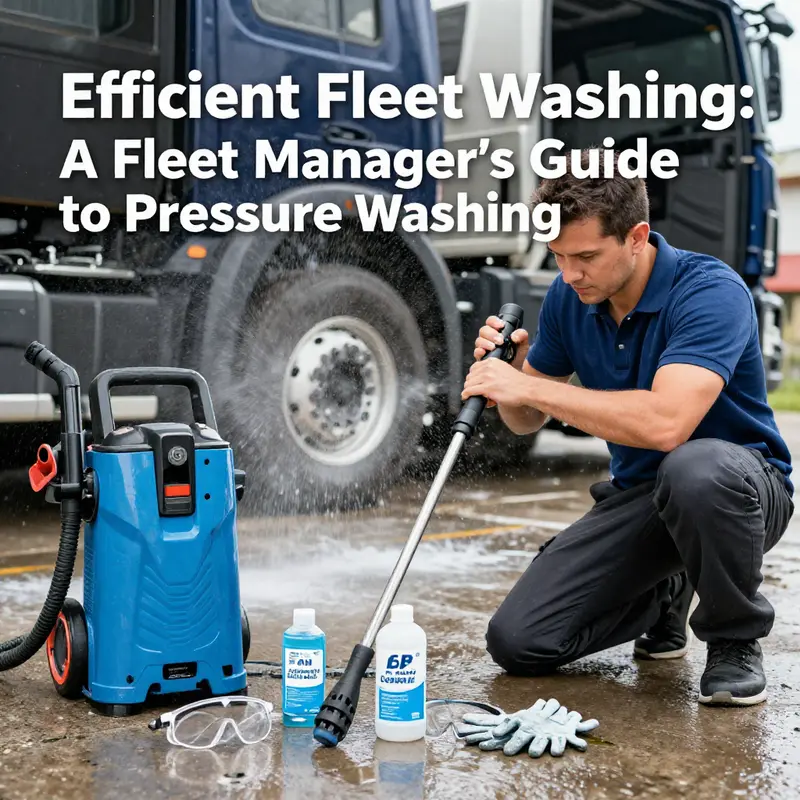
Maintaining a clean fleet is crucial for logistics, freight, and construction management. Pressure washing not only enhances the appearance of vehicles but also prolongs their lifespan by protecting surfaces from damage, rust, and corrosion. This comprehensive guide will outline critical steps for effectively pressure washing cars and trucks. Each chapter will delve into essential preparation tasks, the importance of a pre-rinse, how to apply cleaning solutions properly, and final rinsing techniques that ensure vehicles shine and stay protected. By following these guidelines, fleet managers can keep their vehicles in peak condition, ultimately contributing to operational efficiency and cost savings.
Laying the Groundwork: A Thorough Preparation for Pressure Washing Your Car or Truck
A clean finish begins long before the first spray. Preparation is not a ritual of waiting; it is the first act in protecting the paint, the trim, and the components that keep a vehicle looking good for years. When you approach a wash with a plan, you reduce the chance of rubbing dirt into the clear coat, you minimize the risk of water spots and etching, and you create a smoother, faster rhythm that makes the whole job feel almost effortless. The preparation phase centers on three essentials: the right tools, a sensible location, and a careful sequence that keeps every surface protected from top to bottom. Start by assembling what you need and imagining the path your water will take as you work. That mental map matters as much as the water itself, because it guides your movements and keeps you leaning toward safety rather than haste.
First comes the toolkit. The vehicle you care for deserves a pressure washer in a gentle range—typically roughly 1000 to 2000 PSI for standard cars and trucks. Anything much higher risks lifting wax, scuffing plastic trim, or bending delicate components. Choose a broad, fan-shaped nozzle—often a 40-degree tip—for the main cleaning. It spreads the spray into a softer sheet rather than a concentrated jet, which helps you wipe away grime without concentrating force on a single spot. For the cleaning solution, rely on a high-quality car wash soap designed for use with pressure washers. Avoid household detergents, dish soap, or bleach; these can strip wax and damage the clear coat. Put on safety goggles and closed-toe shoes, and consider gloves if you have sensitive skin. The goal is steady, controlled work, not brute force. If you manage the tools with care, the vehicle’s finish will repay you with a long, bright life.
Location matters as much as the equipment. A shaded area protects soap from drying too quickly and helps you spot soap residue before it dries into streaks. If you’re working in a space where drainage is a factor, be mindful of run-off and environmental considerations. A clean, level surface reduces the risk of slipping or misdirected sprays. In professional discussions about the broader workflow of vehicle cleaning, this preparation phase is sometimes treated as part of facility management for truck wash businesses, where every tool, space, and process is organized to support safety and throughput. facility management for truck wash businesses The point is simple: a well-prepared space reduces the chance of accidents and ensures a more predictable result.
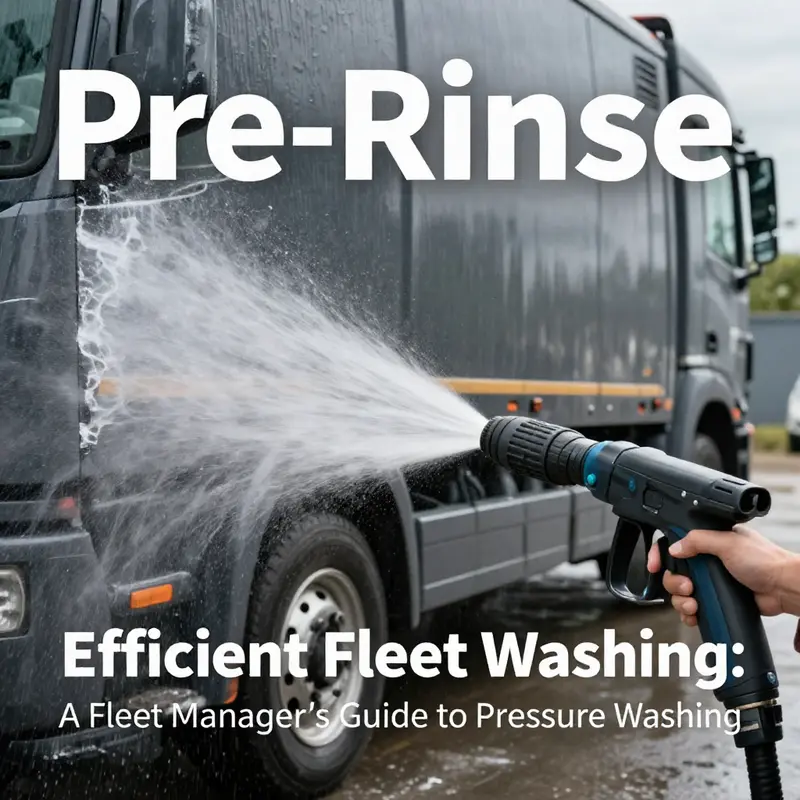
With your tools aligned and your site chosen, you can begin the wash with a deliberate, two-step approach. The pre-rinse, the critical first step, starts from the top and works downward. Begin around the roof and move methodically toward the lower panels, keeping the wand at a distance of about 12 to 18 inches (roughly 30 to 45 centimeters). Use a sweeping motion and avoid lingering on one spot. This initial rinse is not about final cleanliness but about loosening loose dust, sand, and mud that would scratch the finish if scrubbed in at full contact. In practice, spending about one to two minutes on each major area—the roof, the hood, the sides, and the rear—provides a reliable baseline that reduces friction later in the process. The pre-rinse is the shield that protects your paint from micro-scratches as you tackle tougher grime.
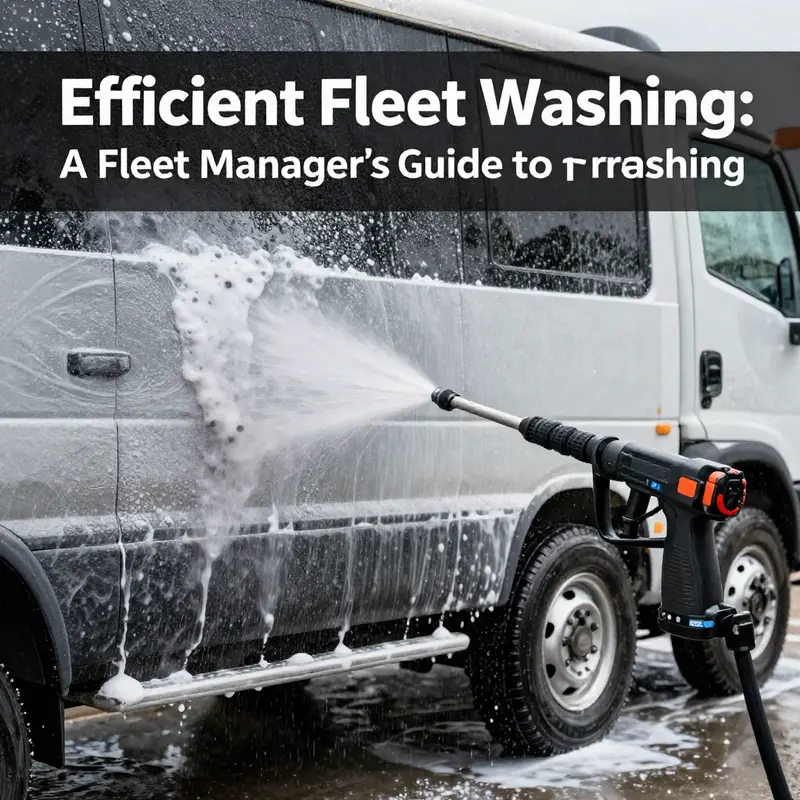
Next comes the soap. Dilute your car wash soap according to the manufacturer’s directions—common mixes run around 1:100 to 1:200 with water. A foam cannon can deliver a thick, even layer of suds to cover every surface, while a bucket-and-sponge approach offers a more hands-on method for seasoned detailers. Apply the suds from top to bottom, taking care to cover high-contact areas like the hood, roof rails, door handles, and lower side panels. For stubborn spots—wheel wells, undercarriages, and lower rocker panels—apply a touch more product and allow it to begin breaking down grime before you rinse. Letting the suds sit for a few minutes gives the cleaning agents time to work, softening grime in a way that reduces the need for aggressive scrubbing later.
The choice of nozzle and pressure during this stage should reflect the shape of the vehicle and the nature of the dirt. A wide-angle spray tip at a lower pressure is ideal for the body panels, protecting the clear coat while lifting away film of dust and road grime. You want an even, forgiving spray that keeps the surface calm rather than exciting a spray of droplets at close range. This approach is part of a broader philosophy of moving the wand consistently and avoiding the trap of concentrating water in a single spot. It’s as much about discipline as it is about equipment: a steady hand, a patient mind, and respect for the finish.
If you’re dealing with wheels, tires, and the undercarriage, you’ll find that this is where the work begins to demand a little more attention. For wheel cleaning, a dedicated wheel cleaner and a soft brush can lift brake dust from rims without scratching delicate alloy surfaces. When you reach the undercarriage, you can use a higher-pressure setting if your equipment permits and you’re comfortable with it. Maintain a safe distance—at least a foot or more from sensitive components—and avoid lingering the spray on any one spot. The goal is not to blast every bolt and line but to wash away salt, grime, and debris that accumulate in hard-to-reach areas. You’ll find that a measured, patient approach pays off in the exposure of clean metal and the absence of oily film that can promote streaks later in the process.
After you’ve loosened and removed the bulk of the grime, a final rinse brings the vehicle to the point where drying can begin in earnest. Start again from the top, ensuring that every crease, around windows, door seals, and around trim, receives a thorough rinse to remove soap residue. Soap left in seams and gaskets invites water spots and may degrade rubber over time. A clean rinse reduces these risks and supports a pristine finish. Drying is the next crucial step. A clean, soft microfiber towel works best for blotting and patting dry, which helps prevent water spots and keeps towels free of grit that can scratch during wiping. Work in sections, starting with the windshield and mirrors, then moving to the body panels. If you skip the drying step, the water can drip and streak in the sun or heat, making the final look uneven and requiring additional touch-ups.
Attention to detail matters most in the final stages. As you recheck the surface, inspect for missed spots or streaks that indicate soap or dirt trapped in folds and creases. The goal is a uniform sheen and a finish that looks almost like the car was dry-washed rather than rinsed with water. This is where experience matters: the cleaner the surface looks after the initial rinse and suds, the less you will have to scrub during the final pass. If you discover any spots that require extra attention, return to that area with a light touch and a cautious sweep, reconfirming that you are not applying more force than necessary.
Preparation also protects more than the paint. It preserves trim, seals, and rubber components by limiting random agitation and shielded exposure to harsh soaps and concentrated jets. It’s easy to underestimate how much a careful start affects the end result, yet the best-washed cars emerge not just clean but calm in appearance. And remember, the ritual of preparation is not a performance; it’s a promise to your vehicle that you respect its finish and its future. In the broader context of professional practice, this stage can be framed as an orderly system—one where tools, space, and workflow align to create safety and efficiency. A well-run process reduces the risk of accidents and damage, while delivering reliable, repeatable results that you can trust every time. For a practical perspective on how this mindset translates into operations, you can explore related topics in facility management for truck wash businesses, which emphasizes careful organization and planning across the entire workflow.
If you’re curious about how the same principle applies in larger operations, consider how a well-run facility organizes equipment, chemicals, and work zones to protect workers and vehicles alike. This mindset isn’t about complicating a simple job; it’s about translating caution into better outcomes. After all, a clean car begins with a clean plan. And that plan hinges on the thoughtful choices you make during preparation—from the right pressure range to the right nozzle, from soap selection to drying technique. When you begin with a clear plan and a respectful approach to the surface, you set a course for a wash that is thorough, safe, and satisfying. For readers seeking a broader, external reference on how professional guides approach preparation and technique, see the BBC guide linked in the resource notes.
External reference: https://www.bbc.com/guides/z3q9h7h
null
null
Foaming the Path to Perfection: Mastering Cleaning Solutions for Pressure Washing Your Car or Truck
The choice of cleaning solution is more than a passing detail in pressure washing a car or truck. It shapes how effectively dirt loosens, how safely the finish holds up, and how much time you’ll spend on the project. When you’re faced with a spectrum of grime—from light dust on a sedan to heavy road filth on a work truck—the solution becomes the first line of defense between a sparkling finish and compromised paint. The key is selecting cleaners that are purpose-built for automotive finishes, that respect seals and gaskets, and that work in harmony with the pressure and nozzle you’ve chosen. For most standard cars and sport utilities, a mild, pH-balanced car wash soap designed for high-pressure cleaning is the right starting point. These detergents are formulated to lift dirt and grime without stripping wax or dulling the gloss. When the vehicle carries more stubborn grime—mud that has baked onto wheel wells, grease that clings to undercarriages, or road grime that clings to rubber seals—an ordinary wash soap may not suffice. In those cases, a heavier-duty, biodegradable truck wash solution can be appropriate. The emphasis remains the same: use a cleaner that is safe on painted surfaces, compatible with the pressure washer, and gentle enough not to erode the finish. It is worth repeating the caution that many household detergents and dish soaps do not belong here. They can strip protective coatings and cause minor, sometimes irreversible, harm to seals and finishes. The long-term payoff for using automotive-specific cleaners is a consistent, high-quality result that protects the vehicle’s appearance and the integrity of its components. The right cleaner also works in tandem with the equipment you’re using. A cleaning solution that foams and clings helps keep dirt suspended and ready for removal, reducing the chance that grit is forced into the paint by a powerful stream. With that foundation, the method of application becomes a dance between chemistry and technique, designed to maximize the dwell time of the soap on the surface without sacrificing efficiency or safety. A practical approach begins with the pre-rinse: a low-pressure rinse that loosens dust, sand, and loose mud so that the solution has a clean stage to work on. This pre-rinse should come from top to bottom, with the wand kept at a respectful distance—roughly a foot to a foot and a half away from the surface—to avoid chasing grit into delicate edges or crevices. The aim is not to scrub away the dirt here but to set the stage for the cleansing foam that follows. Once the surface has been pre-rinsed, apply the cleaning solution. The preferred method is to use a foam cannon or a soap nozzle attachment, which creates a thick, clingy layer of foam. The foam slows down the contact of the water with the surface, allowing the cleaning agents time to break down embedded grime before the rinse begins. In this moment, the two-bucket method becomes particularly valuable. One bucket holds the diluted cleaning solution, while the other contains clean water for rinsing your wash mitt or sponge. This simple practice prevents dirt from reblending with the cleaner and minimizes the chance of scratching the finish. A quick pro tip here: always apply the cleaning solution after you’ve completed a pre-rinse. Detergent on dry, dusty surfaces can trap grit during the wash, potentially creating micro-scratches when you begin to scrub. After the foam has had a moment to work, you can move into gentle agitation. Scrubbing should be done with soft tools—microfiber mitts, soft-worded sponges, or dedicated car wash brushes. The intent is to lift dirt without scouring the paint. It’s crucial to avoid stiff brushes or abrasive pads that can mar the surface. The goal is not brute force but a progressive clean. If the vehicle is heavily soiled, you may need to reapply the soapy layer in areas that still show stubborn grime and repeat a light scrubbing in those zones. The sequence of operations—pre-rinse, apply, dwell, scrub, rinse—should feel like a controlled flow rather than a series of disjointed steps. When you move to rinsing, the same top-to-bottom discipline applies. A thorough rinse removes all suds and residues, particularly from hard-to-reach crevices around windows, door seals, and trim. Pay extra attention to rubber seals and gaskets, which can trap soap and harbor residues that invite water spots or early wear if left unattended. Drying is the final act of care. Use a clean, soft microfiber towel and work in sections, beginning with the windshield and mirrors before moving to the body panels. Immediate drying helps prevent water spots and keeps the soap from drying on the surface. While the overall cleaning plan focuses on the interplay between cleaning solutions and technique, certain nuances deserve emphasis. For example, when tackling wheels and tires, you’ll want to rinse more thoroughly and perhaps use a dedicated wheel cleaner and a stiffer brush, but you must still maintain proper distance from the wheel bead and surrounding suspension components. If you’re cleaning undercarriages—as much as your setup and comfort allow—give the underside a careful rinse, taking care not to spray sensitive lines or components. The solution you choose will influence, but not replace, safe handling and pressure discipline. A common misstep is directing the nozzle at a single spot for too long. The risk here is etched paint or damaged seals. The wand should stay in motion, and the effort should be sectioned so you don’t overwhelm any one area with a single pass. If you’re managing a fleet, the choice of cleaner becomes even more strategic. For many vehicles, a blend of mild car wash soap for day-to-day washing and a heavier-duty cleaner for heavy grime days—used in a measured, safe manner—can keep vehicles looking sharp without compromising paint or seals. In this context, building a rinse-and-repeat routine can ensure consistency across multiple vehicles and reduce the likelihood of careless missteps that can occur when rushing. The value of a well-chosen cleaning solution extends beyond aesthetics. Regular use of automotive-safe cleaners helps preserve wax and sealants, preserves rubber seals, and reduces the likelihood of long-term staining by road grime. To connect the theory with practice, consider the broader strategies employed by professionals who deal with tough grime on larger vehicles. Proven strategies for cleaning grease and tar off your trucks fast offer a reminder that even high-labor grime responds to a measured approach that respects surface materials. That resource emphasizes keeping protective coatings intact while using cleaners that lift stubborn deposits. It’s a reminder that an organized workflow, paired with compatible products, yields better results with less risk of damage. For fleets and individuals alike, the practical takeaway is simple: choose purpose-built cleaners, use them correctly, and integrate them into a disciplined washing routine. The rest of the process—dwell time and rinsing—depends on the grime level and the surface being treated. If you’re curious about expanding your knowledge of cleaning strategies for trucks and other heavy-duty applications, you can explore standalone guidance on grease and tar removal as a complementary technique. Internal links can be a helpful bridge for readers seeking more context. For example, you can explore proven strategies for cleaning grease and tar off your trucks fast, which aligns with the logic of using targeted cleaners and controlled application to tackle stubborn grime while protecting paint and seals. This is not a departure from the car-focused approach; it’s a natural extension of the same principles scaled for heavier contamination and larger surfaces. The central thread remains clear: the right cleaner, applied in the right way, multiplies the effectiveness of your equipment and protects the vehicle’s finish. As you incorporate pressure washing into regular maintenance, you’ll notice cleaner wheels, brighter paint, and fewer bothersome water spots. You’ll also gain confidence in handling undercarriage wash scenarios and other tricky areas by adhering to the top-to-bottom principle and by maintaining an even, sweeping motion with the wand. Beyond the immediate wash, a few post-cleaning considerations complete the cycle. After drying, you may choose to apply a protective wax or sealant to restore shine and provide a durable barrier against UV exposure and future contaminants. Regular maintenance, such as monthly washes and quarterly detailing, helps sustain the finish and prolongs the vehicle’s value. The philosophy behind these guidelines is straightforward: care for the finish, use cleaners that respect the vehicle, and maintain a disciplined technique to maximize results with minimal risk. For readers who want a concise synthesis of the method, remember these core ideas. Start with the appropriate cleaning solution for the vehicle type—mild and pH-balanced for cars, heavier-duty but biodegradable for trucks when needed. Pre-rinse to loosen debris, then apply the foam with a cannon or soap nozzle to maximize dwell time. Use the two-bucket method to keep tooling clean, and scrub gently with soft mitts or sponges. Rinse from top to bottom, dry promptly, and follow up with protective measures for long-term shine. If you’re expanding into the broader world of vehicle care, the linked resource provided above offers an external perspective on professional cleaning solutions and practices. And for readers who want to connect this chapter to a broader fleet and facility context, the internal link to proven truck-cleaning strategies can serve as a practical bridge to related topics on maintenance, safety, and process efficiency. External resource: Kärcher Vehicle Cleaning Solutions.
The Final Sweep: Mastering Rinse, Dry, and Shine After Pressure Washing Your Car or Truck

The final sweep is more than a cosmetic flourish. It is the careful completion of a process that protects the paint, preserves finish integrity, and keeps your vehicle looking showroom-clean for longer. After the scrubbing and the rinse, the last steps—thorough removal of any lingering soap, meticulous drying, and a protective finish—determine whether the effort results in a glossy, spotless surface or a finish prone to water spots and micro-marring. The technique here is straightforward, but it rewards discipline. A well-executed finish guards against mineral deposits, ensures consistent shine across panels, and minimizes the risk of contaminants rebonding to the surface as you drive away. It is a disciplined routine that pairs the mechanical action of rinsing with a careful, almost ceremonial, attention to detail. When done correctly, the final steps feel like an extension of the clean you achieved during the wash, not a separate, optional add-on.
Rinsing stands as the first pillar of this finale. After you’ve applied the appropriate detergent and given the surface a thorough scrub, reintroduce your high-pressure wand with a larger, fan-shaped spray. Begin at the top and work your way downward, methodically sweeping across each panel to ensure no soap residue clings to door edges, window seals, or trim lines. Soap left on rubber seals and around creases can dry into a film that dulls color and invites new dirt to cling. A thorough top-to-bottom rinse prevents the risk of dirty water running back onto already-clean areas, a consequence that can undo hours of careful work. Keep the wand in motion, avoiding a lingering jet on any single spot for more than a couple of seconds. The motion becomes a rhythm: a steady pass across the roof, then one down the windshield, a sweep over the hood, and a careful pass along each side. This approach isn’t merely about removing soap; it’s about ensuring the surface is truly free of cleaner residues that, if left behind, could attract dust or degrade the wax or sealant you may later apply.
Drying, however, is where the process transitions from cleaning to detailing. Water left to air-dry often leaves mineral deposits and hard water spots, especially in communities with hard water. The first rule of drying is immediate action. Once you finish the final rinse, switch to a clean set of microfiber towels or chamois and begin the process right away. Start at the roof and move downward in sections, using a blotting or light wiping motion to lift water without dragging dirt across the paint. Blotting, rather than dragging, helps reduce micro-scratches and swirl marks that can occur when a towel glides over surface dust or grit. The two-towel method is particularly effective: designate one towel for initial blotting and another for polishing and buffing to a streak-free finish. When you handle edges and creases—around windshield corners, door jambs, and the junctions of panels—use careful, narrow strokes to pull moisture from the seams without forcing it into gaps that could trap it later. A good drying routine ends with a final wipe-down of the most exposed zones—the leading edges of doors, the base of A-pillars, and the tops of side mirrors—to ensure every area has a consistent, dry touch.
The finishing touches are more than cosmetic. They complete the protective cycle started by the wash. With the vehicle dry, you have the option to apply a high-quality wax or sealant to seal in the finish and add an extra layer of gloss and protection against environmental fallout. The choice between wax and sealant should be guided by your climate, your patience for maintenance, and the level of gloss you desire. Wax tends to yield a warm depth of shine and is typically easier to work into a thin, even coat, while sealants generally offer longer-lasting protection and quicker removal of residue after the next wash. Either choice should be applied to a clean, dry surface and worked in thin, even coats. Smooth, cross-hatch motions help distribute the product evenly and minimize streaks. After the initial coat cures briefly, a light buff with a fresh microfiber cloth removes any remaining haze and reveals a uniform, glassy finish. It’s essential to avoid applying wax or sealant in direct sunlight or on surfaces that are still warm to the touch; heat can cause uneven curing and leave streaks or film residues that defeat the purpose of the final shine.
As the surface begins to glow, attention to detail shifts from the body to the small, often overlooked zones that define a truly professional finish. The wheels, for instance, deserve one more pass, not with cleaner alone but with a dedicated approach that prevents rinse-water residues from being dragged onto the painted panels. Spin the tires carefully and use a separate clean cloth to wipe the tire sidewalls, ensuring you do not transfer the wheel grime to the face of the paint. While wheels demand their own care, you also want to ensure the undercarriage is free from salt, mud, and debris if conditions permit a brief rinse in that area. If the vehicle’s undercarriage was previously neglected, you may consider a cautious, gentle rinse of the lower frame to prevent corrosive buildup from lingering. In all cases, avoid aggressive contact with exposed components such as brake lines and electrical connections. Your goal is to protect the finish and the integrity of sensitive parts, not to trade one problem for another.
One practical reminder threads through this final sequence: never rush the process. The impulse to speed through rinsing, drying, or applying finishing products can produce uneven coverage or leave water spots that undermine the effect you’ve spent so much effort achieving. Instead, approach each stage with patience. If a stubborn spot reappears—perhaps a spot near a door seal that still holds a few droplets—return to a light spray and a gentle wipe with a fresh microfiber, repeating as needed. The clean vehicle you see at the end is the result of disciplined repetition, not a single, heroic effort. It is this consistency that protects your investment and keeps the finish looking new longer.
To integrate the concept of finishing techniques with broader maintenance ideas, consider how this approach aligns with proven strategies for cleaning grease and tar off your trucks fast. It’s a reminder that the same attention to gentleness, controlled conditions, and thorough rinsing can translate across different vehicle profiles and grime scenarios. This cross-application underlines a core principle: the surface you see is a reflection of the care you give it at every step. You don’t rush to the finish line; you cultivate it through a deliberate, repeatable routine. The final sweep is, in essence, a culmination of the discipline you practiced during the wash, extended into the realm of finish and protection.
In addition to the internal checks that ensure your car emerges spotless, it can be useful to be mindful of the environmental footprint of your process. The rinse water you use inevitably carries soap and dissolved minerals. If you are washing in a driveway or on a paved surface, ensure you don’t direct runoff toward storm drains or into areas where contaminants could enter the water system. A simple, practical habit is to capture and reuse rinse water if feasible, or to direct it toward permeable ground where appropriate and safe. These considerations might feel secondary to getting a pristine finish, but they reflect a broader responsibility that accompanies the care you give your vehicle and the spaces where you wash it.
As you step back to survey the final result—a reflective surface with a uniform glow, free from residue, and protected by a fresh layer of wax or sealant—you can take a moment to acknowledge the value of a methodical finale. The car, truck, or SUV in front of you is not merely clean; it is better protected against the daily assaults of weather, road grime, and salt. The process you’ve followed—top-to-bottom rinsing, careful drying, and selective finishing—has reinforced a simple truth: the best wash is one that respects the finish and the tool you’ve chosen to use. When you repeat this sequence, you reinforce the protection and the luster that makes every drive feel just a little more ceremonial.
For readers seeking a broader context on how these steps fit within a fleet or professional maintenance routine, the linked resource above offers further perspectives on efficient cleaning techniques and the practicalities of maintaining cleanliness in environments where cleanliness translates to efficiency and safety. If you’re interested in exploring more about how rigorous cleaning protocols intersect with trucking operations, this broader view can illuminate how small daily routines scale into measurable improvements in maintenance, downtime, and overall vehicle longevity. As with any skill, proficiency grows through repetition, reflection, and a willingness to refine your method based on what works best for your vehicle and your environment. The final sweep is not the end of learning; it is the closing chapter of a routine you may well perform again and again with greater ease and reliability.
External reference for deeper guidance on pressure-washing technique and vehicle-specific considerations: https://www.caranddriver.com/how-to/pressure-washing-your-car
Final thoughts
Properly pressure washing your fleet vehicles is an essential investment in maintaining their appearance and durability. By carefully preparing, executing pre-rinse techniques, applying the right cleaning solutions, and performing thorough rinsing, fleet managers can ensure their vehicles are clean, reliable, and presentable. Emphasizing these processes not only extends the lifespan of the fleet but can also enhance your company’s image in the eyes of clients and stakeholders. Make pressure washing a routine part of your fleet maintenance strategy to achieve optimal performance and efficiency.