The challenge of maintaining a clean truck engine is vital for operational efficiency and vehicle lifespan, especially for fleet managers in logistics and construction. Power washing is an effective solution; however, it requires meticulous preparation and execution to prevent damage to sensitive components. This guide will equip you with necessary steps to prepare your truck engine for washing, the appropriate tools and cleaners, and a detailed step-by-step cleaning process. Understanding these elements will ensure that your engines remain in peak condition, and your fleets can operate without unexpected downtime due to cleanliness-related issues.
Safe Start: Preparation Steps to Power Wash a Truck Engine Without Damaging Critical Systems

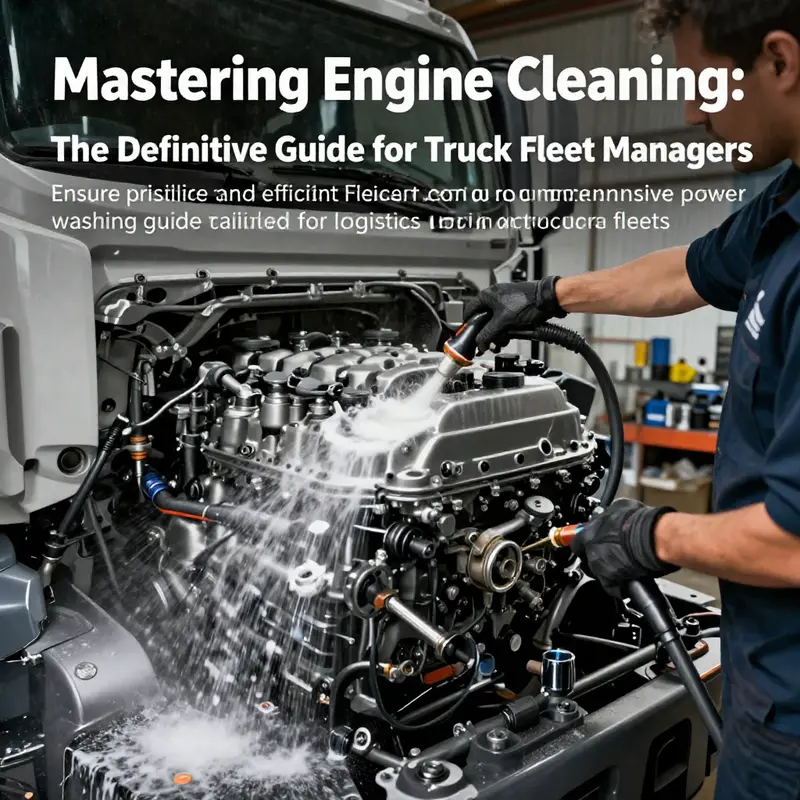
Preparation sets the tone for any engine cleaning project, and when the goal is power washing a truck engine, preparation becomes the difference between a clean bay and a costly repair bill. The engine bay houses sensitive electronics, hot plastics, and a tangle of wiring and hoses that can fail silently if water is allowed to intrude where it should not. The run-up to any wash should begin with a calm assessment of heat, moisture, and accessibility. First, the engine must be cool. Hot components are vulnerable to thermal shock that can crack plastic parts, warp seals, or weaken wiring insulation. A practical rule is to wait at least two to three hours after the engine is shut down, giving the metal and plastic pieces enough time to drop from operating temperatures. This cooling window matters because even when the truck sits in the shade or a garage, surface temperatures can linger, and water contacting a warm surface behaves differently than it does on a truly cold metal surface. The risk is not only the obvious cracking but also the slower, harder-to-detect degradation of seals and coatings that keep fluids where they belong. Even with a cool engine, you should proceed with patience, understanding that rushing this phase invites the kind of mistakes that require expensive fixes later on. The next steps revolve around safeguarding the electrical system. Water and electricity are a dangerous mix, and power washing introduces a scenario where moisture can slip into vulnerable junctions if you are not deliberate. To minimize risk, disconnect the negative battery terminal. This simple precaution can dramatically reduce the chance of short circuits if water finds its way to wiring or connectors. Some professionals advocate this step as essential, while others consider it optional if you are using careful, targeted spray and proper covers. If you choose to disconnect, follow the vehicle’s manual and ensure the battery is secured and isolated. Even with the battery removed, it is prudent to take extra precautions around electricals, which means protecting the air intake, the ECU, the fuse box, relays, and any exposed sensors. Shielding these parts reduces the odds of conductive water finding a path to a circuit that should stay dry. The preparation phase also includes proactive protection of the air intake and exhaust system. An air intake block is a clear access point for water, and a single misstep can allow moisture to reach the throttle body or intake valves. Use a waterproof bag or specialized engine cover to seal the air intake, particularly around the mass airflow sensor that sits near the filter housing. Similarly, if you can, cover the exhaust manifold and nearby exhaust components. Water intrusion in the exhaust system can create corrosion not only in the metal, but it can also affect the catalytic converter’s protective coatings over time. The aim is to limit moisture exposure to the most critical zones while maintaining an avenue for air to escape and for heat to dissipate. When you proceed through these protective steps, you also set the stage for a smoother cleaning session, because blocked access points and loose wiring are less likely to trap grime or permit water to pool where it should not. Preparation also covers what you bring to the task. Use a gentle, biodegradable engine degreaser designed for automotive use. The degreaser should be allowed to dwell for five to ten minutes to break down oil and grease, softening the stubborn grime that otherwise would require aggressive scrubbing or high-pressure blasts. Avoid household cleaners or any degreaser that could damage gaskets, seals, or paint. The cleaner itself becomes part of the safety system; it reduces the need to rely on high-pressure streams to dislodge heavy buildup, which in turn minimizes risk to sensitive components. For the actual washing, equip yourself with a soft-bristle brush, microfiber towels, and a spray nozzle that can be dialed down to a low or medium pressure. A pressure washer remains a tool of choice only when used prudently at low settings. If pressure washing feels beyond what you’re prepared to manage safely, a garden hose with a gentle spray nozzle is often enough to rinse away loosened grime after degreasing. The goal is to create a controlled, forgiving cleaning environment where water flow can be directed with care rather than force. The equipment choice matters as much as the technique. A high-pressure jet—especially one that exceeds 1000 to 1500 psi—can drive water into cracks around seals and into wiring harnesses. This is why the preparation phase emphasizes low-pressure cleaning, deliberate shielding, and a clear plan to work from top to bottom so gravity assists, not defeats, the process. As part of a safe mindset, you should also lay out a plan for the order of operations inside the engine bay. Begin by applying the degreaser to areas that accumulate the most oil and grease, including under the valve cover, around the oil filter, and near the oil pan. The dwell time lets the degreaser emulsify the viscous grime, making it easier to wash away with a gentle rinse. The step-by-step approach is designed to limit the amount of re-accumulated dirt and prevent grime from running into parts you’ve already treated. When you rinse, move gradually from the top of the engine compartment downward, keeping the spray at a safe distance—typically at least a dozen inches away from any exposed electrical components or sensors. The rationale is straightforward: gravity should help pull water away from the most delicate areas without forcing it into spaces that could trap it. Where stubborn residue persists, a soft brush makes the difference. A light scrubbing can loosen oil pan seams, valve covers, and the radiators’ front edges without resorting to aggressive spray pressures. After you’ve finished rinsing, the critical step is thorough drying. Water that clings to connectors, sensor housings, or interior crevices can cause long-term corrosion and intermittent electrical faults. Use compressed air to puff out moisture from confined spaces, followed by wipe-downs with clean, lint-free towels. The goal is to remove as much water as possible and to ensure the bay is dry enough to avoid concealing damp spots that would later evaporate and attract dirt. A cautious, patient dry-down is worth the time, especially if you plan to reconnect the battery and start the engine for a test run. This is not a moment to speed through; moisture trapped in the wrong place can turn a routine wash into a problem that shows up away from the workbench. Once the bay is dry, you can reattach the battery if you had disconnected it, and you should perform a careful inspection for any signs of damage. Look for wet spots near wiring, signs of corrosion, or softened hoses. If any doubt remains about a component’s integrity, replace or seal it before proceeding. If the cleaning disturbed any filters or housings, consider replacement or re-sealing; oil and air filters deserve special attention because a dirty filter can harbor contaminants or unseat during a wash, which would compromise performance or engine protection. After the wash, fresh oil and a new filter can be a prudent step if you suspect the oil system was disturbed or sprayed with degreaser. This does more than protect the engine; it also ensures lubrication remains consistent during the reintroduction of power and heat. The practical upshot of this preparation is that it minimizes the risk of water-induced faults and keeps the engine bay ready for a controlled, safe cleaning experience. The cautionary notes that follow are not a scare tactic but a reminder that power washing is a tool to be used judiciously. Never run the engine while you are power washing; this practice can introduce a dangerous combination of water and live electricity. Avoid directing high-pressure jets at seals, gaskets, or open ports where moisture can be forced into areas that should stay dry. If electricity and water are involved, you may be facing not just a messy engine bay but a costly repair bill that interrupts service and reduces the truck’s uptime. Some maintenance guides emphasize that for the majority of truck owners, manual cleaning with a degreaser and soft brushes often yields similar results to a power wash, with far less risk. The degree of grime you’re dealing with will influence your choice: general road grime and light oil buildup can usually be managed with hand cleaning, while heavy, baked-on grease or tar may tempt the use of more aggressive methods—only under controlled conditions and ideally in a shop where professionals can manage the risk. If you decide to pursue a more thorough approach, remember to set expectations accordingly and plan for an additional dry-down period after any deeper cleaning. A well-structured preparation phase reduces the likelihood that you’ll be surprised by a leak or a short caused by moisture. It also guarantees the protective layers you’ve put in place, such as air intake covers and electrical shields, remain intact through the process. When you read practical guidance from the field, you’ll find that experienced technicians often stress a holistic view: treat the engine bay as a system, not a collection of separate parts. The air flow paths, electrical connectors, and seals work in concert, and any disruption can reverberate through the performance and reliability of the truck. With that in mind, a key takeaway from preparation is that the job is not just about lingering grime removal; it is about preserving the integrity of the engine’s protective layers and ensuring that components stay dry and functional long after the wash is complete. For readers looking to connect this preparation mindset with broader best practices, consider the proven strategies for cleaning grease and tar off your trucks fast. This resource highlights the value of controlled methods in a real-world setting and can serve as a practical companion to the steps outlined here proven strategies for cleaning grease and tar off your trucks fast. Although the aim here is safety, the deeper message is that attention to detail in the prep phase pays dividends in the quality of the outcome. It is worth noting a recommended external resource that expands on best practices for engine under-hood care and cleaning. A comprehensive guide from an established automotive maintenance reference emphasizes the importance of letting the engine cool, shielding sensitive components, and using appropriate degreasers and tools to minimize risk. They reinforce the sequence of application, dwell time, and a disciplined rinse, followed by thorough drying and final checks. The emphasis is on safety first, with the understanding that the engine bay is a delicate ecosystem where moisture control, heat management, and electrical isolation converge to determine the final condition after cleaning. The overarching message is consistent across expert guidance: preparation is not a formality but a foundational step that protects a complex machine from missteps during cleaning. By embracing a methodical approach to cooling, protection, and gentle cleaning, you set up the rest of the process for success, and you maintain the long-term reliability of the truck’s engine and electrical systems. This mindset aligns well with the broader aim of the article: to teach readers how to power wash a truck engine without compromising performance or safety. While some may argue that power washing offers time-saving benefits, the prudent path recognizes how preparation, protection, and conservative cleaning can achieve similar cleanliness with a far lower risk profile. The practical takeaway is to treat preparation as a cornerstone, not a preliminary ritual. If the job is approached with care, the engine bay can emerge cleaner, more manageable, and ready for the next stages of maintenance, whether that means a simple wipe-down, reassembly, or a careful follow-up service. External resources can further support this careful approach, but the real value comes from applying disciplined preparation checks every time. For those who want a concise reminder of the steps, the essence is simple: allow the engine to cool; disconnect the battery; shield sensitive components; prepare a biodegradable degreaser; apply and dwell; rinse at low pressure from top to bottom; avoid spraying electrical connections directly; scrub where needed with a soft brush; rinse thoroughly; dry completely; reconnect the battery; inspect for damage; and finally, consider oil and filter changes if they were disturbed during cleaning. This disciplined sequence minimizes the risk of water-related damage and ensures you get a clean engine bay without compromising the truck’s reliability. As you move from preparation into the actual cleaning phase in subsequent chapters, carry forward this awareness. The careful steps you take now create a stable foundation for an effective, efficient, and safe engine cleaning process that respects the integrity of the truck’s most vital systems and supports long-term performance. External resource: https://www.autozone.com/vehicle-care/under-the-hood/cleaning-your-truck-engine
null
null
Stepwise Cleaning Mastery: Safely Power Washing a Truck Engine Bay
Power washing a truck engine bay is less about brute force and more about balance. The engine is a mosaic of metal, rubber, plastic, sensors, and electronics, all of which respond differently to water, pressure, and cleaner chemistry. When done with care, power washing can reveal a clean, functioning engine and a clearer view of potential leaks or worn parts. When done poorly, it can invite corrosion, electrical shorts, or dislodged connections that complicate repairs. This chapter builds a stepwise approach that integrates preparation, cleaning methods, and aftercare into a single, flowing practice that respects the engine as a complex system while delivering tangible cleanliness. The guiding idea is simple: prepare thoroughly, apply the right products, use the gentlest effective approach, and finish with a careful dry and inspection. In practice, this means knowing what to shield, what to scrub, how to rinse, and when to walk away and let things dry. It also means recognizing that power washing is not a substitute for regular maintenance; it is a procedure you reserve for when the grime has built up to a level that hides critical components or undermines performance. With this mindset, the engine bay becomes not a battlefield of stubborn grease but a controlled environment where precision, patience, and protective measures keep the engine ready for the road ahead.
Preparation anchors the entire process. After a drive, the best time to begin is when the engine has cooled completely. A hot engine, even briefly, can suffer thermal shock when water contacts hot surfaces. Allow a cooling period of a few hours, ensuring the metal and plastic parts are cool to the touch. This is not about rushing through a chore; it is about preventing cracks and warping that high heat can exacerbate. Next, disconnecting the negative battery terminal eliminates the risk of electrical shorts should water find its way to wiring or connectors during the rinse. The moment you recognize the potential for moisture intrusion is the moment you protect the truck’s brains. Shield sensitive components with plastic bags or waterproof covers: the air intake, alternator, the ECU, fuse box, oxygen sensors, spark plug wells, and wiring harnesses all deserve protection. A simple labeling system or masking tape helps you reassemble quickly and verify you didn’t miss any critical areas. Removing loose debris is the quiet, preparatory step that prevents grime from being forced into tight spaces during washing. A soft brush or a quick puff of compressed air clears leaves, dirt, and dust from around the engine bay, especially around crevices near the valve covers and oil pan.
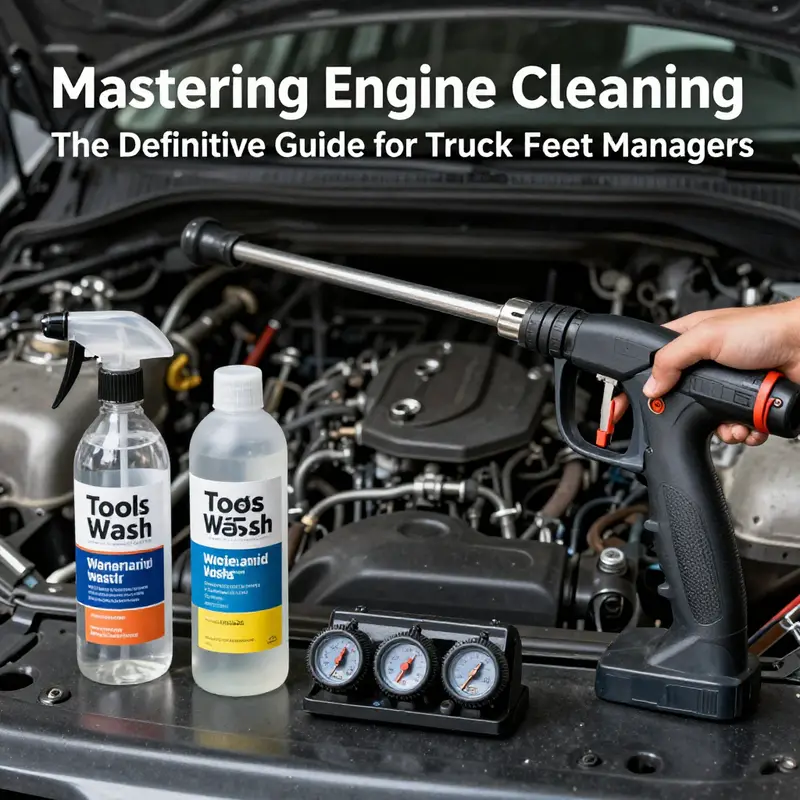
With the engine cooled and the bay shielded, the right tools and products become the next essential chapter of the story. A household pressure washer often exceeds safe limits for engine cleaning; its high PSI can overwhelm seals, push grime into seals, and loosen delicate connections. Instead, select a unit with adjustable settings, ideally maintaining 1000–1500 PSI for safe, effective cleaning. Engine-safe cleaners or degreasers designed for automotive use create a bond with grease that lightens it without requiring aggressive water pressure. Apply the cleaner generously to all greasy and dirty surfaces, focusing on the oil pan seams, around the valve cover, the area around the oil filter, and near the exhaust manifold. Let the cleaner dwell for 5–10 minutes to break down oil, grease, and grime. This dwell time reduces the need for aggressive blasting and helps protect seals and hoses from direct spray damage. Never reach for dish soap or labels that advertise household detergents as a substitute. Harsh detergents can strip protective coatings, soften rubber hoses, or degrade seals, compromising the engine’s integrity over time. The goal is chemistry that loosens grime while water pressure remains a gentle partner rather than a wrench.
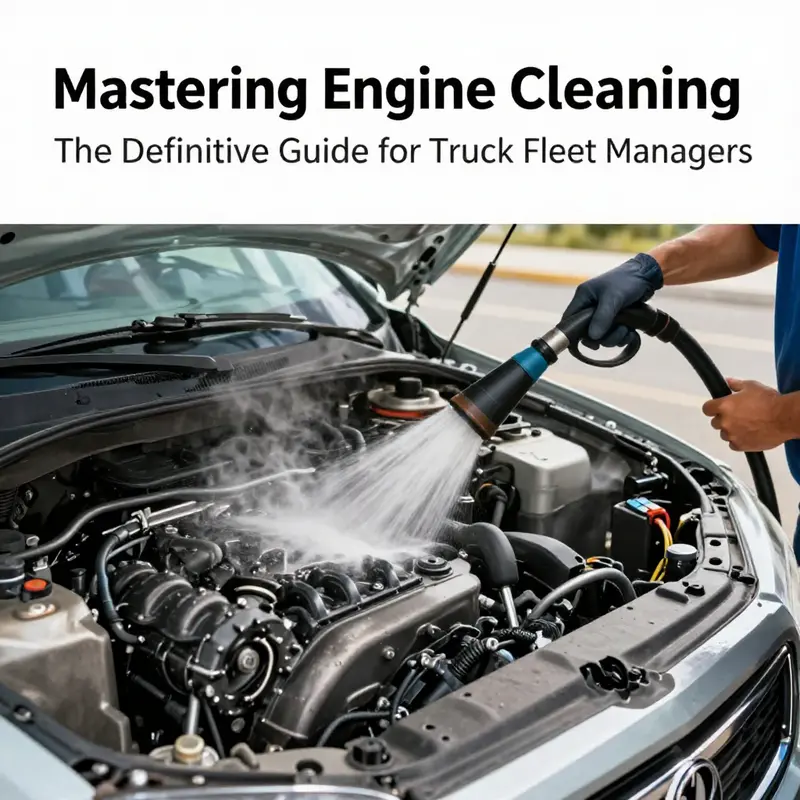
The actual cleaning unfolds as a controlled dialogue between cleaner, brush, and rinse. Begin by applying the degreaser evenly across the engine surface. Concentrate on oil-stained areas, under the valve cover, around the oil filter, and near the exhaust manifold. After allowing the cleaner to work, keep it from drying completely by rewetting or reapplying if needed. When it comes time to rinse, start with a low to medium pressure rinse at least 12 inches away from the engine. The rule of thumb is to work from top to bottom: water should flow downward, carrying loosened grime away from critical components rather than into them. Avoid spraying directly at electrical components, bearings, or open ports. Instead of brute force, use a soft-bristled brush for stubborn spots such as oil pan seams, behind the radiator, or in tight crevices where grime clings stubbornly. Scrubbing is gentle. You’re easing grime, not tearing off protective layers. The rinse should be thorough enough to remove cleaner residues, as any leftover cleaner can attract more grime or promote corrosion over time.
Understanding the role of pressure in power washing is critical. If you must use the pressure washer, keep settings at the lowest effective level, ideally below 1500 PSI, and choose the widest fan spray. Maintain a cautious distance—12 to 18 inches from engine components—to minimize the risk of driving water into seals, sensors, or electrical connectors. While spraying, keep the wand moving in a steady arc to avoid concentrating force on a single spot. Focus on solid metal surfaces and areas with heavy grime, and let the flow ride down with gravity rather than fighting against it. This approach won’t transform your engine into a pristine showroom piece in a minute, but it will wash away built-up dirt without inviting avoidable damage. After the high-pressure pass, a final, lighter rinse with low-pressure water removes residual cleaner and loosens any remaining residue. If access is difficult, a narrow stream at a safe angle might be safer than a broad high-pressure spray that can inadvertently vent moisture toward connections you shielded earlier.
Drying is not glamorous, but it is essential. The engine should air-dry in a well-ventilated area. If you have access to compressed air, use it to speed up the drying in tight spaces and around the sensor housings, but be careful not to drive debris deeper into the engine bay. The objective is to eliminate moisture from critical nooks and crevices, especially around the electrical connectors, wiring looms, and near the ECU weatherproof enclosures. The moment the engine feels dry to the touch and there is no visible moisture, you can proceed to the next steps. Reconnecting the battery is not a rush decision; confirm the engine bay is completely dry. If you’ve disturbed components or if there is any sign of moisture near the connectors, take a little more time with drying. A brief, cautious recheck now can prevent a late-night electrical gremlins problem later.
Post-cleaning checks transform washing from a cosmetic exercise into a protective maintenance step. Reconnect the battery only after you have verified dryness. A quick inspection for wet spots, corrosion, or damaged hoses is prudent. The moment you reintroduce moisture to an area that’s still damp or contaminated, you risk short circuits or corrosion. If you found compromised filters, like the air filter housing that might have shifted or allowed moisture entry, consider replacing them to maintain clean air delivery to the engine. It is also prudent to consider oil and filter changes if the cleaning process disturbed the lubrication system or if you’ve opened the oil pathways or valve covers in a way that might introduce moisture or contaminants. Fresh oil and a new filter help restore optimal lubrication and protect engine internals as you resume driving. This is not merely about a clean appearance; it is a small investment in mechanical longevity. The overall goal is to ensure no moisture remains in areas where it can cause corrosion or short circuits and to verify that all seals and hoses remain intact after cleaning.
In practice, the most successful cleaning sessions blend a respect for the engine’s sensitivities with a clear, methodical routine. A widely cited approach emphasizes using the right cleaner, controlling water pressure, and protecting electrical and electronic components—three pillars that consistently separate a safe wash from a risky one. If the grime is particularly stubborn, you can lean on a dedicated brush for tight spots and reapply cleaner, but always recheck that no cleaning agents or loosened debris are left behind. For many truck owners, this stepwise framework proves both practical and economical. It reduces the risk of expensive repairs while improving the ease of subsequent maintenance checks. Some technicians even integrate this practice with a broader maintenance schedule, using the engine bay wash as a diagnostic moment to spot leaks, hose wear, or degraded wiring insulation that could otherwise go unnoticed in routine servicing. In this light, power washing becomes a proactive maintenance milestone rather than a one-off cosmetic ritual.
As you plan, consider that some professionals advocate a safer, more conservative route: manual cleaning with a degreaser and soft brushes can achieve comparable results with less risk. If you weigh the options, you may find the most prudent path to be a careful, manual pre-cleaning, followed by a limited, low-pressure rinse for only the dirtiest areas, or a full power wash performed in a controlled shop environment equipped with proper tools and trained personnel. The decision should align with your comfort level, the engine’s complexity, and your willingness to perform diligent protective measures. If you choose to pursue a power wash, the principle remains the same: plan, shield, apply, rinse, dry, and inspect with patience. This approach ensures you preserve the engine’s integrity while achieving a level of cleanliness that makes routine inspections easier and potential issues more visible. For readers seeking a concise foundation in the safety philosophy behind this approach, a concise guide to proven strategies for cleaning grease and tar off your trucks fast offers a distilled perspective on grime management without compromising engine safety. Proven strategies for cleaning grease and tar off your trucks fast
To connect the practice to broader learning, imagine the engine bay as a living ecosystem that thrives on balance. Pressure, chemical action, and airflow must harmonize with the engine’s fragile components. The moment one element oversteps its boundary—be it a jet of water near a wiring harness or a degreaser that is too harsh for rubber components—the whole system pays a price. The approach outlined here keeps that balance intact. It respects the engine’s delicate electronics, the gasketed interfaces, and the bearings that could suffer if moisture penetrates seals. It recognizes that the ultimate goal is not just a spotless engine bay but a reliable, well-documented maintenance history. When the bay looks clean, it is easier to notice new leaks, check for cracked hoses, or identify coolant or oil seepage that might otherwise be camouflaged by grime. The result is a cleaner, safer, and more auditable engine environment that supports longevity and dependable performance as you navigate the miles ahead.
External reference: For a visual walkthrough that can complement the stepwise approach described here, you can consult this detailed guide: How to Wash an Engine Bay: 6 Steps (with Pictures)
Final thoughts
Properly power washing truck engines can significantly extend their lifespan and enhance performance. Following the preparation steps, using the right tools and cleaners, and adhering to a structured cleaning process are crucial practices that fleet managers should implement. Investing time in these practices can lead to cleaner engines, reduced maintenance costs, and increased uptime for your fleet operations. Ultimately, a clean engine is a reliable engine, allowing your company to maintain competitive advantage in the logistics and construction industries.