
Maintaining a pristine fleet of trucks is essential for logistics and freight companies, trucking operations, and construction and mining supervisors. A clean truck not only promotes professionalism but also extends the lifespan of vehicles and reduces long-term maintenance costs. Understanding the key components of washing trucks—from essential tools and cleaning agents to effective techniques and protective measures—can streamline the washing process and enhance fleet management. This guide will explore each aspect in detail: essential tools, suitable cleaning agents, effective techniques for washing, and final protective measures to apply post-wash.
Fleet-Grade Precision: The Essential Tools and Methods for Washing a Truck
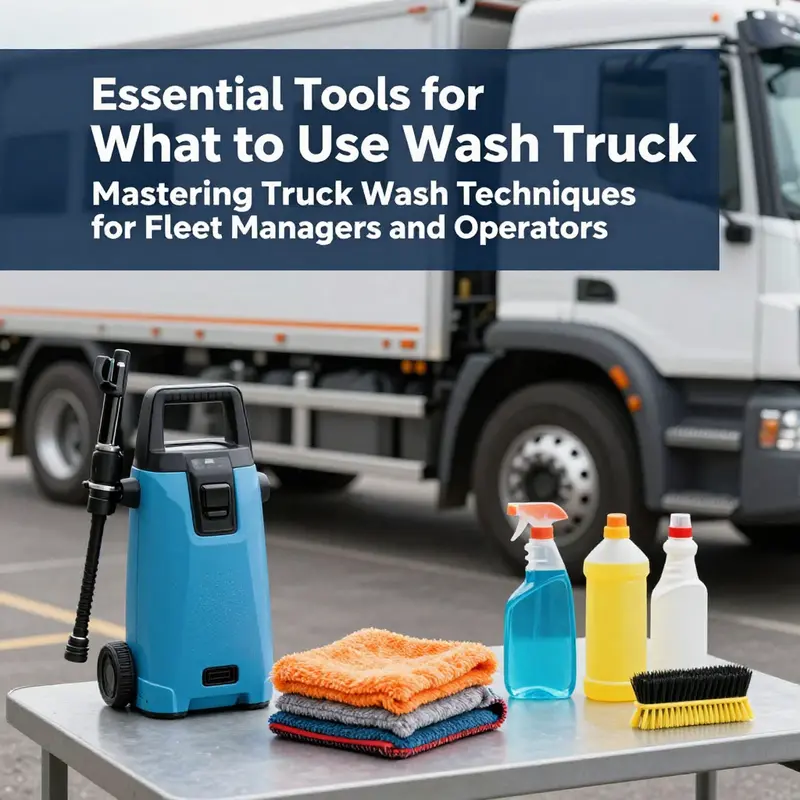
Washing a truck well is more than a chore; it is a careful choreography of tools, techniques, and timing that protects the finish while delivering a fleet-ready shine. The toolkit you assemble becomes the backbone of every wash, guiding how you approach dirt, grime, and the elements that threaten a vehicle’s appearance and longevity. The aim is not merely to remove soil but to do so without introducing new scratches, swirl marks, or hidden corrosion. This requires a holistic view of what to use and how to use it, from the water source and detergents to the mitts, brushes, and drying towels that touch the paint. In commercial or industrial settings, the choice of tools becomes even more consequential, translating into faster cycles, less downtime, and better overall asset protection. The journey begins with the simplest, most fundamental decision: how you source water and how you control pressure, because every wash flows from the first rinse forward, setting the tone for the entire process.
A high-pressure water source is the foundation. The right hose and nozzle give you control over the spray pattern, enabling you to loosen stubborn road grime without hammering the paint. An adjustable nozzle lets you switch from a wide fan to a narrow jet, dialing in pressure so that the initial rinse clears loose debris while the bulk of the work remains gentle on the finish. It is tempting to crank up the pressure, especially with large trucks that accumulate more dirt, but the risk of micro-scratches increases when the paint is exposed to unconstrained force. The ideal approach is a two-step rinse: a gentle stream to begin, followed by a more targeted blast where necessary. For maximum efficiency and consistency, a portable pressure washer can be a game changer on bigger vehicles or in rural settings where a fixed system might not be readily available. The portability lets you work around stubborn mud on undercarriages and wheel wells without repeatedly hauling hoses across ad hoc layouts. The key is to keep the tool in good working condition, protect the nozzle from debris, and make sure the water source remains clean and free of contaminants that could transfer to the surface during the wash.
Cleaning agents come next, and selecting the right formulations matters as much as choosing the right spray. A pH-neutral car wash soap designed for larger vehicles is essential. Dish soap, while ubiquitous, can strip wax and interfere with protective coatings, leaving the paint more vulnerable to the next cycle. A product formulated specifically for trucks is more likely to be balanced for the varied surfaces encountered on a heavy vehicle, including painted panels, chrome accents, and plastic trim. On wheels and rims, a dedicated wheel and rim cleaner is often more potent than a generic soap, because it is formulated to break down brake dust and oily residues without attacking the tire sidewall or brake components. When significant undercarriage contamination—such as salt buildup from winter roadways or heavy road grime on unpaved routes—exists, an undercarriage cleaner can be applied after the top layers have already been rinsed away. The sequence matters: you want to attack the broader surface with a safe, all-purpose cleaner first, then target hard-to-reach areas with a specialized treatment if needed. Across all cleaners, the goal is to maintain compatibility with surfaces and edges while preserving any protective films that may be in place. In the field, it is common to designate separate cleaners for body panels, undercarriage, and wheels to prevent cross-contamination and preserve the integrity of different materials.
The tools that carry these cleaners into contact with the truck are the next piece of the puzzle. Large soft wash mitts made from microfiber are the workhorses of the process. Their plush texture traps dirt particles rather than grinding them across the surface, reducing the risk of scratch marks. It is prudent to have at least two mitts so that you can rinse one while using the other, maintaining a clean, sudsy surface for ongoing sections of the wash. When it comes to brushes, soft-bristled varieties excel for wheels, tires, and other hard-to-reach zones such as wheel wells and fender contours. A separate wheel-specific brush keeps brake dust from migrating onto painted panels, which would otherwise require more corrective work later. A detail brush—a small, stiff implement—comes in handy for door jambs, vents, and intricate trim where dirt tends to accumulate but is easily missed with larger tools. A wash bucket with a built-in dirt trap keeps the rinse water relatively free of grit, preserving the mitt’s effectiveness and reducing the chance of dragging grit back onto the surface. These tools, used in concert, form a gentle but thorough pass that respects the finish while delivering a deep clean.
Drying and finishing steps seal the work and protect the surface from the next exposure to the elements. Large, plush microfiber towels are favored for their high absorbency and low lint characteristics. The emphasis is on removing water promptly to prevent water spots and streaks, especially on sun-exposed panels where evaporation can be uneven. A clay bar, while optional, offers a truly smooth finish by lifting embedded contaminants such as tree sap or industrial fallout that ordinary washing cannot dislodge. If you pursue a clay bar step, it should follow a thorough wash and rinse so that the clay can glide across the surface with minimal resistance. After drying and claying, applying a protective wax or sealant creates a barrier against UV rays, road salt, and grime, extending the period between washes and helping to maintain a glossy appearance. For trucks operating in harsh weather, this final layer of protection becomes a strategic maintenance decision that contributes to longer-term surface integrity and lower total ownership costs.
The sequence described above is more than a recipe; it is a disciplined workflow that minimizes rework and reduces the risk of introducing new damage while maximizing efficiency. Rinsing first clears loose soil, which prevents additional abrasion during the main wash. Working in sections—starting at the top and moving downward—helps to control runoff and reduces the likelihood of streaks forming on freshly cleaned areas. A two-bucket strategy—one for soapy water and one for rinsing—helps keep dirt out of the wash water and prevents reapplication of grit to the mitt. This approach is especially important when conditions require a longer wash, or when the vehicle presents a mix of delicate trims and tougher paint surfaces.
An additional practical dimension centers on shade and timing. Direct sunlight can cause soap and water to dry too quickly, leaving water spots and making it harder to detect missed spots. Washing in the shade, when possible, gives you more predictable results and reduces the risk of streaks and dried residues. It also offers a more comfortable working environment, which matters when crews are washing multiple vehicles in a day. The no cross-contamination rule—never using the same brush or mitt on the wheels and the body—still holds as a foundational discipline. Brake dust is not only abrasive; it is often laden with metallic particles that can scratch paint if transferred from the wheel to the body. Keeping tools designated for each area ensures a cleaner, safer process and a higher quality finish.
Beyond the basic kit, more advanced options frame how you scale washing for fleets and larger operations. Touchless truck wash systems represent one of the most significant evolutions in modern washing. These systems employ high-pressure water jets paired with chemical detergents to clean the entire surface without any physical contact. The absence of contact eliminates direct abrasion against the paint and bodywork, dramatically reducing the risk of scratches and swirl marks that can mar fleet visuals and reduce resale value. For operators managing many vehicles, touchless systems can deliver consistent results with lower labor input and can be integrated into larger facility layouts to support continuous throughput. Yet the decision to adopt touchless technology requires balancing initial capital costs, maintenance needs, and the specific dirt profile of the fleet. Debris that hides in seams or underbody areas may sometimes require targeted follow-up cleaning, especially after heavy road usage or off-road deployments. In many cases, a hybrid approach—combining a touchless baseline with targeted manual cleaning for stubborn spots—offers the best of both worlds: the gentle efficiency of touchless washing with the precision of hand cleaning where necessary.
Dedicated car wash kits provide another layer of precision, particularly for tackling wheel contaminants and axle grime that accumulate quickly in commercial settings. A 5-gallon bucket system, frequently part of professional-grade car wash kits, ensures you can mix, measure, and apply cleaners in an organized manner. Using dedicated tools within these kits helps to prevent cross-contamination between the body and the wheels or undercarriage, which in turn preserves finishes and reduces the need for corrective work. The wheel and tire cleaners in these kits are designed to break down brake dust and road grime specifically for those components, allowing you to tackle those stubborn areas with confidence. When paired with separate brushes for wheels and for the body, the system becomes a coherent, hygienic cleaning process that supports both the appearance and the longevity of the truck. In fleet contexts, standardizing these dedicated tools through kits helps ensure that every operator follows the same, efficient procedure, reducing variance in results and simplifying training and compliance checks.
The operational efficiency of a washing program often hinges on how you design the workflow and whether you can keep capital equipment in constant use. In planning for efficiency, operators can learn from broader industry discussions about resource optimization. Parliamentary records in the Hansard archive highlight that systems designed to operate in cycles with minimal repetition can realize meaningful water savings while sustaining productivity. The principle is simple but powerful: you want to design a process that accomplishes the required cleaning in as few passes as possible, with each pass addressing a distinct layer of soil and grime. This reduces both water consumption and labor time, a critical consideration for fleets with tight maintenance windows or remote servicing locations. While the specifics of a given facility will vary, the underlying logic remains solid: optimize the cycle so that the system can run consistently, reducing idle time and enabling equipment to stay in use for longer periods. For fleets, this translates into measurable gains in efficiency and sustainability, reinforcing the idea that the tools you choose are not just for aesthetics but part of a broader strategy for responsible operations. For more thorough policy context on sustainable practices in vehicle washing, researchers and managers can consult the Hansard record on vehicle washing systems and water efficiency.
In addition to hardware choices and washing sequences, the logistics of integrating tools into a cohesive workflow deserve thoughtful attention. The goal is to design a routine that minimizes backtracking and backflow of dirt while providing clear, repeatable steps for any operator. When you implement a standardized kit and a clear sequence, you reduce training time and ensure consistent outcomes across shifts. The separation of tools by task—body prep, wheel cleaning, detailed areas—prevents cross-contamination and accelerates the process without compromising quality. It is also crucial to design the workspace so that equipment pathways minimize the chance of dragging grit across clean panels. For instance, placing wheel cleaning equipment closer to the wheel arches and relegating the body wash area to the central bays helps operators visually and physically separate tasks. In practice, this can be reinforced through simple, durable process maps that stay with the kit and are understood by all operators, reducing the likelihood of deviation and ensuring that every wash follows a proven path.
Ultimately, the tools you choose should align with the broader goals of fleet maintenance: protecting value, maximizing uptime, and stewarding resources. The simplest way to anchor these aims is to think through the lifecycle of the wash cycle, from the moment water first touches the vehicle to the finish that leaves the last impression. The right high-pressure source, a pH-neutral soap, wheel-specific cleaners, soft wash mitts, soft brushes, a detail brush for tight spots, a dirt-trap bucket, plush microfiber towels, and an optional clay bar and protective wax or sealant together form a robust kit. This kit is not a luxury but a practical investment in the finish and integrity of the truck’s surfaces. It supports consistent results, reduces the need for corrective detailing, and aligns with responsible resource use—a key consideration for organizations aiming to blend performance with sustainability.
As you consider your next procurement or workflow adjustment, reflecting on the balance between traditional hand washing and modern mechanized options can guide a prudent choice. Touchless washes reduce contact with the surface and lower the risk of human error, but they may not address every contaminant or edge case that a thorough hand wash handles. Conversely, a well-designed manual system with dedicated kits can deliver exceptional results and offer flexibility in challenging environments, while still emphasizing water efficiency and proper tool separation. The central idea is not to chase a single solution but to build a resilient toolkit and a repeatable process that can adapt to different fleets, dirt profiles, and weather. In doing so, you create a washing program that is not only effective today but also sustainable for tomorrow, with clear training paths, standardized tools, and a culture that respects the vehicle’s value and the costs of maintenance.
Internal link: For those managing fleet operations and seeking alignment with regulatory expectations, consider how the broader framework of truck wash industry compliance and emissions regulations informs the selection and use of cleaning systems. This alignment helps ensure that the tools, workflows, and water management practices you implement meet both performance and policy expectations. See more at the linked resource on truck wash industry compliance and emissions regulations.
External resource: For a policy-oriented perspective on water efficiency and system design in vehicle washing, the Hansard record on vehicle washing systems and water efficiency offers valuable context and data that can complement hands-on practice with the kit described above. https://www.parliament.uk/business/publications/hansard/2025-12-15/vehicle-washing-systems-and-water-efficiency/
Choosing Cleaning Agents for a Truck Wash that Protects Finish and Performance

Selecting the right cleaning agents for a truck wash is about balance. You want to remove stubborn dirt while preserving the finish, seals, and components that keep a vehicle looking good and performing reliably. For exterior bodywork, use a pH-balanced automotive wash soap that lifts dirt without stripping wax or clear coat. Dish soaps can erode protective layers, so they should be avoided for routine washing. Wheels demand a dedicated cleaner and a non-abrasive brush to avoid scratching delicate finishes. Glass cleaners should be streak-free and safe for tint; avoid ammonia-based formulas on tinted glass. Interior care calls for materials-specific cleaners, with leather treated by a dedicated conditioner and vinyl or plastic trims protected by a UV-safe product. Under the hood, use a safe degreaser after the engine cools and avoid harsh solvents near electrical components. Finally, follow a rinse-and-dry routine and apply a protective sealant or wax to lock in cleanliness. This surface-aware approach reduces the risk of damage and helps the truck stay looking its best mile after mile.
Truck Wash Mastery: Essential Tools, Detergents, and Techniques for a Safe, Shine-Ready Big Rig

Washing a truck is more than a cosmetic ritual; it is a protective maintenance practice that preserves metal, preserves finishes, and sustains performance in the face of road salt, industrial fallout, and harsh weather. The work demands a careful blend of the right tools, the proper cleaners, and disciplined technique. When these elements align, the truck emerges not only clean but protected, with its surfaces ready to resist the next mile and the next season. The challenge, especially for larger fleets or owner-operators who spend long days on the road, is to execute a process that is efficient, thorough, and kind to delicate coatings. This chapter threads together the core ideas from practical experimentation and industry guidance, weaving a coherent rhythm that helps you approach truck washing as a crafted routine rather than a hit-or-miss chore. At its heart is a simple principle: use gentleness where it matters, aggression where it’s warranted, and always maintain a clear separation between the components that contact the wheels and those that contact the painted body. In practice, that means selecting biodegradable, pH-neutral detergents, deploying controlled high-pressure water, and embracing a method that emphasizes protection as much as cleanliness.
Biodegradable and pH-neutral detergents form the foundation of a respectful wash that respects finishes while cutting through grease, road salt, and embedded grime. These cleaners are formulated to break down stubborn road grime without stripping waxes, sealants, or rubber seals. They also align with sustainability goals that many operators now consider essential, especially fleets that wash frequently or operate in proximity to sensitive environments. The choice isn’t about chasing the sharpest chemical or the strongest foam; it is about finding a cleaner that works with the paint and trim without asking you to compromise the integrity of the surface. When you select a detergent labeled as biodegradable and pH-neutral, you give yourself a certainty that, come rinse time, you won’t see chalky residues or dull blotches after drying. This becomes especially relevant on complex trucks with chrome accents or black plastic trim, where aggressive cleaners can lift color or degrade surface coatings if misapplied.
A second pillar is the water approach. High-pressure water is invaluable for removing stubborn mud, tar, and debris, especially from the undercarriage and frame where buildup collects and moisture can linger. The guidance from practitioners suggests a range around 1,500 to 3,000 PSI as a practical window to break apart grime without risking paint deformation or warping of metal components. This is not a license to blast away at close range with the strongest setting; it is a reminder to respect distance, angle, and pattern. Touchless wash systems, when available, offer an appealing balance. They couple high-pressure jets with detergents in a way that minimizes surface contact, reducing the chances of micro-scratches while still delivering a robust exterior clean. Even when you opt for manual washing, the principle remains the same: use controlled pressure, stay off sensitive edges, and pause to adjust your approach if you notice chipping or a faded finish.
To accompany the water strategy, the tools you wield should be selected with intention. A heavy-duty hose and an adjustable nozzle let you modulate spray patterns—fan for wide rinses, jet for spot-treatment—without overexposing any single area. For larger trucks, a portable pressure washer brings convenience and speed to the task, letting you reach the entire body, wheels, and the undercarriage with relative ease. The tools of the wash are more than accessories; they are extensions of your hands and judgments. Large, soft microfiber mitts trap dirt particles and prevent scratches, and you should have at least two so you can rinse one while you work with the other. Separate brushes for wheels and body surfaces are essential to prevent cross-contamination. The high brake-dust environment of wheels can be abrasive enough to scratch the paint if it ever finds its way onto the body. A dedicated wheel brush and a separate, softer brush for body panels help maintain a scratch-free finish. A detail brush becomes indispensable for door jambs, vents, and intricate trim where grime hides in corners and crevices. For transporting your soap and rinse water, a wash bucket with a built-in dirt trap keeps grit from reloading onto your mitt, which is a small but meaningful barrier against micro-scratches that accumulate across a long washing session.
The sequence matters. Begin with a thorough rinse of the entire truck to remove loose dirt and protect the finish from the initial contact of soap. Rinse helps lift heavy soils into suspension and prevents them from acting like sandpaper during the main wash. Then, approach the wash in sections, starting at the top and progressing downward. This helps prevent streaks and ensures that gravity does the work of carrying soap and loosened dirt toward the ground rather than onto already-clean areas. The two-bucket method is not simply a tip; it is a discipline. One bucket is dedicated to soapy water, and the other is used strictly for rinsing the mitt. This simple separation prevents dirty water from being reapplied to the paint and reduces the chance of scratches, especially when you move from the roof to the doors and down the sides where the paint is most vulnerable. Keeping sunlight away while you wash further protects the finish. Direct sun causes the water to evaporate quickly, which can lead to water spots and makes it harder to judge whether you have reached every panel. If you do wash in shade or during a cooler part of the day, you gain a clearer view of any missed spots and you reduce the difficulty of controlling suds and rinse.
Beyond the outer body, the undercarriage deserves careful attention. The undercarriage is a haven for road salt, oil residues, and caked mud that can trap moisture against metal. Accumulated grime here doesn’t just dull aesthetics; it contributes to corrosion and adds unsprung weight that can affect handling. When you tackle this area, a soft-bristle brush or nylon scrubber paired with a dedicated undercarriage cleaner is the right combination. Apply the cleaner, let it dwell for a moment to loosen embedded soils, and then rinse with high-pressure water from a safe distance. This approach reduces the risk of spraying back onto sensitive components and ensures the cleaner has time to work its chemistry on the grime without forcing you to scrub aggressively. Once the undercarriage is clean, a final pass with water and air-drying can help remove residual moisture that would otherwise hold onto salt and moisture that accelerates corrosion.
A pragmatic blend of automated and manual processes can be particularly effective for fleets. Automated touchless wash systems give you a consistent exterior cleanse, and manual detailing can be reserved for hard-to-reach areas like the wheel wells and lower edges of doors where spray patterns may leave a thin film. For some operators, mobile truck wash services offer a practical option for full-service cleaning on-site, including interior attention and optional waxing. The hybrid approach recognizes that a one-size-fits-all method rarely delivers the best long-term results for heavy-duty vehicles that differ in paint condition, age, and exposure.
Drying is not a cosmetic afterthought. It is an essential finishing step that prevents water spots and helps protect the freshly cleaned surface. Large, microfiber towels with high lint resistance are the preferred drying tool. They absorb moisture quickly and leave the surface with a smooth, gleaming finish. For higher-volume operations, air blowers or a dedicated drying system can deliver faster results and minimize the risk of streaking after the wash. If you are washing DIY or on a tight schedule, you can supplement towels with a clean, lint-free drying cloth to ensure every panel dries evenly and without leaving residues behind. If you choose to use a clay bar, it should be done after the initial wash to remove embedded contaminants such as tree sap and overspray that ordinary soap cannot lift. A clay bar is optional but highly recommended for trucks that accumulate significant surface contamination or work in industrial environments where particulate matter adheres to the finish. Following the clay bar, apply a protective wax or sealant to lock in the shine and protect the paint from the elements. A well-chosen sealant can also reduce the time needed for subsequent wash cycles by making surfaces slick and easier to rinse clean in the future.
A few practical tips help translate these principles into a reliable routine. Rinse first to remove loose dirt, then wash in sections from top to bottom. Use two buckets to prevent cross-contamination, and never reuse the same mitt on wheels and paint. Work in shade when possible, and tailor your approach to the truck’s specific condition and age. These steps transform washing from a routine task into a deliberate care ritual that extends the life of the finish and preserves the vehicle’s value. The techniques are supported by a broader body of guidance, including recommendations that emphasize the value of biodegradable, pH-neutral detergents and the importance of frame and undercarriage cleaning for long-term durability.
In practice, the intuition of good washing is as much about assessment as action. As you prepare to wash, scan the truck for areas that appear weathered or scuffed, such as once-bright chrome or plastic trim that has dulled with exposure. If you discover a surface that looks like it could be damaged by aggressive cleaning, pause and adjust your method. Perhaps switch to a gentler rinse and a softer brush. The goal is not to conquer the grime in one pass but to clean thoroughly while safeguarding the finish. If you are part of a fleet with regular maintenance windows, consider scheduling a consistent cadence: frame cleaning every three to six months, weekly exterior washes for daily-use trucks, and interior detailing on a monthly or quarterly basis depending on usage. A routine like this reduces the risk of heavy buildup, protects against corrosion, and improves the overall efficiency of wash operations.
For readers seeking a broader perspective on mobile truck washing that harmonizes on-site practicality with technical nuance, a comprehensive guide on mobile truck wash specifications, types, and applications offers detailed context about equipment configurations, chemical handling, and process variations in different settings. See the external reference for a deeper dive into these specifications and applications. In addition, the approach outlined here can be reinforced by targeted insights found in relevant fleet-management discussions and case studies about wash best practices and outcomes. A short path toward more informed decisions is to explore practical strategies for managing grease and tar removal when confronted with particularly stubborn soils. In this regard, the idea that you can lean on proven strategies for cleaning grease and tar off your trucks fast is worth exploring within your team. Proven strategies for cleaning grease and tar off your trucks fast provides a concise reference to some of the methods discussed here and invites a closer look at tailored techniques for those challenging deposits.
The chapter’s guidance aligns with a broader consideration of how wash practices fit within the wider objectives of fleet maintenance. Clean trucks reflect careful scheduling, disciplined workflows, and an eye for detail that extends beyond the sink and hose. They signal proactive maintenance, reduce the risk of corrosion, and support safer, more efficient operation in every mile and at every delivery point. The discipline of washing well—of choosing the right cleaners, applying them with appropriate pressure, and drying with intention—translates into tangible gains in vehicle longevity and operating cost. This is not merely about keeping a vehicle clean; it is about sustaining performance, protecting investments, and maintaining a professional appearance that communicates reliability to customers and partners.
As you integrate these practices, you’ll find that the chapter’s recommendations are not burdensome add-ons but efficient routines that fit naturally into daily, weekly, or monthly maintenance cycles. The most important takeaway is to approach truck washing with care and consistency: select cleaners that respect the finish, use water in a controlled, non-abrasive way, separate wheels from body materials to avoid cross-contamination, and finish with a thorough dry and protective seal. When these elements come together, washing becomes a predictable, repeatable process that yields reliable results. The vehicle’s finish remains vibrant, its components stay protected, and the operation benefits from a workflow that can scale with fleet size and service demand.
External reference: For readers who want to expand on the technical and practical dimensions of mobile truck wash capabilities and specifications, see the external resource that outlines the broader landscape of mobile and on-site wash applications and standards: https://www.truckwashpros.com/guide/mobile-truck-wash-specifications-types-applications/
Drying and Shielding: Finishing Your Truck Wash for Lasting Shine and Protection

Finishing a truck wash is as much about what happens after the rinse as it is about the rinse itself. When you’ve spent time lifting grime from chrome, glass, and painted panels, the next steps determine whether that clean finish endures through road grime, sun, salt, and the occasional detour into a muddy wash bay. Drying and protection are not afterthoughts; they are the final, crucial phase that locks in whatever you’ve already removed and gives your truck a durable shield against the elements. In this part of the process, you move from the mechanics of washing to the artistry of finishing, where technique, products, and timing matter as much as the effort you invested in the wash itself.
Drying first is essential. Water remaining on the surface invites streaks, water spots, and mineral deposits that can mar the look you’ve labored to restore. The best approach begins with the right tools and a patient rhythm. A high-quality microfiber drying towel, large enough to cover broad panels in a single pass, is your ally. These towels are soft, highly absorbent, and designed to lift water rather than drag it across the finish. They’ll soak up residual moisture from painted surfaces, chrome trim, and glass with minimal friction. Resist the urge to reach for a rougher cloth or a paper product; lint and micro-scratches accumulate when an improper towel is used. A terry cloth or paper towel can leave behind fibers and tiny scratches that become visible once the sun hits the paint at an angle. The goal during drying is not speed but a careful, methodical removal of water in a way that preserves the surface you just cleaned.
As you begin drying, work from top to bottom. Start with the roof, then the hood, doors, and bed, and finally lower panels and the undercarriage where moisture tends to cling. The reason for this sequence is simple: gravity helps you catch drips that would otherwise run across clean surfaces, creating streaks on doors and fenders. Use light pressure and gentle, pad-like strokes to lift water rather than push it along the surface. For chrome accents and glass, a separate portion of the towel or a dedicated microfiber cloth keeps those areas pristine and free of towel fibers that might abrade the finish. Never rub vigorously on any painted surface; instead, pat and blot to remove water while preserving the slick, glossy finish you’ve earned through the wash.
A second key step in drying is attention to detail around seams, crevices, and door jambs. Water loves to hide in hinge gaps and weatherstripping. A careful swipe with the towel at these points reduces the risk of mineral buildup and helps prevent interior moisture from wicking into seals, which over time can lead to rubber deterioration or foam compression. If you notice water beading in hard-to-reach spots after your initial pass, return with a clean portion of the towel and address those micro-traps. Consistency in this stage pays off later because you’ll be minimizing the potential for water spots once the vehicle cools and the sun resumes its daily rhythm.
Beyond the towel, some pros incorporate a second drying aid—an optional quick-pass with a very light mist of waterless wash or a dedicated drying aid spray. This is not a substitute for the microfiber towel but rather a complement that helps lift the last few droplets and leaves a faint layer that can be wiped away with a final pass. If you choose this approach, ensure the product is compatible with your paint and protected surfaces. The objective remains clear: remove moisture, then prevent water spots by ensuring the surface is evenly dry before applying any protective layer.
With the vehicle dry, you move into the protective phase. The simplest and most practical path in many fleets and personal drives is to apply a wax or sealant after drying. The protection you lay down at this stage serves as a barrier against UV rays, acid rain, tree sap, pollen, and the friction of road debris. A high-quality wax or sealant adds a glossy layer that enhances the color depth and makes water bead and slide off more readily in future washes. Forty-five minutes to an hour of curing time, depending on the product and ambient conditions, can be enough for the initial bond to set. It’s worth noting that some drivers prefer a ceramic coating for longer-term protection, especially in environments with heavy weather exposure, salt, or industrial fallout. Ceramic coatings offer superior durability and hydrophobic properties, creating a slick surface that repels water and contaminants for years rather than months. If you’re evaluating ceramic options, balance the desired longevity with the maintenance required to sustain the coating’s performance, including occasional polish or refinement as recommended by the product’s guidelines.
Whichever option you choose—wax, sealant, or ceramic—your application should follow the manufacturer’s directions carefully. Clean, dry surfaces absorb products more evenly, and a cool, shaded environment helps avoid streaking or flash-drying that can cause uneven coverage. In the absence of direct sun, apply the coating in thin, even layers, maintaining a steady technique as you move across each panel. For waxes, a light, circular or back-and-forth motion can distribute the product uniformly before a gentle buff removes any haze. Sealants typically require a similar approach, but with a longer cure window before the final wipe-off to ensure the polymer bonds properly to the paint. Ceramic coatings demand meticulous surface preparation and a slightly different application cadence—often a longer cure time and a dedicated curing wipe once the film has bonded to the surface. Regardless of the product, the overarching rule is to keep surfaces cool, low in humidity, and free from dust or contaminants that could be trapped beneath the finishing layer.
The choice of drying and finishing products should align with how the truck is used and where it will spend most of its time. A truck that faces harsh weather, road salt, or off-road environments benefits from a more robust protective layer, while a light-use vehicle in a temperate climate may excel with a high-quality wax or sealant that’s easier to maintain. It’s not necessary to switch products with every wash, but it is wise to re-evaluate your protective strategy as seasons change or the vehicle’s exposure profile shifts. In some fleets, a routine of wash, dry, and re-seal or re-wax can be integrated into the maintenance schedule, ensuring that the paint and trim receive consistent care and that the finish remains resilient to daily wear and tear.
A practical note about the washing process itself comes from the broader context of fleet maintenance. In fleets where trucks handle sensitive cargo or operate in environments with specialized contamination, the sequence and materials of care matter more than casual washing. For example, vehicle hygiene routines are structured around minimizing cross-contamination and preserving protective coatings on a daily basis. Best practices emphasize keeping wash tools clean and dedicated to specific tasks, such as using separate mitts for wheels and body panels and employing a two-bucket system to prevent dirty rinse water from reapplying dirt to the surface. These approaches reduce micro-scratches and maintain a showroom-like finish, even after repeated wash cycles. The emphasis on discipline in tool use and technique extends to drying and protective steps, where a consistent workflow delivers superior results over ad-hoc methods. For fleets and drivers managing particularly sensitive loads, there is added value in following industry guidelines that address cleaning and maintenance comprehensively, ensuring that the vehicle’s appearance reflects the care it receives and the standards required for safe, compliant operation. A relevant guide on best practices for cleaning food-grade tankers highlights how the same attention to detail and methodical approach can be applied across different vehicle types and cargo contexts, reinforcing the idea that core washing principles translate into broader fleet maintenance strategies. best practices for cleaning food-grade tankers
Even after you’ve completed the final buff and polishing pass, there are still small but meaningful steps that contribute to a long-lasting finish. A microfiber washing cover, designed to protect delicate surfaces during the washing process, can reduce the chance of introducing scratches while you scrub or rinse. This universal, reusable cover is especially useful when dealing with larger trucks or when you’re working in tight spaces where wheels, tires, and fender edges are at risk of contact with abrasive tools. The cover’s design emphasizes safe, scratch-free washing by providing a soft barrier between brushes, mitts, and vulnerable trim. If you’re curious about how this tool fits into your wash routine, you can learn more about its features and availability through industry resources and suppliers. The essentials of its use are straightforward: drape or wrap the cover around the vehicle’s lower areas as you work on the sides, ensuring it remains flat and does not bunch near moving parts or hot components. A practical note is to dry the vehicle immediately after washing to prevent water spots from forming, especially in bright sun or dry heat where evaporation happens quickly. Keeping the finish dry and protected sets the stage for a lasting shine that’s not just skin-deep but resilient against the elements.
To extend the conversation from drying to protection, it’s helpful to consider the long game: the finish is a living layer on the truck. UV exposure, airborne pollutants, and temperature cycles gradually erode the integrity of the paint and trim. Regular protection—whether wax, sealant, or ceramic coating—helps maintain color depth, gloss, and sound resale value. Even if you opt for a more modest protective approach, the impact is measurable. A properly dried surface that’s promptly sealed resists water spots and mineral deposits, stays easier to wipe clean, and requires less aggressive cleaning to return to its former luster. The practical upshot is straightforward: invest a little time in drying and a measured step of protection after every wash, and you’ll enjoy a finish that looks refreshed longer and stands up better to the road’s demands.
In terms of workflow integration, think of drying and protection as a natural continuation of your washing routine rather than a separate task. If your wash process already follows a top-to-bottom approach, you can roll into drying immediately after the final rinse, then progress into protection while the surface is still slightly warm from the sun-dried shelves or from the ambient warmth of the day. If weather or schedule requires you to pause, a quick wipe-down with a clean microfiber cloth to remove remaining moisture before you return to finish with sealant or wax can save you time and reduce the risk of water spots when you resume. The key is consistency: a dependable routine that you can repeat on every wash day, ensuring that the vehicle’s finish benefits from the same treatment every time.
The last reminder ties back to the broader principles of fleet care and the necessity of thoughtful maintenance in professional contexts. When a truck is part of a larger operation, your finishing routine contributes to uptime, appearance, and morale. A clean, well-protected vehicle reflects a commitment to quality and care that resonates with drivers, fleet managers, and customers alike. It’s a visible signal that the operation pays attention to detail and upholds standards that go beyond mere functionality. In this spirit, the drying and protection phase is not a cosmetic luxury but a practical investment in the truck’s longevity, performance, and overall operating cost. The payoff—fewer issues with rust, fewer paint imperfections from exposure, and easier maintenance on the next wash cycle—models the mindset of ongoing care that keeps a fleet looking and performing at its best.
For fleets and individual drivers who want to explore more about protective options tailored to their use case, it can be valuable to connect the general guidelines with specific contexts. For example, fleets accommodating food-grade transport face unique cleanliness expectations and regulatory considerations. The same core washing principles apply, but the protective layer and the schedule may adapt to the cargo and transit patterns. In those cases, consulting specialized resources and applying the safest, most durable protections available can help ensure both compliance and a pristine appearance. The overarching takeaway is that post-wash care is a difference-maker. Drying thoroughly, applying a deliberate protective layer, and maintaining a consistent routine all contribute to a finish that remains vibrant and resilient, even as the truck travels through sun, rain, salt, and road grime.
External resource: Microfiber Washing Cover details and usage guidance are discussed by industry suppliers, which can provide practical demonstrations and context for this tool’s role in a safe wash cycle. For a detailed look at its design and applications, visit a trusted supplier site. External resource: https://www.truckssupply.com.
Final thoughts
Understanding the essentials of washing trucks from the right tools to effective techniques contributes significantly to fleet management success. Employing appropriate cleaning agents not only enhances the wash quality but also ensures the longevity of the truck’s finish. Furthermore, paying attention to drying and protecting methods safeguards your investment and maintains a professional image. Implementing these expert insights can streamline your truck maintenance processes, ensuring your fleet remains clean, efficient, and durable over time.