
Maintaining the cleanliness of a truck bed is crucial for fleet managers, trucking company owners, and construction supervisors. A clean truck bed not only enhances the vehicle’s aesthetic appeal but also preserves its structural integrity and longevity. In this guide, we will delve into the preparation required before washing your truck bed, the effective techniques for washing it, and essential post-wash care. Each chapter is thoughtfully designed to provide you with the necessary knowledge to ensure optimal vehicle maintenance, supporting the operational efficiency of your fleet.
Groundwork for a Gleaming Bed: The Essential Prep Before Washing a Truck Bed

The bed of a truck is more than a cargo well; it is a functional surface that has to endure abuse from dirt, gravel, grease, and weather. Washing it well begins long before the spray hits the metal. Preparation is not a mere preface to cleaning; it is the act that shapes the entire outcome. When you approach the task with a plan, you treat the bed as a living component of the vehicle, worthy of respect and care. The sequence makes a difference: a patient, methodical start reduces the risk of scratches, preserves coatings and liners, and yields a finish that looks purposeful rather than hurried. In the realm of truck maintenance, preparation is the quiet work that pays off with a bed that shines, resists rust, and stays protected under its protective layer. This chapter follows that logic, weaving safety, technique, and care into a single, continuous practice that keeps the bed in excellent condition and ready for whatever you haul next.
To begin, you slow the pace and set the frame for success. The engine should be off, the keys removed, and the truck parked on a flat, stable surface. A level stance is not just a comfort—it’s a safety measure. You want to avoid any chance of movement during the wash that could cause injury or damage. If the truck has been in sun, you wait for the metal to adjust to ambient temperature rather than subjecting paint to sudden changes. The idea is simple: heat expands metal and can amplify paint sensitivity; a cool bed accepts the rinse more evenly and reduces the risk of thermal shock to coatings. This is particularly important for beds that bear a spray-on liner or a polyurethane coating, because those materials can be more susceptible to temperature-induced stress. The preparation phase, then, centers on calm, deliberate steps that protect both you and the vehicle.
Once the truck is stationary and the engine is cool, you turn your attention to the bed itself. Loose debris collects in corners, grooves, and gaps. Before any water or cleaner comes into play, you sweep out gravel, dirt, and loose residue with a broom or soft brush. This is not a cosmetic gesture; it is a guard against scratching during the wash. Imagine tiny pebbles acting like sandpaper as you scrub with a sponge; pre-clearing them minimizes micro-scratches and keeps the surface level clean for the actual wash. If stubborn residue remains after a first pass, a light pre-treatment with a degreaser or a specialized truck bed cleaner can be applied to the spot. Let it dwell briefly in accordance with the product’s instructions, then come back with a brush to lift away the softened grime. The idea is to loosen, not to scrub aggressively, so the coatings and liners stay intact while you work.
As you plan your approach, you think about protecting sensitive components near the bed. Remove mats or liners if feasible so you can wash them separately, ensuring the bed stays clean while the mats are treated to their own cycle of care. Exposed wiring, sensors, or electrical modules near the bed area deserve particular attention. Shield these elements from splashing water by covering them with plastic sheeting or a waterproof wrap, and position hoses so that spray cannot penetrate seals or fasteners. The guiding principle here is clear: avoid water on anything that is not designed to endure it, and keep the bed liner’s edges free of pressure that could push water into seams or gaskets. The extra few minutes you invest in protection can save you hours of repair work later on.
With the area prepared and protected, you assemble a set of supplies that honor the bed’s surface. The water you use matters as much as the tools you wield. If your water supply is hard, mineral deposits can leave spots and halos that dull the finish. If possible, opt for soft or filtered water for the final rinse. This is not a luxury but a practical step toward a spotless result. For the actual wash, choose a mild, automotive-safe cleaner with a neutral pH. Harsh household detergents, alkaline cleaners, or strong degreasers can strip protective coatings, damage spray-on liners, or cause the paint to wear thin in high-traffic zones. The cleaner should be formulated for truck beds, designed to cut grease and grime without aggressive chemistry. The goal is to suspend dirt gently, lift it away without smearing, and preserve the integrity of coatings. Pair the cleaner with a soft-bristled brush or sponge, a bucket, and a hose capable of adjustable pressure. A microfiber towel or chamois should be on hand for drying, as these materials absorb water quickly and reduce the chances of leaving streaks that can lead to rust after drying.
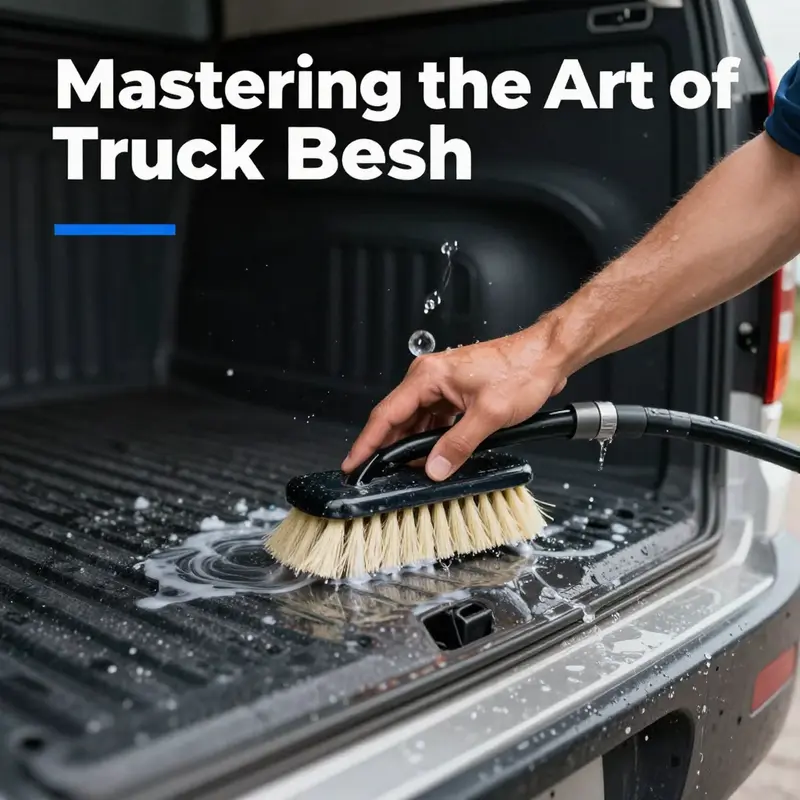
In terms of technique, the approach to washing is as important as the materials you use. The bed should be rinsed first, not last, to loosen the mud and soil without forcing it deeper into seams or through the liner. A garden hose with moderate pressure is ideal for this initial pass. The rule against high-pressure washers remains firm: do not aim a high-velocity spray directly at the bed. If you do opt to use a pressure washer, keep the nozzle at a safe distance and aim at roughly a 45-degree angle. This approach reduces the likelihood of lifting bed liner material or forcing water into gaps. Begin at the top of the bed—where dirt tends to accumulate from transported materials—and work downward in sections. This top-to-bottom flow minimizes re-depositing grime onto already cleaned areas and helps you maintain a consistent finish. As you scrub, use a gentle, circular motion with a soft brush, giving grease and oil time to loosen. For stubborn stains, apply a small amount of cleaner to the brush or sponge, let it sit briefly, then come back with renewed effort. The emphasis is on control: slow, deliberate movements prevent abrasion and keep the liner intact.
Washing in sections is not just practical; it is protective. The bed’s corners, sidewalls, and grip rails often harbor the most stubborn grime. Clean one segment, then move to the next, always returning to rinse and ensure no cleaner residue remains. Leftover soap or cleaner can dry into water spots and may affect the bed’s finish when exposed to sun. After each section receives its cleaning, a thorough final rinse should follow, ensuring all suds are removed and the surface looks even. If you are working with a degreaser for tough grease, apply it to the difficult patch, allow it to dwell for a minute or two, then scrub lightly and rinse thoroughly. It is essential to avoid scrubbing with excessive force; the goal is to lift rather than gouge. The bed’s surface, whether bare metal, painted steel, aluminum, fiberglass, or a sprayed liner, deserves respect. The left-to-right rhythm of rinsing and scrubbing across the bed mirrors the garment-dyeing principle: you want even exposure and consistent results across the entire surface.
Once the washing is complete, the drying phase follows almost immediately. Drying promptly is critical to prevent water spots and to minimize the opportunity for rust to take hold in any scratches or bare metal patches. A clean microfiber towel or chamois should be used to blot and wipe away moisture, moving from top to bottom and from the center outward to avoid pushing water into seams. It’s best to remove as much water as possible before air drying, as residual moisture can evaporate and leave unsightly marks in sunlight or heat. Direct sun should be avoided during drying, as the combination of warm air and sun can trap moisture in tiny imperfections and cause streaking. If the bed has a hard-to-reach area around corners or channels, use a smaller towel to address it so no moisture remains where it can corrode coatings or promote rust. The goal is a uniform, dry surface that looks freshly protected and ready for its next load. The care you put into drying mirrors the care you give when applying coatings: even, attentive, and thorough.
Your work does not end with drying. A post-wash inspection closes the loop and anchors the practice in long-term bed health. Look for signs of damage—cracks in the coating, dents, rust patches, or wear in the bed liner. Small issues can snowball if left unattended. If you notice peeling liner, chips in the paint, or exposed metal, address them promptly. Reapplying bed liner or coating where it has faded or chipped provides a reset for the bed’s protective barrier. In some cases, the bed liner’s material may require a refresh or reapplication with polyurethane or a rubberized formula, depending on the bed and its use profile. While this is more involved than a routine wash, it represents prudent upkeep that can extend the bed’s life, preserve resale value, and maintain a professional appearance on the road.
The practical discipline of preparation translates into real-world benefits. A bed that is cared for in this way resists moisture intrusion, remains more resistant to surface scratches from cargo, and keeps coatings intact longer. Regular attention to the bed, even when it’s only minor debris and a quick rinse, compounds over time into significant durability and cleaner aesthetics. The approach also supports safety and efficiency. By keeping wiring shielded, securing mats, and using appropriate water pressure, you reduce the risk of accidental electric issues, water intrusion, or material fatigue around seals and coatings. This is not an exercise in perfectionism; it is a robust, repeatable process that acknowledges the bed as a critical component of the truck’s overall functionality.
Within the broader ecosystem of truck maintenance, there is value in recognizing how preparation interfaces with professional practice. In formal settings—whether a fleet operation or a small-business wash bay—the discipline of prep becomes a framework for consistency. For those who run or manage wash facilities, the principle translates into a standard operating rhythm: clear pre-wash checks, controlled washing, and thorough post-wash verification. This perspective is echoed across industry discussions about facility management for truck wash businesses, where the aim is to maintain safe, repeatable, high-quality results while protecting equipment and personnel. If you are curious about how professional practices scale, consider exploring resources that discuss facility management for truck wash businesses, which can offer insights into workflow design, safety protocols, and equipment maintenance that align with the logical sequence of bed cleaning described here.
The preparatory steps detailed here are not isolated tips but a thread that ties together the practical with the precautionary. They set the stage for an effective wash that respects the bed’s materials while delivering a finish that looks purposeful and well cared for. The sequence works across different bed constructions—painted steel, aluminum, fiberglass, or sprayed liners—and remains applicable regardless of whether you haul gravel, soil, tools, or salt. The consistent message is straightforward: begin with cooling, clear the debris, protect sensitive components, gather appropriate cleaning agents and tools, then rinse, scrub, and dry with care. When you follow this disciplined sequence, you reduce risk, extend the bed’s life, and preserve its functional beauty for countless trips ahead. If you ever wonder why professional-grade cleanliness can feel different from a quick spray-down, the answer often lies in the sequence and the intention behind it. Preparation is the quiet architect of a successful wash.
For readers seeking to connect these practices to larger operational considerations, an important takeaway is how preparation dovetails with broader maintenance culture. In fleet operations or larger workshop environments, a consistent prep routine helps standardize a process that can otherwise drift with circumstances. The steps outlined here—cooling, debris removal, protective measures, careful cleaning, and thorough drying—become the backbone of a reliable, repeatable, and safe cleaning habit. They also pave the way for more nuanced care later on, such as assessing the need for reapplying a bed liner, planning seasonal protection, or scheduling more intensive detailing sessions. When the bed is prepared with the calm, methodical respect described in this narrative, you create a foundation that makes every wash more effective, every step more efficient, and every cargo-hauling day more straightforward and dependable.
The preparation phase is a practical expression of a broader philosophy: treat the truck as a system with interdependent parts that deserve attention before the obvious maintenance tasks. By honoring the bed’s material reality—knowing when it can handle water, recognizing how coatings respond to heat, and respecting the delicate balance of liners and seals—you set in motion a washing process that is not only effective but sustainable. This approach rewards the careful reader with a cleaner bed, longer-lasting coatings, and a safer, more predictable routine that can be repeated with confidence. In this light, preparation is finally seen not as a preliminary step but as the essential, ongoing discipline that makes every wash meaningful and every haul a little easier to manage.
In the spirit of practical wisdom, this narrative invites you to carry forward a professional mindset. In real-world wash bays and in the field, the same principles apply: start with a stable platform, shield sensitive elements, manage debris with care, select era-appropriate cleaners, apply controlled mechanical action, rinse thoroughly, and dry with intention. When you internalize this rhythm, the bed becomes a testament to deliberate care rather than a race to finish. The bed’s health then mirrors the owner’s commitment to maintenance and responsibility, a reflection that shows up in the bed’s appearance, its longevity, and its readiness for the next job. And as you integrate these practices into daily or weekly routines, you create a culture of care—one that respects the bed as a vital part of the truck’s life story and, ultimately, a key contributor to safe, efficient, and enduring operation.
For readers who want to connect these ideas to broader professional guidance, there is a path to deeper insight without leaving the practical orbit of bed washing. In the wider world of truck care, discussing best practices and safety considerations is common, and many fleets and independent operators benefit from well-structured resources. The practice of carefully preparing the bed before washing aligns with the broader ethos of preventive maintenance. It reinforces a habit of looking ahead: anticipating where dirt hides, predicting where water could cause trouble, and envisioning the best sequence to return the surface to its rightful state. This forward-thinking approach not only yields a better wash but also strengthens the relationship between driver, vehicle, and the work they perform together. If you seek a broader framework for how these practices fit within fleet operations or maintenance culture, you can explore professional resources that address facility management for truck wash businesses, which provide a larger context for standardizing and sustaining high-quality cleaning practices across teams and locations.
As the process concludes, the bed stands ready for the next load. The careful preparation—grounded in patience, protection, and precise technique—has paid off in a clean, well-maintained surface that can withstand the daily grind. The habit you build around preparation will ripple into other maintenance tasks as well, informing how you plan, execute, and verify work across the vehicle. The bed is not simply clean; it is preserved, protected, and prepared for durability. This is the essence of thoughtful maintenance: doing the small things correctly so the bigger tasks remain manageable, and so your truck continues to perform with confidence, year after year.
For readers seeking to connect this practice to hands-on routines in professional contexts, the simple act of preparation becomes a bridge. It links the quiet discipline of pre-wash work with the dynamic demands of cargo, weather, and road conditions. It also highlights the value of restraint—knowing when to hold back from aggressive pressure, choosing the right cleaners, and respecting the bed’s coatings and liners. In the end, preparation is the common language that turns a routine chore into a reliable, repeatable procedure. It strengthens trust with customers, protects fleet assets, and reinforces the principle that care taken before the wash yields quality results afterward. As you carry these ideas into your own wash routine, you build a consistent practice that honors the bed and its essential role in the truck’s daily life.
To close the loop, consider how this preparation sets the stage for longer-term upkeep. Regular, well-executed washing becomes a proactive habit that can reveal early signs of wear and tear, such as thin coating in high-friction areas or minor rust spots around screw heads and connectors. Early detection is a powerful partner to preparation because it allows you to address issues before they escalate. When you combine preparation with a routine post-wash inspection, you develop a comprehensive maintenance mindset that improves reliability, reduces repair costs, and keeps the truck looking professional and performing at its best. In sum, the bed’s cleanliness reflects the care you invest in the vehicle as a whole. It speaks to your respect for the tool that helps you move the world, one load at a time. And with that respect, you carry forward a practice that blends science, craft, and prudent stewardship into every wash, making the bed not only clean but resilient and ready for the work ahead.
If you want to explore related aspects of maintenance and facility practices, a broader discussion on professional settings and care routines can offer supplementary ideas on how to scale these practices for fleets of all sizes. For example, the concept of facility management for truck wash businesses provides a framework for consistent workflows, safety protocols, and equipment reliability that can enhance the effectiveness of bed cleaning when applied at scale. This broader lens can help you translate the careful, methodical prep described here into a standardized protocol that supports teams, reduces variability, and keeps a fleet in steady operation. You can learn more about these professional considerations through resources focused on fleet maintenance and facility management, which complement the hands-on skillset outlined in this chapter.
Finally, while this chapter emphasizes diesel contexts and careful handling, it is essential to acknowledge safety boundaries. The method described here is tailored for diesel trucks; never apply the same approach to gasoline tanks or other fuel systems, where compressed air or aggressive cleaning processes can generate static electricity with dangerous consequences. The emphasis remains on safety, control, and respect for the vehicle’s coatings and structural integrity. By keeping these cautions in mind and following the thoughtful sequence outlined above, you ensure that bed washing remains a sustainable, safe, and effective practice—one that supports the long life and dependable performance of your truck bed and the work you rely on it to do.
For further reading on vehicle care practices, additional guidelines, and broader maintenance principles, consider consulting reputable automotive maintenance resources. In particular, detailed guidance on vehicle upkeep and bed-specific cleaning practices is available at CarCare.org, which provides comprehensive advice for maintaining and caring for your vehicle’s finish and protective coatings. This external resource complements the hands-on approach described here, offering additional perspectives and tips that reinforce a disciplined maintenance routine.
Gentle Hands, Clean Bed: A Thorough, Safe Method for Washing the Truck Bed
The cargo bed of a pickup carries a quiet weight of dirt, grit, and sometimes the stubborn traces of oil and tar. Cleanliness here is not just about appearances; it protects coatings, preserves resale value, and extends the life of liner materials that guard metal against corrosion. A thoughtful wash, performed with care and the right materials, makes sense in any fleet or personal vehicle scenario. The bed deserves the same attention a craftsman gives to a workbench. The goal is to preserve the integrity of paint, coatings, and liners while removing the grime that accumulates in corners, ridges, and shallow recesses. The approach is straightforward but exacting: prepare the bed, choose the right water and cleaners, wash in a deliberate sequence, dry promptly, and then assess for wear or damage that may require further attention. In practice, this means a method that respects heat, avoids harsh chemicals, and uses tools gentle enough to protect sensitive edges and seals. The sequence matters as much as the tools do, because a rushed, aggressive scrub can introduce micro-scratches that invite rust or reduce the effectiveness of protective layers. A well-executed wash, though simple, is a quiet act of maintenance that pays dividends over time. To begin, set the stage with proper preparation. Do not attempt a wash while the engine is hot or the metal surfaces still release heat into a cold hose. Heat expands and contracts metal unpredictably, and a sudden temperature change can create microcracks or weaken coatings that have taken years to mature. Allow the bed to cool completely, and once it does, sweep away loose debris with a broom or brush. Gravel, dust, and small stones can scratch the surface during subsequent rinsing, so removing them first is a small but meaningful precaution. The act of sweeping also gives you a chance to inspect the bed for any obvious damage—chips in the paint, worn liner edges, or loose fasteners that might snag a rag or brush later on. With the bed cleared of loose matter, you can turn your attention to the water and cleaners. Water quality matters as much as the soap you choose. Hard water can leave mineral deposits that dry into spots, especially on bare metal or lighter coatings. If you have access to soft water or a good filtration system for rinsing, use it. If not, a thorough rinse with clean, clear water can still do a lot of work, provided you avoid soap residues that dry hard and leave a film. In most cases, a dedicated, pH-neutral cleaner designed for truck beds is the best choice. These cleaners are formulated to cut through grease and mud while remaining gentle on rubber seals, plastic components, and bed liners. Household detergents and alkaline cleaners should be avoided. They can strip protective coatings and degrade seals and liners, leading to a less durable bed environment. The cleaner you select should be labeled as safe for bed liners and coatings; read the label, follow the instructions, and use the recommended dilution. The idea is to strike a balance: enough cleaning power to lift grime, but not so much that it weakens the protective layers that keep the bed sturdy against corrosion, chemicals, and the elements. Once the cleaning agents are chosen, rinse first to loosen the dirt. A garden hose with moderate pressure is ideal for the initial pass. Direct high-pressure streams at the bed can force water into seals and seams, dislodge edge coatings, or lift the liner material. If a jet is necessary for stubborn areas, keep the nozzle at a safe distance and angle—about 45 degrees—to wash away grime without forcing water under layers or into gaps that should remain sealed against moisture. The focus on temperature and pressure is not merely a caution; it is a recognition that the bed’s components—paint, seals, and liners—are not built to endure a high-energy assault. After the initial rinse, the scrubbing begins. Use a soft-bristled brush or a plush sponge. Hard tools invite scratches that can trap moisture and promote rust. For grease or oil that clings stubbornly to metal or liner seams, apply a small amount of the truck-bed-safe cleaner and let it sit for a few minutes. The waiting period allows the chemical to penetrate and loosen the bond between grime and surface, making the subsequent scrub more effective with less physical abrasion. As you scrub, work in sections from top to bottom. The reasoning is practical: cleaning from top to bottom prevents lifted dirt from dripping onto areas you’ve already cleaned, creating a re-work loop you don’t need. It also helps you keep track of areas you’ve already addressed so you don’t miss patches that accumulate more debris as you work. The bed’s corners, channels, and wheel-well pockets often hide the most stubborn soils—mud that got baked in by sun and heat, or oil that settled into grooves. These areas benefit from a slower, methodical approach. Move the brush in a controlled circular or back-and-forth motion, applying enough pressure to dislodge grime without forcing cleaner beneath any edges that could peel or crack. For especially resistant stains, a second treatment with a fresh application of cleaner, followed by a longer dwell time, can make a noticeable difference. It is here that the guidance from seasoned truck-maintenance hands rings true: patience and a measured touch are often more effective than brute force. After the scrubbing, a thorough rinse is essential. Residual soap or cleaner can trap moisture and, if left in contact with metal, may contribute to oxidation over time. Rinse until the water runs clear and all suds are gone from the deepest channels. A second, lighter rinse can help ensure no soap film remains on the bed’s underside where water can linger and evaporate unevenly. The drying stage should not be short-changed. Dry the bed immediately after the final rinse using a clean microfiber towel or a chamois. Wet spots left on bare metal or etched liner patches can harbor moisture that accelerates oxidation or leaves water spots that look unsightly and may trap contaminants. If possible, avoid leaving the truck to dry in direct sun. The intense heat can cause water to evaporate quickly in a way that leaves streaks or creates microscopic residues that are difficult to wipe away later. A shaded, breezy area is ideal for drying; if you must, use a gentle breeze to carry evaporating moisture away from the surface rather than letting it pool in a corner. The drying process also has a protective logic. A well-dried bed is less likely to develop rust in tiny scratches or chips that might be invisible to the eye but exposed to moisture and oxygen. After drying, inspect the bed carefully. Look for any signs of wear, cracks, or dents that may have appeared during the wash or in the days since. If you notice chips in the paint, bent edges, or damaged bed liner, address them promptly. Small chips can be touched up, but larger issues may require more substantial attention to prevent corrosion. A worn bed liner or damaged seal can invite moisture and dirt to accumulate in places that are difficult to reach during routine cleaning, diminishing the bed’s protective barrier. If the liner is peeling, consider reapplying a polyurethane or rubberized bed liner in the affected area. A fresh liner not only protects but also makes future cleanings easier by preventing soil from sticking to rough surfaces and reducing the need for aggressive scrubbing. The care you give the bed after washing can influence how easy future cleanings will be. When you treat the liner with appropriate products designed to maintain flexibility and adhesion, you reduce the emergence of cracks and peeling and extend the bed’s overall life. This is not about turning a wash into a ritual, but about building a durable routine that keeps the bed looking sharp and functioning well. If you are managing a fleet or repeatedly tackling difficult grime, you may discover that certain soils require different strategies. For example, areas where road grime and tar accumulate can benefit from a targeted approach. A dedicated cleaner with a higher grease-cutting capability applied for a short dwell time can help. However, even in these cases, you should still respect the bed’s coatings and liners, avoiding aggressive detergents that could compromise the protective layers. The emphasis remains on gentleness paired with effective cleaning power. The guidelines are consistent with broader principles of vehicle care, where the goal is to maintain protective films, prevent corrosion, and minimize the risk of damage from cleaning processes. In this context, the broader knowledge base suggests that the core steps—cooling, debris removal, careful product selection, restrained use of high-pressure water, gentle scrubbing, thorough rinsing, and immediate drying—combine to create a dependable routine. For readers who want to explore deeper strategies for maintaining steel beds or specialized linings, there are resources that discuss proven strategies for cleaning grease and tar off your trucks fast. This internal reference provides practical examples of how professionals tackle stubborn grime while safeguarding protective layers. For more detailed instructions and safety guidelines, refer to the official maintenance manuals provided by vehicle manufacturers or trusted automotive resources. A robust maintenance practice recognizes that each bed type may have its own nuances, and a careful reader will consult the specs for their specific truck model and bed liner system. Following manufacturer guidelines ensures compatibility with coatings and warranties, and it helps align your routine with industry standards. When you consider the entire lifecycle of a truck bed, the wash becomes part of a larger maintenance philosophy. It is not a single act but a recurring process—one that supports the bed’s durability and the vehicle’s overall performance. The steps described above create a rhythm that can be adapted to different climates, bed materials, and load demands. In colder climates, for instance, the debris you encounter is often gravel and road salt residue that sits in joints and crevices. In those situations, a slightly longer dwell time with the cleaner and a more thorough rinse can help prevent mineral buildup. In hotter climates, direct sun on the bed may accelerate drying in a way that leaves streaks; thus a shaded area for drying, or even a brief wipe with a dry microfiber followed by a final air-dry, can help maintain a pristine finish. The overarching principle remains constant: protect the bed’s integrity while methodically removing soil and grime. The approach is deliberately practical, rooted in the material realities of truck beds—steel or aluminum, coatings and liners, seal materials, and the way grime behaves in real-world use. The reader can translate these ideas into a personal routine that fits the vehicle and the work at hand. And because teams or individuals may manage more than one vehicle, the same sequence can scale up with a little organization—dedicated cleaning buckets, the same soft brushes, and consistent application of the same cleaner to prevent cross-contamination between vehicles. In terms of realistic expectations, a well-executed wash will reduce the risk of corrosion, extend the life of protective coatings, and keep the bed looking professional. It won’t magically erase deep scratches or pre-existing corrosion, but it will prevent new damage from forming and will make it easier to assess the bed’s condition after each wash. The value of the process lies in its predictability and its respect for the bed’s materials. The end result is a truck bed that not only looks cleaner but is more resilient to the tasks that follow. For readers who want to explore more about fleet maintenance and the human factors behind effective cleaning programs, resources that cover facility management for truck-wash operations offer useful perspectives on how routine care fits into larger operational workflows. The broader takeaways are simple: consistency, gentle handling, and attention to material-specific guidance. When these elements come together, washing the bed of a truck becomes less about a single chore and more about a disciplined, efficient habit that protects the vehicle’s value and readiness for work. For a concise, practical entry into this topic, you can reference the proven strategies for cleaning grease and tar off your trucks fast, which provides concrete techniques that align with the core principles described here. External references can offer complementary viewpoints and real-world examples that reinforce the approach while expanding the toolbox of techniques available for challenging soils. In all cases, the instruction remains the same: let the bed breathe, treat it with care, and finish with a thorough inspection that confirms you’ve addressed the grime without compromising the bed’s protective layers. The resulting cleanliness is not merely cosmetic; it is a small but meaningful investment in the vehicle’s longevity, performance, and readiness for the road ahead. External reference: https://www.consumerreports.org/car-maintenance/how-to-wash-your-car/ |
After the Rinse: Post-Wash Care That Shields the Bed of a Diesel Truck

Washing the bed of a truck is a clear first step, but the real work—protecting the metal, the coating, and the liner—happens after the water stops flowing. The post-wash stage is where intention meets maintenance, where a careful, deliberate routine prevents rust, preserves finish, and extends the life of the bed, its liner, and any cargo systems you rely on. When a fleet or a weekend setup hinges on a reliable bed, every square inch of that space deserves a quiet, methodical follow-through that begins the moment you step back from the rinse. The difference between a bed that looks good for a day and one that remains solid and dependable for years is often a matter of the details you choose to attend to once the water is off the surface. In this chapter, the focus is on turning a ritual into a lasting habit, a routine that respects the metal beneath the paint, honors the bed liner, and keeps moisture from becoming a silent adversary in the corners and seams where neglect tends to hide.
The first pillar of post-wash care is thorough drying. Water left to evaporate on a metal surface invites micro rust and water spots, especially in environments where mineral content or residual detergents can leave a film. A microfiber towel, a chamois, or an air dryer can do the heavy lifting here, but what matters most is the discipline of drying promptly and completely. Move in deliberate strokes, top to bottom, and pay attention to the corners, raised ribs, and any grooves where moisture can collect. Drying is not just cosmetic; it is a preventative measure. If you have any scratches or bare metal exposed, drying becomes even more critical, because lingering dampness can exploit tiny abrasions, allowing moisture to time with oxygen and begin the slow process of oxidation. In practical terms, you may find that once the bed is rinsed, you need two rounds of drying: a quick, broad pass to remove the bulk of the water and a second, meticulous pass to target pockets where dampness tends to linger.
Beyond surface dryness, consider the bed liner itself. A bed liner—whether it is a spray-on coating, a rigid plastic, or a flexible rubber liner—acts as a shield. It slows corrosion, cushions cargo, and defines how the bed handles moisture over time. After washing, a routine inspection becomes essential. Look for cracks, peeling, or seams that appear suspiciously worn. Even minor gaps can trap water against metal or allow dirt to infiltrate the interface between liner and bed. If you notice any irregularities, address them promptly. Minor imperfections can escalate, and the last thing you want is a hidden water pocket beneath a liner edge or a compromised spray coat that allows moisture and salt to reach bare metal.
Cleaning the liner itself deserves a careful approach. Harsh chemicals or high-pressure sprays directed at the liner can degrade its integrity, shorten its life, and compromise its protective job. Instead, stick to mild soap and water, applied with a soft brush or sponge. If the liner is rubber or fabric-based, avoid aggressive scrubbing that can abrade or tear fibers. Let the cleaner sit for a moment on greasy spots, then gently work them with the grain of the liner’s material. Rinse thoroughly to remove residue that could bake into the surface as heat builds up during sun exposure. In the end, you want a surface that is clean but not chemically stressed—one that resists staining and remains supple enough to flex with temperature changes without cracking. When in doubt, test a small, inconspicuous area first to ensure the cleaner does not react with the liner material.
From there, think about protection on a longer horizon. Post-wash care is a natural moment to consider replenishing or reinforcing protective layers. For beds with liners, a routine conditioning or sealant every six to twelve months helps maintain elasticity, UV resistance, and surface integrity. A conditioner or sealant acts like a moisture shield, not a miracle product. Its job is to slow down ultraviolet degradation, prevent micro-scratches from becoming visible wear, and keep the liner’s surface from becoming brittle over time. If your environment is particularly sunny or exposes the bed to harsh weather cycles, leaning toward a slightly more frequent treatment can pay off in the form of better protection and a bed liner that remains supple and resilient. It is not a substitute for gentle cleaning, but rather an enhancement that complements proper washing and drying. For unlined beds, the decision becomes even more direct: adding a bed liner is one of the most cost-effective ways to preserve the bed’s life, reduce the need for frequent touch-ups, and maintain a clean, cargo-ready space that resists denting and corrosion through decades of use.
This is also the moment to consider mold and mildew. The bed of a truck that sits damp or humid invites moisture-related issues, particularly if you are hauling gear like a camper or other enclosed cargo. The key is to be thorough about drying, but also to ensure that nothing sits damp in a closed space for extended periods. Before you load gear or connect a camper, run a quick check to confirm the bed is bone-dry. If you detect any residual humidity, use a fan or a vented space to accelerate evaporation. Mold and mildew produce odors and can degrade metal and liner materials over time, so the habit of ensuring dryness is not just about appearance; it is about long-term hygiene and structural integrity.
Alongside moisture control, your post-wash mindset should include an eye toward potential damage that is easy to miss in the moment. Small chips in paint or liner, micro-scratches, and tiny pitting on metal edges deserve equal attention because they can serve as starting points for corrosion. The moment you finish drying, do a slow, deliberate walk along the bed and its edges, noting any area that looks weathered or uneven. If you find a chip, a scratch, or a crack, address it promptly. Touch-up paints or patch materials that match your bed’s finish can close the opening that moisture longed to exploit. In many fleets, these small repairs are the difference between a bed that continues to perform and one that requires expensive restoration far sooner than expected. The goal is to catch vulnerability before it becomes a problem, to treat the surface early, and to keep the bed ready for the next haul.
Safety considerations should ring through every stage of this post-wash routine. It is crucial to remember that the prescribed method here is intended for diesel trucks. The combination of diesel fuel systems, electrical components, and certain bed-liner configurations can create unique hazards if steps meant for a diesel application are misapplied to gasoline tanks. In particular, high-velocity or forced air movements near fuel components can generate static electricity in ways that are not safe around gasoline vapors. This is not a general warning about washing; it is a reminder that the context of the vehicle matters. If you are working with a gasoline-fueled system or a different bed setup, consult the manufacturer’s guidelines and adhere to the applicable safety standards. The truck’s manual, followed by trusted automotive resources, will clarify what is permissible and what should be avoided in any given configuration. When you see a note about the risk of static electricity, take it seriously: it is about preventing a fire hazard in a space that can be deceptively dry next to a hot engine and a potential fuel source.
In the broader picture, post-wash care gently steers you toward two practical habits that build a durable, dependable cargo space. First, schedule a routine inspection cadence that aligns with your climate and use. If you operate in winter, with road salt and moisture, you might want to perform a more frequent check than someone in a dry climate. Second, treat the bed as a living component of the vehicle, not a one-off feature. It deserves the same attention you devote to tires and brakes, because it bears the load, the wear, and the weather that come with daily use. When you commit to a steady post-wash routine, you create a predictable pattern: rinse, dry, inspect, protect, and verify. This is not merely about aesthetics; it is about preserving the bed’s integrity and ensuring that its protective layers do their job for the long haul.
To weave this practice into everyday discipline, you can connect the post-wash moment with the broader language of care that many fleets adopt. The idea is to frame post-wash care not as an extra task but as a natural extension of maintenance that protects the cargo you carry and the vehicle you rely on. In real-world terms, you might spend a few extra minutes drying and inspecting, but you gain months or even years of additional life from a bed that remains free of rust, chipping, and lingering moisture. This continuity matters in fleets where the bed is used to haul agricultural products, building materials, or camper gear. Each load adds a layer of potential moisture and wear, and your post-wash habit becomes the quiet guardian of the bed in between jobs. The result is a bed that looks presentable and, more important, performs consistently; it remains a stable platform for loading, securing, and protecting the cargo as it moves through the workday.
For readers seeking deeper practical nuance, there is value in cross-referencing related maintenance guidance that speaks to the same core ideas. The link below points to a resource that outlines proven strategies for cleaning grease and tar off trucks, a topic that intersects with bed care because stubborn soils, not just moisture, test the durability of liners and coatings. Integrating such strategies can help you tailor your post-wash approach to the kinds of grime your bed encounters, without compromising the protective layers that safeguard the metal and liner. By applying a consistent, careful approach to both cleaning and post-wash care, you ensure that the bed remains a robust work surface that supports your tasks rather than a liability that demands ongoing repair.
Proven strategies for cleaning grease and tar off your trucks fast
As you move toward more comprehensive routines, remember that your post-wash care is part of a larger ecosystem of vehicle maintenance. It dovetails with inspections after every heavy use, with scheduled protective reapplications, and with mindful storage practices when the truck bed will be idle for extended periods. If you haul campers or other equipment, this post-wash cadence becomes even more crucial. A dry, well-sealed bed helps prevent moisture from seeping into seams and corners where it can trigger mold, corrosion, or fatigue in the metal. It also helps maintain the bed’s appearance, which matters for resale value and for the visual impression of a well-kept fleet. In this light, post-wash care is not a chore; it is a form of proactive stewardship that protects investment and ensures reliable performance across years of service.
To close the loop, let this chapter serve as a reminder that post-wash care is the hinge between cleaning and long-term protection. The moment the rinse ends is the moment to lock in dryness, verify the liner’s condition, and reinforce the bed’s defenses against the elements. The routine should be simple, repeatable, and non-destructive. It should respect the bed’s design, whether it relies on a spray-on coating, a rubber liner, or a fabric-lined surface. It should also recognize the diesel-specific context in which this method operates, applying common-sense safety and manufacturer guidance as a baseline. When you treat post-wash care as an integrated, ongoing practice, you build a bed that remains a solid foundation for cargo and an honest reflection of diligent maintenance. The bed becomes more than a space to haul gear; it becomes a testament to careful stewardship that spans the life of the vehicle and the needs of every job you undertake.
External resource for broader context on bed maintenance and protection tips: https://www.autoblog.com/truck-bed-maintenance-tips-2024
Final thoughts
In conclusion, washing the bed of a truck is a vital part of vehicle maintenance that requires thoughtful preparation, careful washing techniques, and diligent post-wash care. By implementing the practices outlined in this guide, fleet managers, trucking company owners, and construction supervisors can ensure the longevity and optimal performance of their vehicles. A well-maintained truck bed not only improves the presentability of your fleet but also protects your investment over time.