Lifting a washing machine into a truck necessitates meticulous planning and technique to prevent injury and appliance damage. This comprehensive guide is tailored for logistics and freight professionals, truck operators, and fleet managers, illuminating essential steps for a safe and efficient move. The subsequent chapters break down the preparation needed before the lift, the recommended equipment to utilize, proper lifting techniques, methods for securing the washer during transport, and final safety checks to ensure a successful relocation. By following these guidelines, you ensure a smoother, safer operational process, fostering efficiency and reliability in appliance transportation.
Securing the Load: Thorough Preparation for Safe Lifting a Washer into a Truck
Preparation for lifting a washer into a truck is not an afterthought; it is the foundation that determines whether the move is efficient, safe, and free of damage to the appliance. This chapter unfolds the preparation as a single, steady practice rather than a checklist to race through. When you treat prep as the first and most essential step, you reduce the risk of spills, drum damage, and back injuries, and you set a tone of deliberate, controlled action for what comes next. Every stage—from power and water disconnection to the moment the washer sits securely on its final resting place—echoes a commitment to safe handling. The approach is practical, patient, and predictable, guiding you through a sequence that respects both person and machine. It is about creating favorable conditions: a clean workspace, a quiet, clear route, and a neutral environment in which the weight can be managed without surprises. In that sense, preparation isn’t merely administrative; it is the strategy that keeps your back protected, your gear in good condition, and your workload controllable from the first unplug to the last strap cinched tight.
First comes control over the power and water sources, the very lifeblood of a washer during an upheaval. Before any physical maneuver, you unplug the machine from the electrical outlet and close both the inlet and outlet valves. This precaution prevents the drift of electricity into water lines and eliminates the risk of a sudden spray if hoses are disturbed during movement. With the power cut and valves shut, you create a predictable, closed system that minimizes the chance of leaks or shocks mid-transport. The goal is not to rush but to establish a firm boundary between the stationary, safe base you start from and the dynamic, potentially hazardous activity of moving a heavy appliance. The moment you remove the power and seal the water lines, you take a decisive step toward a safer operation.
Next comes the thorough emptying of the washer and the removal of any residual contents that could shift or spill mid-lift. Open the door or lid and drain all remaining water. Remove clothing, detergents, and any detachable accessories that might rattle or ooze during transport. If the drum holds water or soap remnants, a short rinse cycle or the drain function should clear it out. Once the interior is dry, take a moment to inspect the dispenser and filter areas, removing soap residue or lint so nothing clogs the pathways during the trip. Emptying the unit reduces weight, which makes each lift more controllable and less fatiguing. It also minimizes the chance of leaking soap or water onto the truck bed, which could create a slippery or corrosive environment for the haul.
If your washer uses shipping bolts—those that lock the drum in place during shipment—remove them before you begin actual movement. The bolts are designed to stabilize the drum during transit, but they must not remain in place when you’re trying to maneuver the appliance through a doorway or into a truck. If you find yourself mid-move and the bolts are still in place, secure them tightly to prevent internal movement, then plan a safe stop to remove them. Removing the bolts and stowing them properly means the drum can respond to the ride in a controlled manner rather than fighting against a rigid, fixed interior. This step, though it might seem trivial, prevents awkward shifts that can compromise balance as you navigate stairs, ramps, or a truck bed.
Protection is the next crucial node in preparation. Thick blankets, foam padding, or bubble wrap create a cushioned envelope around the washer, with particular attention paid to corners and edges—the parts most exposed to impact during loading and transport. If the original packaging is available, it provides a level of shock absorption that generic padding cannot always replicate, so consider using it when possible. Secure the protective layers with wide packing tape to prevent shifting during motion. The goal is not to overpack but to create a stable cocoon around the appliance that resists tearing or slipping as you maneuver across uneven ground or into a confined truck bed. A well-wrapped washer not only minimizes cosmetic damage but also protects the sensitive internal components from jolts that occur even on smooth pavement.
With the washer prepared, attention turns to the environment into which it will move. The truck bed must be ready to receive the appliance in a way that preserves its integrity. Clear the area of any debris, and ensure the bed is clean and dry. A tarp or rubber mat on the floor helps reduce scratches and improves grip, preventing the washer from sliding as it is slid or rolled into place. Position the truck so that the rear opening is level with the ground, and aim to lower the tailgate to create a gentle ramp rather than a sharp edge. A level entry path reduces the temptation to jerk or yank, which can cause a loss of balance. If a ramp is available, plan to use it in conjunction with a dolly, allowing the washer to roll into the truck with minimal lifting. The idea is to create a smooth transition from ground to truck bed, a path that respects the machine’s weight and the handler’s stamina.
This preparation phase is also about anticipating the space you must work within. Measure the washer’s height, width, and depth, and compare those numbers against the truck’s cargo area. Confirm there is enough clearance for safe loading and the subsequent securing once the unit is inside. A miscalculation here can transform a routine lift into a forced maneuver that strains the back or scrapes the appliance. If the space seems tight, consider shifting the truck’s position or temporarily adjusting the ramp angle to maximize the approach clearance without compromising control. The aim is not only to get the machine into the truck but to do so without exertion that invites injury or damage.
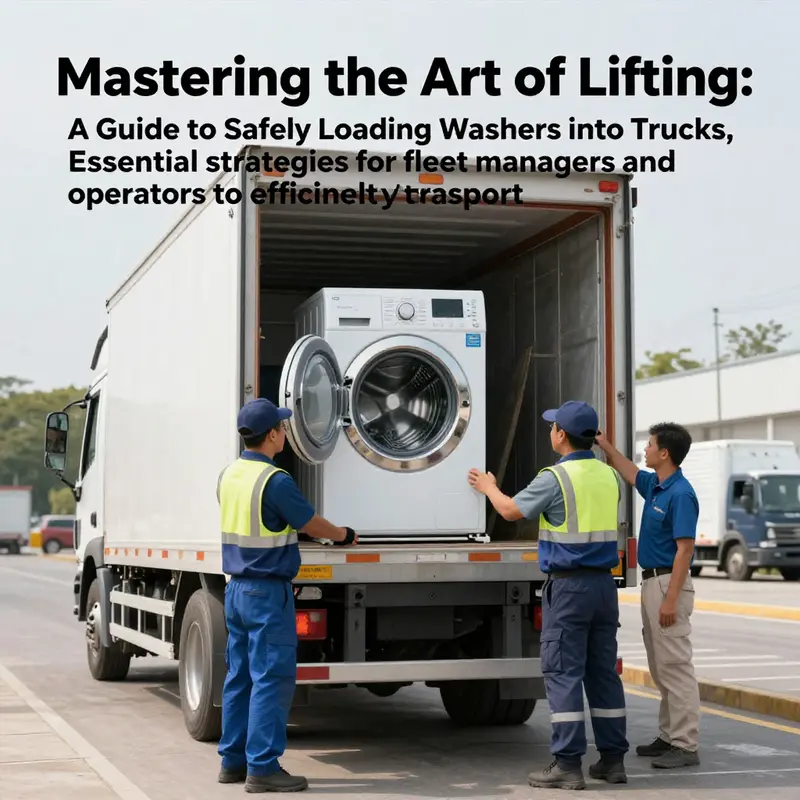
The motion plan is then reinforced by the right equipment and collaboration. A heavy-duty dolly or hand truck, with straps that can secure the unit to the frame, becomes your trusted ally. Lifting straps that go over the shoulders and around the washer’s body help distribute weight and relieve stress on the back, especially when the load is heavy and uneven. For heavier washers—those approaching or exceeding eighteen kilograms—two people are advisable. One person guides the front while the other pushes from behind, maintaining balance and reducing the risk of tipping. The teamwork is not a show of strength alone; it is a coordinated procedure that ensures the load remains stable as you guide it toward the dolly and then up the ramp into the truck.
Finally, before you lift a single inch, review your plan aloud in your mind. Visualize each movement: bend at the knees, keep the back straight, and keep the washer close to your center of gravity. Think through turning corners by pivoting your feet rather than twisting the torso. Confirm that the dolly is properly aligned, the straps are correctly positioned, and that the path to the truck bed is clear of obstacles. If a ramp is involved, roll rather than lift, letting the wheels bear the majority of the weight. Remember the safety caveat: do not rush. The goal is to complete the preparation with a calm, steady tempo that respects the weight, the space, and the people involved.
In sum, preparation is not a separate chore but the framework that makes the actual lift safe and predictable. By disconnecting power and water, emptying the unit, removing or securing transport bolts, protecting the appliance, and readying the truck bed and path, you create a controlled environment where technique and equipment can work in harmony. The preparation phase reduces surprises, minimizes strain, and sets the stage for a smooth, efficient lift into the vehicle. It is the quiet, deliberate work done before the physical effort—an approach that aligns safety with practicality and makes the entire operation smoother and safer in the long run.
Important safety reminder: According to the U.S. Consumer Product Safety Commission (CPSC), improper handling of large appliances like washers can lead to serious injuries. Always prioritize safety over speed. For more detailed guidance on safe appliance handling and transportation, consult official guidelines from the CPSC. External resource: https://www.cpsc.gov/.
Lifting with Precision: Essential Equipment and Safe Setup for Moving a Washer into a Truck

When you’re preparing to move a washer into a truck, the equipment you choose is as critical as the technique you use. The goal is to translate muscular effort into controlled, safe movement that protects both the appliance and the people involved. A well-chosen setup begins with the right hardware and a clear plan. You’ll want a sturdy dolly with large, reliable wheels and a set of straps or a lifting harness that can distribute weight evenly across your body. A dolly by itself reduces the strain on your arms and back, but it only helps if you can secure the load properly and maneuver it with deliberate control. The straps or lifting harness are what keep the weight distributed so you don’t end up pulling with your lower back or attempting to hoist a load that is simply too heavy for a single person to manage. For most washers that are heavy but still within a manageable range for two people, this combination is enough to pull the appliance onto the truck bed from the side or rear with confidence and precision.
Before you even lay hands on the machine, confirm the weight and dimensions. The last thing you want is to discover mid-load that the washer won’t fit through the doorway, or that the drop from the tailgate would jeopardize stability. If the machine weighs more than about 40 kilograms, consider additional equipment that can reduce physical strain. A hydraulic lift gate, if your truck is equipped with one, lets the crew raise and lower the washer with the turn of a switch instead of wrestling it onto a ramp. For higher bed configurations, a truck-mounted winch system can provide controlled vertical and horizontal movement, preserving balance and reducing the risk of sudden shifts that can damage the cabinet or drum bearings. If you don’t have these options, a ramp and careful dolly operation become your best alternative, with the emphasis on slow, deliberate movement rather than speed.
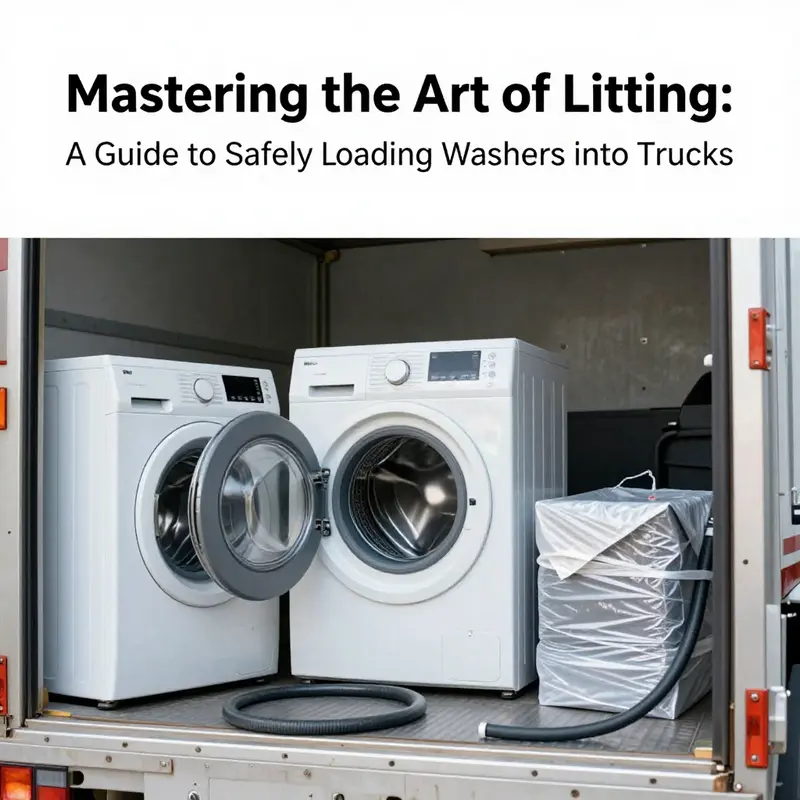
Protecting the appliance during transit starts long before the actual lift. Wrap the washer in moving blankets or foam padding to cushion against bumps and minor impacts that can leave cosmetic scratches or chip paint. Place a layer of cardboard or a lightweight skid under the base to glide smoothly over the truck bed and to dampen any vibrations that come from road irregularities. The goal is to keep the exterior as pristine as possible while also maintaining a stable, non-slip surface for the load. When you secure the unit, you are not just tying it down to prevent shifting; you are locking in a stable center of gravity so that the weight remains evenly distributed as the truck moves forward. The seven or eight feet of space inside a typical truck bed is enough for a compact washer when it stands upright, but it becomes a crisis if the load starts to tilt or slide.
The actual lifting sequence should be anchored in a simple, repeatable rhythm. Begin by guiding the washer onto the dolly from the side or rear, never from the top. Do not grab the door or control panel; those components are more fragile than their metal counterparts and can be damaged if pulled. Instead, grasp the base or the sturdy sides of the machine to keep the load balanced against your body. When the team is two-handed—one person guiding the front and the other pushing from behind—use a mild, coordinated push to set the dolly in motion. Keep the washer close to your torso; this keeps your center of gravity near you and reduces the risk of a sudden jerk that could strain a back or slip a grip.
As you approach the ramp or the truck bed, test the incline with small, controlled moves rather than committing to a full ascent. If a ramp is available, roll the washer up slowly and steadily, maintaining constant contact with the dolly’s handles or frame. Do not attempt to tilt or twist the load on the ramp; let the dolly carry the weight as designed. If you’re using a hydraulic lift gate, this is where it becomes invaluable. Set the load so that it sits upright against the bed, with the wheels of the dolly aligned to roll over the edge without catching. Maintain a light, continuous contact with the appliance as you guide it into place, pausing to adjust your grip if the weight shifts or the motion becomes labored. When the washer is fully on the bed, you still do not release control. Keep it steady while you prepare for final securing.
Securing the load inside the truck is not a separate step but an extension of the loading technique. Ratchet straps or sturdy bungee cords should be anchored to solid points along the truck bed. Do not strap the washer to moving parts or to the door panels, which could transfer tension into components that are not designed to bear it. Tighten just enough to prevent shifting, then gently test movement by nudging the load with a hand or foot to ensure it won’t groan, tilt, or roll during transit. If the washer ends up resting against a wall or another sturdy object, place padding between surfaces to absorb shock and reduce the chance of friction or impact noise that can travel through the vehicle.
Positioning the washer upright is worth emphasis. Setting the appliance on its side or back can disturb internal balance weights and increase the risk of mechanical damage when the vehicle is in motion. An upright stance aligns with the way most washers are built to operate, preserving the integrity of bearings and seals during transport. The transport bolts, if they have been reinstalled after the move, should be rechecked during the final steps. They are designed to immobilize the drum during transit and prevent it from shifting inside the cabinet. A careful checklist—empty, secure, upright, bolted, and strapped—helps ensure that nothing is overlooked in the rush of a move.
There is also a practical logic to equipment choice that extends beyond one-off moves. Regular maintenance and proper storage of loading gear play a critical role in the safety and efficiency of every relocation you undertake. The equipment’s condition affects how smoothly the operation proceeds and the margin for error. It is worth connecting this practical setup to broader care practices for your fleet and tools. For a reminder on how routine upkeep supports safe loading and transport, see the guide on the Importance of Regular Trailer Maintenance. Keeping the trailer and related equipment in good order reduces the likelihood of a misstep during loading and makes every job more predictable and safer for everyone involved.
As you bring the operation to a close, take a moment to verify the overall setup. The washer should sit firmly against a wall or a block so that it cannot shift once the truck is in motion. All hoses should be reconnected only after you have reached your destination, but for transport you should detach and secure them to prevent leaks or snagging. If possible, remove any loose items from inside the drum to prevent rattling noises or imbalances in mass distribution. When you reverse the process at the new site, you will apply the same discipline: clear the waiting area, inspect the truck bed, and ensure that the securing methods are still intact before initiating the reverse load. The discipline you practice during loading—careful planning, prudent use of equipment, and a measured approach to movement—becomes the foundation for a safe move every time.
Finally, remember that safety is not a single moment but a continuous standard. The U.S. Consumer Product Safety Commission provides guidelines and warnings about improper handling of large appliances. Practicing these guidelines and staying aware of body mechanics reduces the chance of injuries and damage. The practical takeaway is simple: equipment enhances control, control reduces risk, and risk reduction protects you, your helpers, and the appliance itself. By investing in the right gear, using a systematic loading protocol, and consulting authoritative safety resources when in doubt, you turn a potentially arduous task into a well-coordinated operation that respects both people and machines. External safety references can be found at the Consumer Product Safety Commission for a thorough review of handling guidelines and reminders that safety should always lead the process.
External resource: https://www.cpsc.gov/
From Floor to Freight: A Safe, Integrated Approach to Lifting a Washer into a Truck

Lifting a washing machine into a truck is less a test of brute strength than a test of coordination, planning, and respect for the appliance itself. It demands a quiet, deliberate rhythm where every move supports the next. The moment you decide to move a washer is the moment you begin choreographing a small, portable engineering problem: weight distribution, surface friction, body mechanics, and the rigid constraints of the truck’s cargo space. When you treat the task as a sequence of careful decisions rather than a single heroic lift, you reduce the risk of back strain, dropped loads, and dented casings. The approach is simple in principle but exacting in execution, and it rewards patience and teamwork as much as muscle. You want the washer to travel intact and arrive ready to function, not to be a casualty of haste or improvisation. The core idea is to secure, transport, and settle the machine with the same care you would give a fragile piece of equipment that costs more than a sum of parts. Safety is not a barrier to progress; it is the pathway to it.\n\nPreparation is the quiet foundation on which every safe lift rests. Begin by ensuring the washer is truly ready for movement. Remove all clothing, detergents, and fabric softeners from the drum area. If there is residual water, drain it with a brief cycle or the unit’s drain function. Disconnect hoses—the inlet and outlet—then tuck them out of the way where they cannot snag during the move. For front-loading models, reinstall the transit bolts if you have them; their purpose is to keep the drum from shifting during transit, a simple precaution that pays off later. Then step back and measure. Know the washer’s height, width, and depth, then compare those dimensions to the truck’s cargo bay. A clearance calculation may seem overly precise, but it matters. A few inches can be the difference between a smooth roll and a scrape against a doorway, a fender, or a wall. With the space confirmed, the object should be protected. Wrap the machine in moving blankets or foam padding, and add a layer of cardboard or a wooden skid beneath it if available. The padding guards against scratches on the shell and helps dampen minor vibrations once the washer is in motion. The goal is a traveling envelope, not a hard shell that amplifies impact. Weight distribution matters too; a machine that’s top-heavy can shift unpredictably as the dolly negotiates thresholds and ramps. If you doubt your ability to maneuver it solo, arrange help. A second person isn’t a luxury; it’s a safety feature when you’re dealing with a bulky, awkward load.\n\nEquipment choice shapes the entire experience. A heavy-duty dolly or hand truck is almost indispensable. Position the dolly to accept the washer from the side or rear, whichever offers the most secure contact point and the least need for awkward lifts. Straps or a rope will become your lifeline for stability. A back support belt can reduce spinal load, especially when you are guiding heavier units. For heavier washers—those approaching or exceeding eighteen kilograms—the act of lifting is clearly a two-person job: one person at the front, guiding, while the other supports from behind, smoothing the device’s ascent onto the dolly and maintaining balance. The aim is not novelty but reliability: create a controlled arc of movement that feels almost routine. The presence of a ramp adds a level of predictability that cannot be overstated. If your truck has a tailgate ramp or you own a portable one, the washer should roll onto the dolly, then glide up the ramp with steady, even momentum. The dolly acts as a bridge between the floor and the truck bed, turning what could be a perilous lift into a measured, rolling transfer. Manual tipping should never be forced; if a ramp is not available, rethink the approach rather than risk the load.\n\nThe lifting technique itself is the hinge that holds all the preparation together. Stand with your feet shoulder-width apart for a solid base. Bend your knees, not your waist, and keep your back straight. Engage your core. Let your legs do the lifting work, not your spine. The washer should be kept as close to your body as possible; this minimizes leverage and reduces the sheer load your back must endure. Avoid twisting your torso when you need to change direction. Instead, pivot your feet like a dancer’s, letting the entire body rotate rather than the midsection. If you have used a dolly, the plan is to roll the unit onto the dolly, secure the straps, and guide it toward the truck with a controlled, continuous motion. When you encounter any angle or slope, smoothness wins over speed. Never tilt the washer more than a 45-degree angle, and never attempt to steer or lift against a sudden shift in weight. The drum, the bearings, and the suspension are all sensitive to abrupt changes; the safest path is one of gradual, predictable movement. Padding remains essential as the load traverses thresholds or doorways. A momentary contact with a hard surface can mar the finish, while padding keeps the ride quiet and the finish pristine.\n\nInside the cargo space, securing the load becomes a final act of discipline. Once the washer sits safely in the truck bed, fasten it with ratchet straps or sturdy cords anchored to fixed points. The goal is not to immobilize the drum through a single tight strap but to create a cradle around the base that prevents lateral movement. If possible, place blocks or additional padding around the base to resist shifting during transit. An upright position is safer than a tilt that could compress lines or hoses in odd ways. In all cases, never lay the washer on its side or invert it. Internal components can suffer, and leaks can spring from the soft gaskets beneath the drum. The final checks should include ensuring all connections are fully disconnected and secured in their own protective routes. Once the machine has found a resting place, reinstall the transit bolts if you had them in place before moving. They provide a final safeguard against drum movement in motion, a small but meaningful habit that pays dividends at the other end of the journey.\n\nAs with any manual handling task in a professional setting, a single misstep can derail what should have been a straightforward move. The guidance from recognized safety authorities underlines this point with clarity: prioritize safety over speed, and treat every load with respect. If you suspect fatigue, call for a pause. If the space feels cramped, reassess rather than press on. The process is not a test of brute strength but of controlled, deliberate action. For those seeking formal safety training that aligns with industry standards, consider resources such as the Kenworth Truck Centres training commitment, which offers structured guidance on safe handling and workplace procedures. This emphasis on training reinforces the principle that competent, prepared teams perform better—and safer—than lone, improvised efforts Kenworth Truck Centres training commitment.\n\nFor further reading on manual handling and the broader safety framework around moving heavy loads, you can consult established guidelines from national safety authorities. These resources lay out practical, step-by-step practices that complement the hands-on approach described here. They reinforce the idea that every move should be planned, every tool checked, and every participant aware of their role. By coupling careful preparation with disciplined technique, you protect both the washer and the people who move it. In addition to the internal and training considerations, it is prudent to keep a small toolkit and a spare strap in the truck for contingencies. A wedged piece of cardboard at the base can also help minimize surface marks should you encounter a tight doorway or a misjudged corner. Ultimately, the journey from floor to freight is a microcosm of professional moving work: it requires prudence, patience, and a shared commitment to safety that travels with you from the first measurement to the final strap tightening.\n\nExternal resource: OSHA’s guidance on safe manual handling offers additional perspectives on posture, load limits, and risk reduction that complement the steps outlined above. For formal, standards-aligned practices, see https://www.osha.gov/SLTC/materialhandling/index.html.
Securing the Washer for Transit: Precision, Care, and Technique When Lifting a Washer into a Truck

Lifting a washing machine into a truck is less about brute strength and more about a disciplined, patient approach that starts long before you touch the appliance. The goal is a load that stays stable from the moment it leaves the floor to the moment it reaches its final resting place in the truck bed. A successful move hinges on planning, proper lifting technique, and smart securing. When done correctly, the process protects you from injury and shields the washer from internal jarring, leaks, or damage to its cabinet and drum bearings. The idea is to treat the appliance as a precision load, not as a bulky nuisance that must be shoved into a confined space. That mindset shapes every action you take, from preparation through to securing at the destination.
Preparation begins with the washer itself. Empty it completely, leaving no clothes or detergents behind. Detergent drawers can trap residue and leak during transport, so rinse and wipe them clean. If there is any remaining water in the drum, run a short cycle or use the drain function to extract it. This reduces shifting once the machine is in motion. Detach and secure the inlet and outlet hoses to prevent them from snagging on corners or snagging their fittings during loading. For front-loading models, reinstall or confirm the transport bolts as needed. These bolts stabilize the drum inside the cabinet and prevent internal movement that could otherwise cause misalignment or damage in transit. Dimensions matter as well. Measure the washer’s height, width, and depth and compare them to the truck’s cargo space. You want a buffer of clearance for maneuvering, along with enough room to accommodate a protective layer around the appliance. Padding is essential. Move blankets, foam pads, or bubble wrap into position to cushion the sides, top, and front. Cardboard or wooden skids can lift the base off the truck bed and provide a rigid, non-slip surface for loading.
Equipment choice makes a critical difference. A heavy-duty dolly or hand truck with wide, rubberized wheels is ideal for traversing door thresholds, carpet, and slick floors. Position the dolly so you can roll the washer onto it from the side or rear with control and balance. Lifting straps or a back support belt can alleviate strain by distributing the weight across your shoulders and hips rather than concentrating it in the lower back. If the washer is particularly heavy—over roughly 18 kilograms—organize teamwork. One person guides the front while another provides power from behind, maintaining even balance as the unit moves. The goal is a smooth, coordinated lift rather than a jagged, one-person pull. A short, clear plan and good communication keep everyone in step.
The lifting technique is the hinge of safety. Start with your feet shoulder-width apart to create a wide, stable base. Bend your knees, keep your back straight, and engage your leg muscles to lift. The washer should stay as close to your torso as possible, reducing the torque on your spine. Do not pull on the handle or the top edge. Instead, secure a solid grip toward the base or around the body of the unit. As you rise, move with your legs, not your back. Maintain a smooth, controlled motion and avoid any twisting of the torso. When you reach the point of transfer onto the dolly, pivot your feet instead of twisting your torso and roll the load forward with the wheels aligned to the path ahead.
If you must tilt the washer to clear a doorway or fit into a ramp, limits matter. Tilt no more than 45 degrees and only when necessary. Excessive tilting can shift the internal counterweights and suspension, upsetting the balance and potentially causing a component to bind or a connection to loosen. The smoother the movement, the lower the risk of banging internal parts against the cabinet. When you tilt, keep the washer upright as much as possible and use the dolly to maintain stability across changes in elevation or slope. Do not attempt to rotate the unit on its own axis in midair; wheel turns should be done with the dolly in firm contact with the floor and the load aligned with the wheelbase.
Once the washer is on the dolly, and you have traversed any thresholds, the securing phase begins. Inside the vehicle, position the washer so it cannot shift during transport. Use ratchet straps or tie-down ropes anchored to fixed points in the truck bed or rear seating area. If you have cargo rails or anchor eyes, attach lines through sturdy points around the base of the machine, taking care not to pinch hoses or cables. Foam padding, blankets, or moving pads should be placed under and around the unit to absorb vibrations and prevent scratches. Think of damping as part of the securing system, not an afterthought. In some cases, it can be beneficial to add a light fill of soft packing materials inside the drum area to reduce internal movement. The objective is to eliminate gaps where the washer could shift or rattle under braking and acceleration.
Weight distribution matters, too. If the load is taller or wider than other cargo, make sure its center of gravity remains near the vehicle’s center. Arrange padding so that the washer sits squarely, not angled, and ensure straps are snug but not so tight that they deform the cabinet. It is tempting to over-tighten—this can stress cabinet panels and seals. Instead, achieve a snug hold that prevents sliding in any direction. Check that the load does not obstruct visibility, dashboard controls, or emergency equipment. If you have a two-seat cab, be mindful of how the load can influence seat belt anchors or airbag sensors. The aim is to be safe and legally compliant, without compromising visibility or control.
The securing process should also consider movement from road conditions. Anticipate small bumps, potholes, or sudden decelerations by ensuring padding remains in place and straps stay taut. In some workflows, moving the drum’s contents with empty bottles or soft packing inside can dampen rattle without adding significant mass. Again, the emphasis is on stability rather than stiffness; you want the washer to ride the distance without imparting shocks to its internal bearings or cabinet.
If you are driving the vehicle yourself, take a route with reasonable turns and avoided sharp angles. Maintain steady speeds and allow longer stopping distances. Smooth driving reduces the frequency and severity of jolts the machine endures. This mindful approach preserves not only the washer but also your own safety and that of any bystanders. When you reach the destination, perform a quick stability check before you exit. Ensure all straps remain secured and that there is no creeping or loosening during the unloading sequence. Do not attempt to reposition the washer without checking the securing system again, especially if you suspect any movement.
Reinstallation of the transport bolts should be part of the unloading sequence if the washer is to be moved again. These bolts lock the drum in place and prevent any internal shifting during subsequent transportation or repositioning. In practice, this means loosening and removing your securing straps, carefully lowering the dolly, and reattaching the bolts per the manufacturer’s guidance before powering the unit back into service at the new location. While these steps may seem routine, they are essential to preserving the long-term integrity of the drum bearings, suspension, and cabinet hardware. Safety guidance from established authorities is clear: improper handling of large appliances can cause serious injuries. Always prioritize careful, deliberate actions over speed.
For readers seeking a practical, real-world perspective on how professionals manage these moves, a case study from industry peers provides helpful context. In particular, the account from the Derrick Wolfe trucking success story offers a grounded view of the workflow, from pre-muel preparation to final securing and verified transport readiness. The narrative reinforces that the best results come from combining methodical preparation with hands-on teamwork. Readers can explore the account here: Derrick Wolfe trucking success story.
As you finalize the plan and proceed with the lift, keep in mind the broader safety ecosystem that supports every move. Consult official guidance and manufacturer instructions for specifics on transport bolts, counterweights, and any model-specific precautions. The U.S. Consumer Product Safety Commission outlines essential practices for appliance transport, emphasizing proper lifting, securing, and avoiding improper positioning. Their guidelines align with industry best practices and reinforce the principle that safety is a process, not a single decision. You should review these guidelines to reinforce your own checklist and ensure every step of the operation aligns with current safety standards. External resources can provide updated details that reflect evolving equipment designs and regulatory expectations. For an authoritative external reference, see the CPSC guidelines on appliance transportation: https://www.cpsc.gov.
Final Checks and Safety Protocols: A Steady, Level Path to Lifting a Washer into a Truck
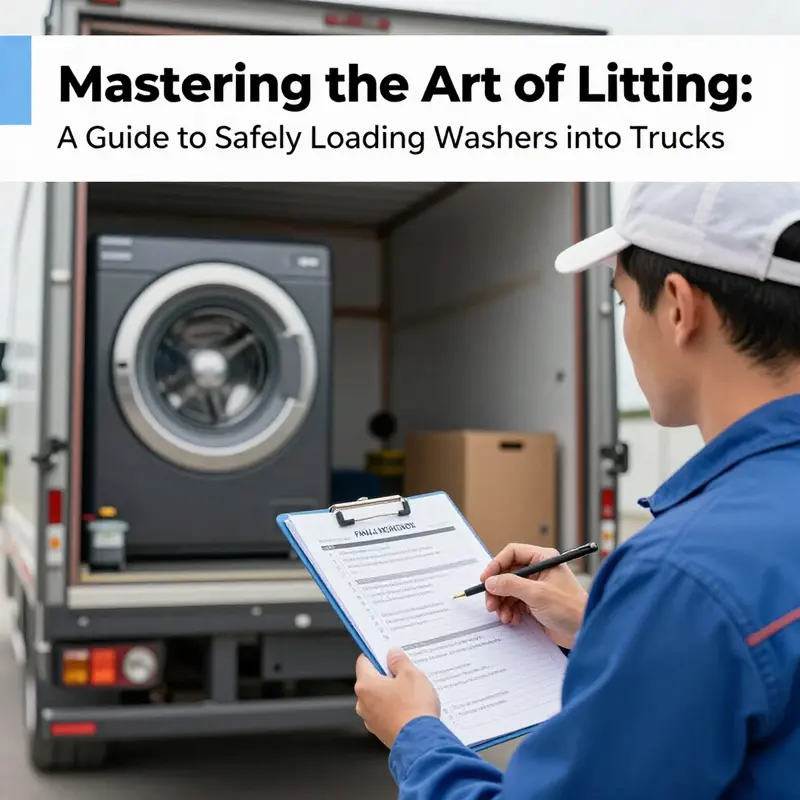
The final phase of loading a washer into a truck is where planning meets protection, and where a measured, deliberate approach keeps you and the appliance safe. By this point, you have already cleared the space, prepared the equipment, and rehearsed the movements. The last mile—the actual transfer—tests not only strength but situational awareness. It demands a quiet discipline: steady hands, clear communication, and a relentless focus on keeping the load close to your center of gravity. Before you proceed, take a breath and remind yourself that safety is a prerequisite, not an afterthought. A moment spent verifying conditions now can prevent a damaged washer, a strained back, or a fall that could derail the entire move. The road ahead is predictable only if you make it so with careful checks and well-timed coordination.
First, inspect the tools and the vehicle with the same care you would give to a safety inspection on a long-haul trip. Examine the dolly wheels for smooth rotation, the handles for secure grip, and the straps for frayed fibers or stretched knots. A wobbly wheel or a slick strap can betray even the strongest lifter when the washer begins to roll. The truck bed should be clean, free of grit or protruding hardware, and the floor should sit level. A level surface matters more than most people realize because an uneven base can cause the appliance to shift as soon as momentum carries it a few inches. A level bed makes the difference between a smooth slide and a noisy, jolting ride that unsettles the drum bearings well before the first mile is logged. For extra peace of mind, reference the broader principle behind regular trailer upkeep, which emphasizes consistent checks and a stable platform—something you can relate to through Importance of Regular Trailer Maintenance.
Second, recheck the packaging and padding. You may have wrapped the washer earlier, but a final wrap around corners, the glass door, and other vulnerable points can be worth the extra shield. If you still have stretch film or bubble wrap, give the unit a light, even cover that protects against surface dings without trapping heat or moisture. If you kept the original box, confirm that it is still intact enough to cushion the shock of a rough road, though most moving scenarios benefit from padding beyond the box itself. The goal is to preserve the finish and keep interior components free from jostling. A well-wrapped appliance presents fewer hazards to your hands and the truck bed alike, and it also reduces the chance of snagging on a protruding edge while sliding onto the dolly.
Third, maintain a strict emphasis on keeping the washer level and upright. The drum’s balance is delicate, and even brief tilting during loading can set up a cascade of issues once the unit is in motion. A tilted washer can strain bearings, misalign the belt (where applicable), and generate unusual racket that becomes a telltale sign of trouble after installation. The simplest rule is: no tilts. If the path to the truck bed requires a small incline, proceed slowly, stay centered, and use the dolly to ride the washer up with controlled momentum. A ramp can be a significant aid, but only if you can keep the load square and stable along the ascent. Remember, the objective is a straight, controlled ascent into the bed, not a dramatic lift that snaps the spine and jerks the appliance. Keeping the center of gravity in the middle of the bed not only minimizes shifting during transport but also makes later alignment much more predictable when you unload and reinstall.
Next comes teamwork, which is not an optional luxury but a requirement for most washers that exceed a certain weight or size. Even with a capable dolly, two sets of hands—one guiding, one supporting—make a world of difference. The guide communicates the route, signals when to move, and helps maintain balance as weight distribution changes. The spotter behind the unit provides a safety margin, ready to catch any sudden drift and to prevent the load from creeping toward the edge of the bed. Smooth, coordinated action avoids abrupt jerks or sudden halts that would throw the washer off balance. The moment is a test of trust as much as strength; clear communication turns two people into a synchronized system, keeping momentum steady and predictable.
After the washer is inside the truck, securing it becomes the next crucial step. Do not delay; secure it immediately with straps or ropes that are anchored to solid points in the bed. Tighten gradually and evenly, checking that the straps do not compress the outer casing to the point of damage while still preventing any movement. The aim is to immobilize the appliance without creating pressure points that could crack panels or warp the metal. Place blocks or padding at the base to prevent rolling or shifting, and ensure that nothing protrudes into the drum area that could damage vulnerable components during transit. It is equally important to avoid placing the washer on its side or upside down, a rule that echoes across many guidelines for transporting heavy appliances. The internal components—the drum bearings, the motor, and related seals—prefer the stability of an upright, level configuration for the duration of the journey.
With the securing complete, a broader check becomes necessary: confirm the center of gravity remains balanced within the truck bed. This is not an abstract concern; it translates into real-world safety on the road. A centered load reduces the chance of movement when the vehicle accelerates, brakes, or encounters a bump in the road. If your truck has a built-in level indicator or you carry a small level tool for this exact purpose, use it. A simple cross-check—one level across the width and another along the length—can save countless adjustments later. The idea is straightforward: a stable, level base allows you to unload in a controlled manner and makes reinstalling or placing the washer at the destination less strenuous and less risky.
Finally, the personal safety gear and the human factor deserve explicit attention. The hands and feet of the operation need appropriate protection. Slip-resistant gloves safeguard against sweaty palms and provide a firmer grip on the dolly and straps. Safety shoes with a rigid toe protect against dropped edges or accidental catches. A hard hat may be prudent if there is overhead risk from a doorway or ram but is not universally required; use your judgment based on the environment and your local safety practices. If fatigue or pain signals appear—back tightness, numbness in the arms, or a dull ache—stop and reassess. Pacing the move, taking a breath, and widening the crew are all prudent steps when the body asks for relief. The best moves in this context are the ones that preserve the long-term health of the people involved and the integrity of the appliance.
As the final checks wind down, keep in mind the broader safety framework that professionals rely on for any heavy-object transfer. The measures described here are not just about preventing damage to the washer; they are about preventing injuries and ensuring that the job can be completed with confidence and minimal disruption. If you are ever unsure about a step, err on the side of extra care: stop, reassess, and involve another person if needed. The process rewards patience and deliberate action over speed. When you arrive at the destination, you can apply the same attention to unloading, re-securing, and reinstalling transport bolts, knowing you have left nothing to chance.
For those seeking a more granular blueprint, the Appliance Moving Guide and related safety primers can offer further context on handling large appliances. And as you reflect on the sequence you followed, remember that the success of a move hinges less on brute force and more on the disciplined application of the fundamentals: clean tools, a clean bed, level handling, coordinated teamwork, secure restraint, and a final, calm confirmation that nothing shifts during transport. This approach translates to fewer surprises, fewer repairs, and a smoother transition from curb to curb. External readers may appreciate a deeper dive into the practical, field-tested practices that underlie these guidelines, such as the detailed steps in comprehensive external resources like the Appliance Moving Guide.
External reference for further guidance: Appliance moving guide.
Final thoughts
Successfully lifting a washing machine into a truck is contingent upon meticulous preparation, utilizing proper equipment, adopting safe lifting techniques, and ensuring secure transport. By following the structured strategies outlined in this guide, logistics and fleet management professionals can minimize risks and enhance operational efficiency. Prioritizing safety not only protects personnel but also safeguards valuable equipment. Implement these practices to strengthen your team’s capabilities and maintain the integrity of your transported appliances.